Overview
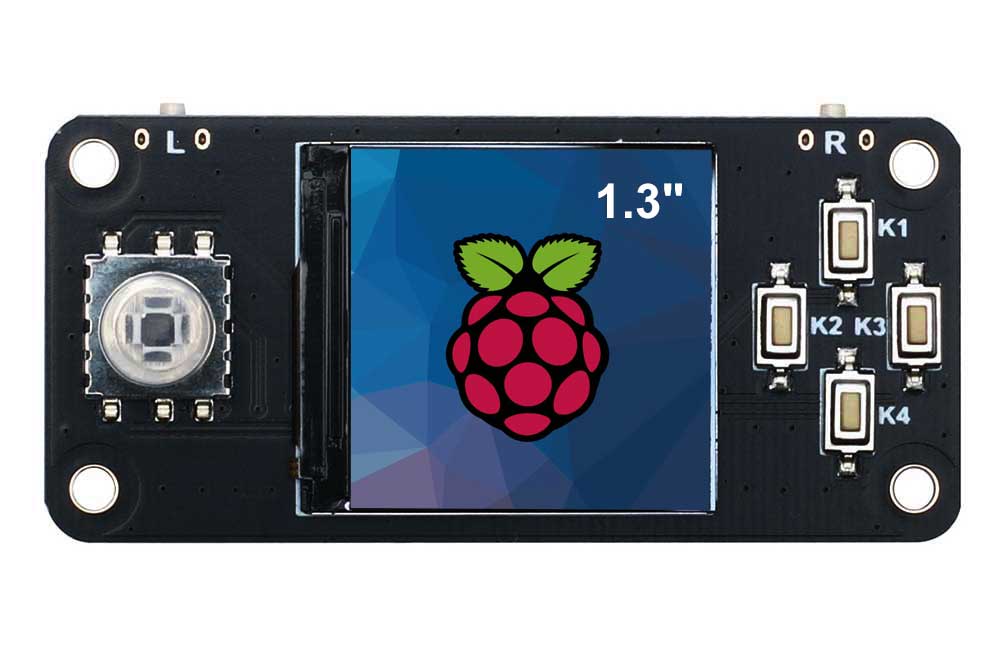
This TFT LCD display is equipped with an onboard joystick, six buttons, with a resolution of 240x240, an internal ST7789 controller, designed based on the Raspberry Pi 40-pin GPIO header, compatible with Raspberry Pi Zero/Zero W/Zero WH/2B/3B/3B+/4B. It utilizes SPI interface communication and provides demo codes in C and Python for Raspberry Pi, capable of drawing points, lines, rectangles, circles, as well as displaying English characters and images.
Parameters
| Resolution | 240 x 240 |
| Display Colors | RGB,65K colors |
| Control chip | ST7789 |
| Screen type | TFT |
| Backlight | LED |
| Communication Interfaces | 4 Line SPI |
| Supply Voltage | 3.3V |
| Operating Temp | -20℃~+70℃ |
| Storage Temp | -30℃~+80℃ |
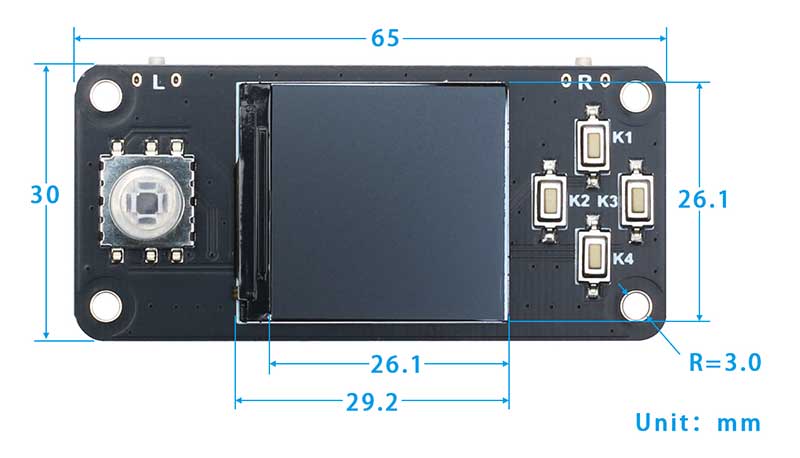
| LCD display area | 23.4mm (W) x 23.4mm (H) |
| Dimensions | 65mm(L) x 30mm(W) |
| Weight | 13g |
Usages
Since the bookworm system no longer supports the wiringpi library, the example program for this system uses the lgpio library, and for the bullseye system, the wiringpi library version of the example program can be used.
Hardware interface configuration description
Wiring Instructions for Raspberry Pi
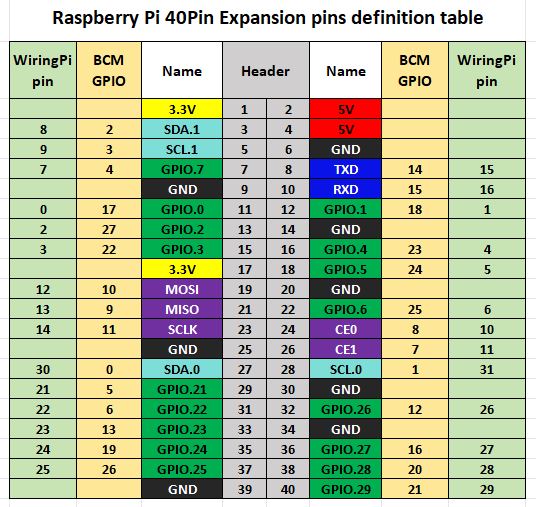
The demo codes in the Raspberry Pi motherboard uses the wiringPi number pin definitions, and the bookworm system uses the pin definition of the BCM number. The definition of the connection with the Raspberry Pi motherboard is shown in the following table:
| LCD interface | Pin function | BCM number | wiringPi number |
|---|---|---|---|
| VCC | 3.3V | 3.3V | 3.3V |
| GND | GND | GND | GND |
| SDA | MOSI | 10 | 12 |
| SCK | SCK | 11 | 14 |
| CS | CE0 | 8 | 10 |
| D/C | P6 | 25 | 6 |
| RESET | P2 | 27 | 2 |
| BL | P5 | 24 | 5 |
| K1 | P0 | 17 | 0 |
| K2 | P1 | 18 | 1 |
| K3 | P3 | 22 | 3 |
| K4 | P4 | 23 | 4 |
| R | P28 | 20 | 28 |
| L | P29 | 21 | 29 |
| LEFT | P21 | 5 | 21 |
| DOWN | P25 | 26 | 25 |
| RIGHT | P24 | 19 | 24 |
| CENT | P22 | 6 | 22 |
| UP | P23 | 13 | 23 |
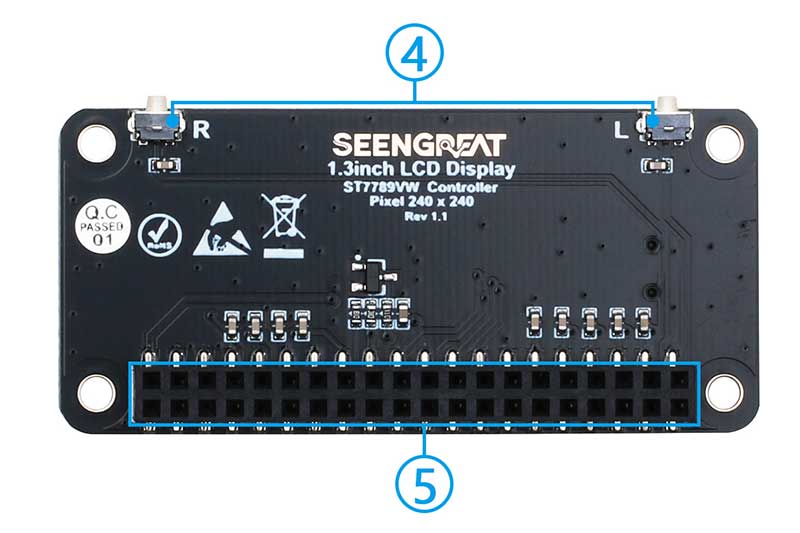
Top view / bottom view
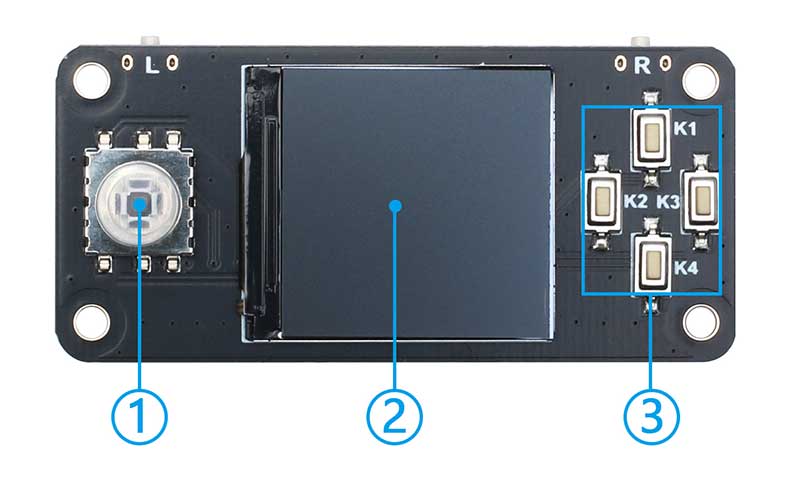
① User joystick(Five direction)
② 1.3 inch LCD display
③ User button K1~K4
④ User button L and R
⑤ Raspberry Pi 40pin GPIO Female Header
Demo Codes Usage
Wiringpi Library Installation
First, use the "gpio -v" command on the terminal to check whether the wiringpi library has been installed. If the information of 2.52 appears, it means that the installation has been successful. You can skip this part of the content, otherwise you need to install it as follows:
sudo apt-get install wiringpi#For Raspberry Pi systems after May 2019 (earlier ones do not need to be executed), an upgrade may be required:
wget https://project-downloads.drogon.net/wiringpi-latest.deb#Version 4B upgrade of Raspberry Pi,If your download fails or the #speed is very slow, you can download it at the following linkand then #and copy it to the Raspberry Pi mainboard:
#https://github.com/seengreat/wiringpi-library
sudo dpkg -i wiringpi-latest.deb
gpio -v
If version 2.52 appears, the installation is successful
#For the Bullseye branch system, use the following command:
git clone https://github.com/WiringPi/WiringPi
cd WiringPi
./build
gpio -v
# Running gpio - v will result in version 2.70. If it does not appear, it indicates an installation error
If the error prompt "ImportError: No module named 'wiring pi'" appears when running the python version of the example program, run the following command:
# For Python 2. x version
pip install wiringpi# For Python 3.x version
pip3 install wiringpiNote: If the installation fails, you can try the following compilation and installation:
git clone --recursive https://github.com/WiringPi/WiringPi-Python.gitNote: --recursive option can automatically pull submodules, otherwise you need to download them manually.
Go to the WiringPi-Python folder you just downloaded and enter the following command to compile and install:
#For Python 2.x version
sudo python setup.py install# For Python 3.x version
sudo python3 setup.py installIf the following error occurs:

At this point, enter the command sudo apt install swig to install swig, and then perform sudo python3 setup.py install to compile and install it. If a message similar to the following appears, the installation is successful.

lgpio library installation
For the bookworm system, the sample program uses the lgpio library. The following is the installation command for the library:
wget https://github.com/joan2937/lg/archive/master.zip
unzip master.zip
cd lg-master
make
sudo make install
Turn on the SPI interface
sudo raspi-configEnable the SPI interface:
Interfacing Options -> SPI -> YesTo view the enabled SPI devices:
ls /dev/spi* #prints: "/dev/spidev0.0" and "/dev/spidev0.1"
Installation of Python libraries
The demo codes are working under the python3 environment, and running the demo codes of python requires the installation of the pil, numpy, and spidev libraries. Please run the following commands to install:
sudo apt-get install python3-pil
sudo apt-get install python3-numpy
sudo apt-get install python3-pip
sudo pip3 install spidev
C Version Demo Codes
Note: For Raspberry Pi 4B and versions after raspbian_lite-2019-06-20, the following settings are required, otherwise the keys cannot be entered normally.
sudo nano /boot/config.txtAdd the following:
gpio=17,22,18,13,26,5,19,6,20,21,23=pu
Then save to exit.
Go to the demo codes/c directory
sudo make clean
sudo make
sudo ./main
Python Version Demo Codes
Go to the demo codes/python directory
python3 gui_demo.py
python3 key_demo.py
Demo Codes Description
C language version
The Demo Codes structure is divided into the bottom layer and the application layer, the underlying file is lcd_1inch3.c and lcd_1inch3.h, the underlying code implements the initialization of the Raspberry Pi motherboard control pin and LCD screen, and the application layer file lcd_gui.c and lcd_gui.h, mainly realizing the drawing of points, lines, rectangles, circles and the display function of English characters and pictures.
The files whose file names begin with "font" are related to the font. The ". c" suffix corresponds to the data source files of the font. The data structures of multiple font data source files are defined in the "fonts. h" file. The file with the suffix ". bmp" in the Raspberry Pi motherboard example program is the picture source file used for display. The number in the file name represents the pixel number of color (bpp, bit per pixel), for example, 1.3inch_demo1.bmp represents the picture file in 24bpp true color format.
Python language version
The python language version of the example program is only provided for the Raspberry Pi platform. At the same time, because the python platform can reference the PIL image processing library, many application layer API functions can be directly provided by the library, which greatly reduces the amount of code in the example program. The python version of the demo code file has a gui_demo.py、key_demo.py、lcd_ inch3.py three files, gui_demo.py is mainly used to draw lines, rectangles and circles, and display English characters and key_demo.py is the function demonstration of on-board buttons, lcd_1inch3.py is the driver to realize the bottom layer of LCD, including SPI initialization, LCD screen reset, initialization, etc.
Resources
Data Sheet