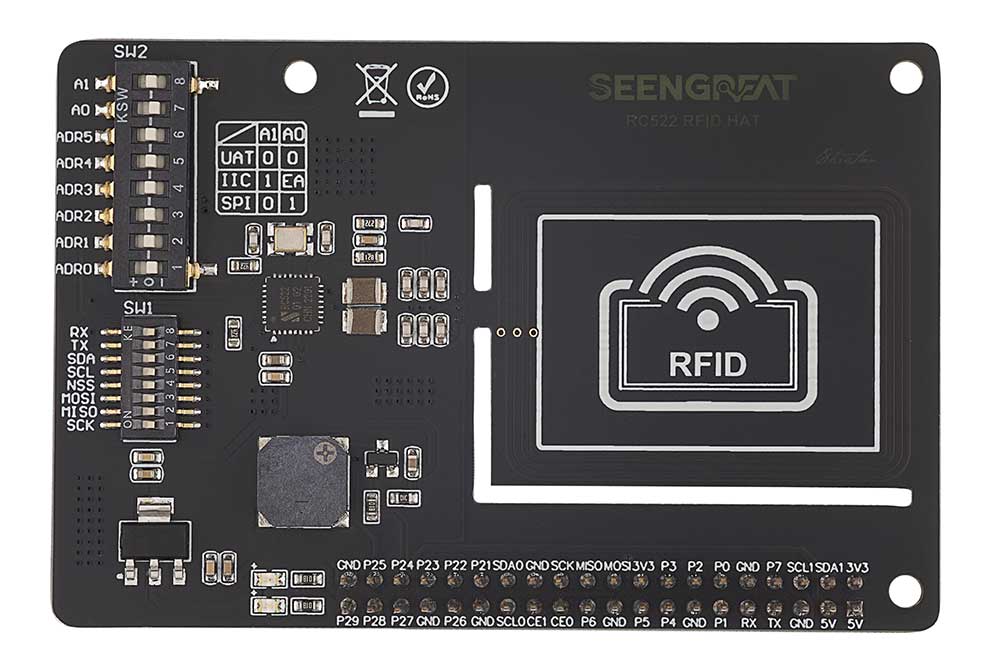
Overview
The RC522 RFID HAT is a module designed for Raspberry Pi application in RFID scenarios, which is used for contact-less communication at 13.56MHz. It also supports I2C, SPI and UART serial port communication, and the communication interface can be set by the on-board DIP switch.
Specifications
- Power Supply 3.3V / 5V
- Supports ISO/IEC14443A/MIFARE
- Supports MIFARE Classic encryption in reader/writer model
- Supports interfaces of SPI/I2C/UART
- Running at 13.56MHz
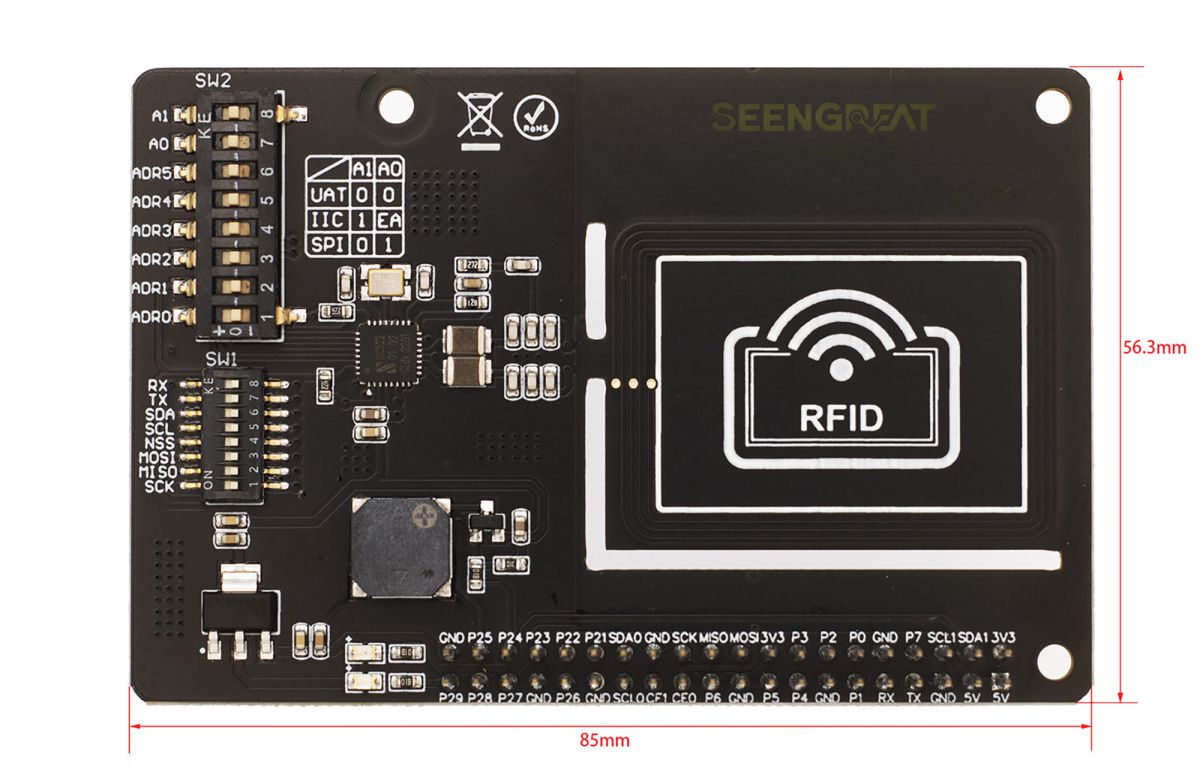
- Dimensions: 85mm(Length) x 56.3mm(Width)
Usage
Since the bookworm system no longer supports the wiringpi library, the example program for this system uses the lgpio library, and for the bullseye system, the wiringpi library version of the example program can be used.
Instructions of Hard Interface Configuration( For Three Types of Interface Conguration)
RC522 RFID HAT supports three communication modes of I2C, SPI and UART at the same time. The communication interface can be switched through the two DIP switches, SW1 and SW2. The specific methods of configuration will be mentioned in the following diagrams 2.2.1, 2.2.2, 2.2.3.
Demo Codes
Install the Wiringpi library.
First, install the WiringPI library.
sudo apt-get install wiringpi
wget https://project-downloads.drogon.net/wiringpi-latest.deb # Raspberry Pi 4B version upgrade
sudo dpkg -i wiringpi-latest.deb
gpio -v # If version 2.52 appears, it means that the installation has been successful
Install the lgpio library
For the bookworm system, the sample program uses the lgpio library. The following is the installation command for the library:
wget https://github.com/joan2937/lg/archive/master.zip
unzip master.zip
cd lg-master
make
sudo make install
Uart Serial Port
Configure the module hardware DIP switch as the UART interface according to the requirements of the module UART interface configuration. This is shown below:
SW1 | SW2 |
RX -> ON | A1 -> - |
TX -> ON | A0 -> - |
SDA -> OFF | ADR5 -> 0 |
SCL -> OFF | ADR4 -> 0 |
NSS -> OFF | ADR3 -> 0 |
MOSI -> OFF | ADR2 -> 0 |
MISO -> OFF | ADR1 -> 0 |
SCK -> OFF | ADR0 -> 0 |
Serial port configuration of Raspberry Pi
Because the serial port of "ttyS0" is used in the demo codes, it is necessary to confirm whether the "ttyS0" serial port has been configured before running the demo codes, and the confirmation process is as follows:
The Raspberry Pi 3/4B has two serial ports, namely "hardware serial port" "/dev/ttyAMA0" and "mini serial port" "/dev/ttyS0". Due to the on-board Bluetooth module, this "hardware serial port" is assigned to connect with the Bluetooth module by default, and the "mini serial port" is assigned to the GPIO Tx Rx led by the pin by default. First, check the serial port mapping through the terminal command ls -l /dev, such as only "serial1 -> ttyAMA0", no "ttyS0" related mapping.
Access the terminal of Raspberry Pi:
sudo raspi-configInterface Options->Serial Port->No->Yes->OK
Then reboot
At this time, you can see the mapping relationship between serial0 -> ttyS0 and serial1 ->ttyAMA0, and "ttyS0" can be used normally.
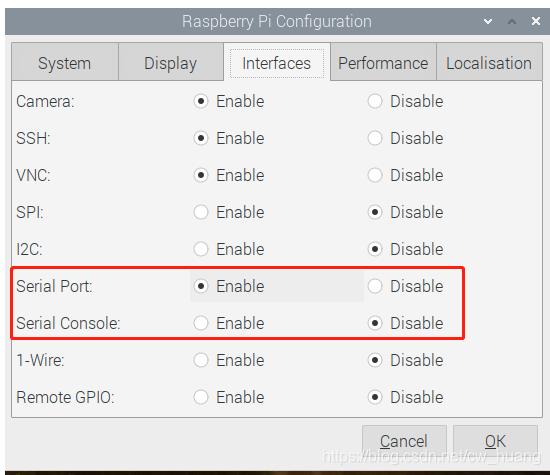
In addition, we also need to disable the serial console, access the Raspberry Pi Configuration in the main menu, and select the Serial Console as Disable in the Interfaces options.
Install python serial library:
sudo apt-get install python3-serialExecute the demo codes of serial port
Access the terminal of Raspberry Pi and get the program directory:
cd /home/pi/RC522_RFID_HAT/Python:
Access python directory: cd Python
Then execute:
sudo python3 rc522-python-uart.pyC:
Access c directory: cd C/UART
Execute:
sudo make
sudo ./main
SPI Interface
Configure the module hardware DIP switch as the SPI interface according to the requirements of the module SPI interface configuration. This is shown below:
SW1 | SW2 |
RX -> OFF | A1 -> - |
TX -> OFF | A0 -> + |
SDA -> OFF | ADR5 -> 0 |
SCL -> OFF | ADR4 -> 0 |
NSS -> ON | ADR3 -> 0 |
MOSI -> ON | ADR2 -> 0 |
MISO -> ON | ADR1 -> 0 |
SCK -> ON | ADR0 -> 0 |
SPI Configuration of Raspberry Pi
Start the system configuration of Raspberry Pi:
sudo raspi-configEnable the SPI interface:
Interfacing Options -> SPI -> YesCheck the enabled SPI devices:
ls /dev/spi* # will print out:"/dev/spidev0.0"and"/dev/spidev0.1"Install the spidev library for Python3:
sudo pip3 install spidevExecute the demo codes of SPI interface
Access the terminal of Raspberry Pi and get the program directory:
cd /home/pi/RC522_RFID_HAT/Python:
Access python directory: cd Python
Then execute:
sudo python3 rc522-python-spi.pyC:
Access c directory: cd C/SPI
Execute:
sudo make
sudo ./main
I2C Interface
RC522 RFID HAT has been led the I2C address lines out. It can be freely selected by the users. The way to configure can be queried in RC522 official manual. Here we will also offer the screenshot of the mentioned configuration methods in the manual.
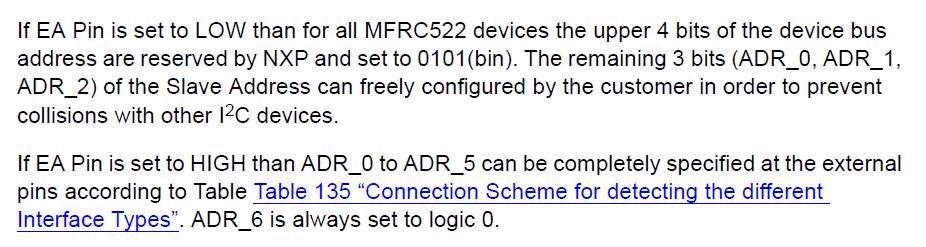
The demo codes we provide is to set the EA to 1 via the DIP switch SW2, ADR_0-ADR_5 also all set to 1, and ADR6 is always 0, so the address is 0X3F (00111111).
Configure the module hardware DIP switch as the I2C interface according to the requirements of the module I2C interface configuration. This is shown below:
SW1 | SW2 |
RX -> OFF | A1 -> + |
TX -> OFF | A0 -> + |
SDA -> ON | ADR5 -> + |
SCL -> ON | ADR4 -> + |
NSS -> OFF | ADR3 -> + |
MOSI -> OFF | ADR2 -> + |
MISO -> OFF | ADR1 -> + |
SCK -> OFF | ADR0 -> + |
I2C Configuration of Raspberry Pi
Start the system configuration of Raspberry Pi:
sudo raspi-configEnable the I2C interface:
Interfacing Options -> I2C -> Yes
sudo rebootCheck the enabled I2C devices:
ls /dev/i2c* # will print out:"/dev/i2c-1"Install I2C library:
sudo apt install i2c-toolsInstall smbus of python:
sudo apt install python-smbusTest the address of the device mounted on the I2C bus:
sudo i2cdetect -y -a 1Execute the demo codes of the I2C interface:
cd /home/pi/RC522_RFID_HAT/Python:
Access python directory: cd Python
Then execute: sudo python3 rc522-python-i2c.py
C:
Access c directory; cd C/IIC
Execute:
sudo make
sudo ./main
Resources
Demo codes for bullseye system
Demo codes for bookworm system
Data Sheet