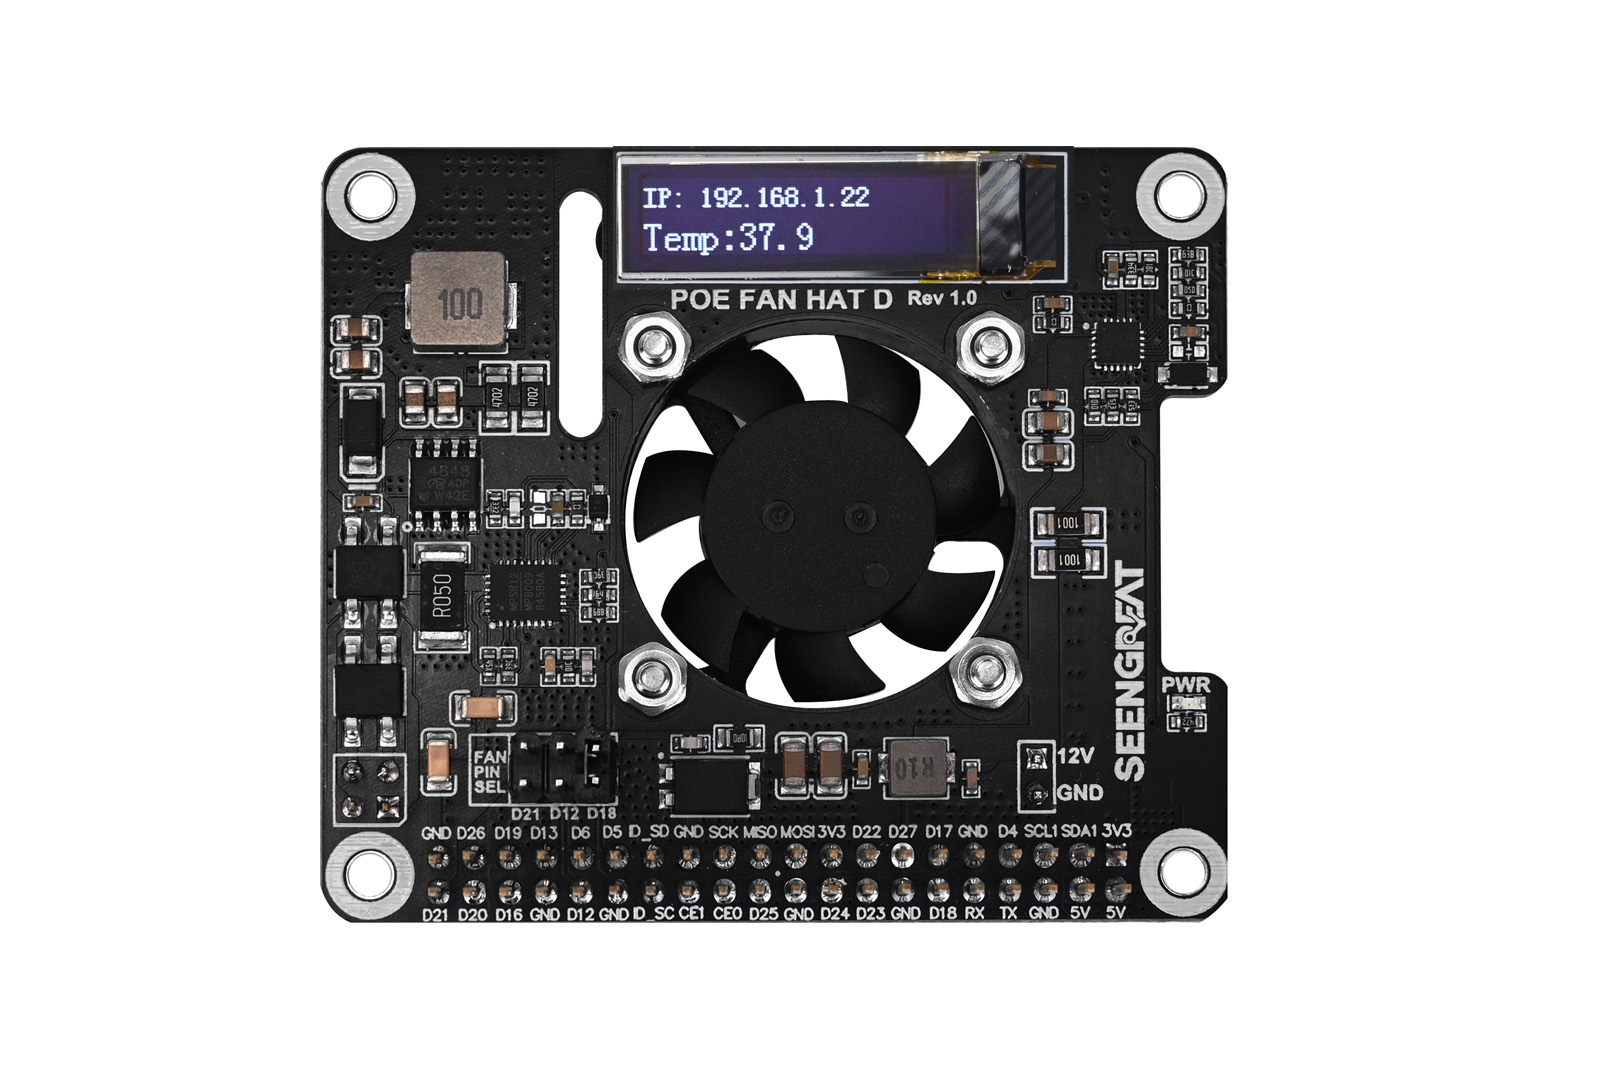
Product Overview
The POE FAN HAT D is a PoE power supply and cooling solution designed for the Raspberry Pi 3B+/4B. This board supports the IEEE 802.3af/at network standard. It can be used with PoE routers or switches that support the IEEE 802.3af/at network standard, allowing the Raspberry Pi to connect to the network and receive power through a single Ethernet cable. The product also features a 0.87inch OLED display, which can show useful information for users. Additionally, the board is equipped with a high-speed adjustable active cooling fan, providing better heat dissipation. The board is designed based on the Raspberry Pi 40P expansion interface, making it simple and easy to use by plugging directly into the Raspberry Pi's 40PIN expansion interface.
Product Parameters
| Input Voltage | PoE power input (37V ~ 57V) |
| Output Voltage | 5V、12V |
| Maximum Output Power | 22.5W (5V/4.5A), up to 5V/4.85A in extreme conditions |
| 24W(12V/2A) | |
| Network Standard | IEEE 802.3af/at PoE |
| Fan Speed (Max) | 9000 RPM |
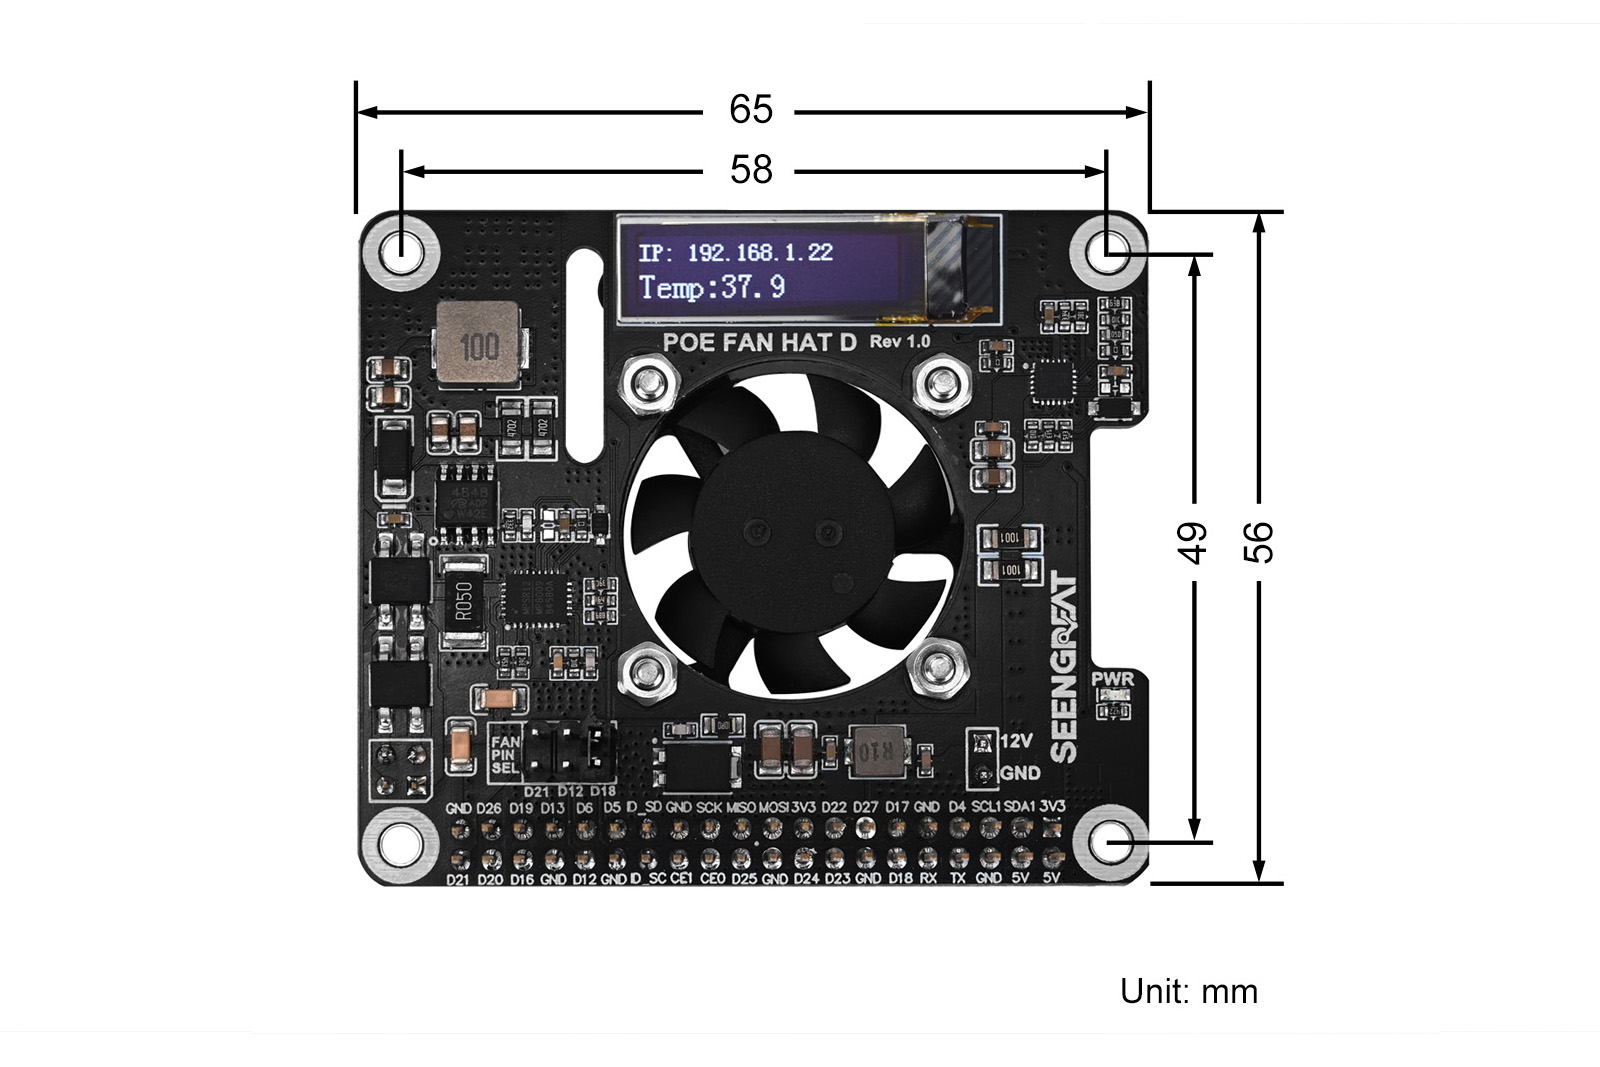
Product Dimensions
| Dimensions | 65mm (Length) * 56mm (Width) |
| Weight | 40g (excluding accessories) |
Raspberry Pi Usage
The example code is divided into two versions: one using the WiringPi library and the other using the LGPIO library. The Bullseye system uses the WiringPi library, while the Bookworm system uses the LGPIO library.
Resource Overview Diagram
The resource overview is shown in the figure below:
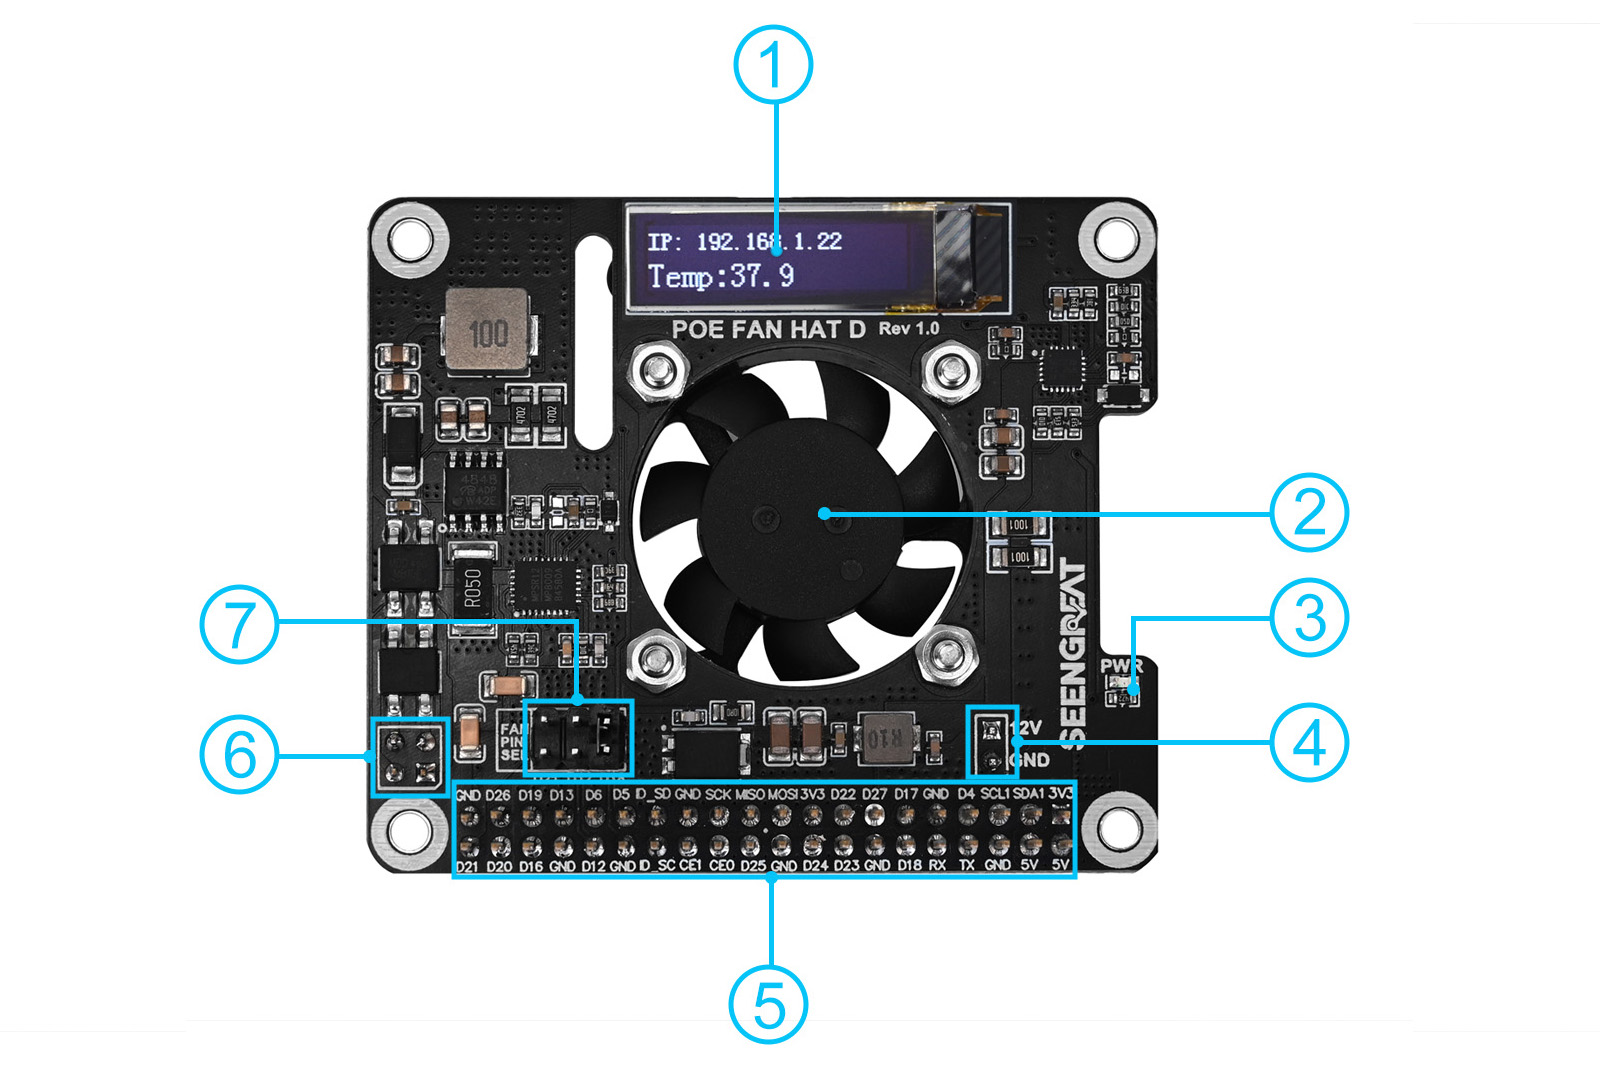
① 0.87inch OLED display
② 3007 active cooling fan
③ 5V power indicator LED
④ 12V output pin header
⑤ Raspberry Pi 40-Pin expansion pin header
⑥ Raspberry Pi 4B/3B+ PoE power input header
⑦ Speed-adjustable fan driver pin selection header
Instructions
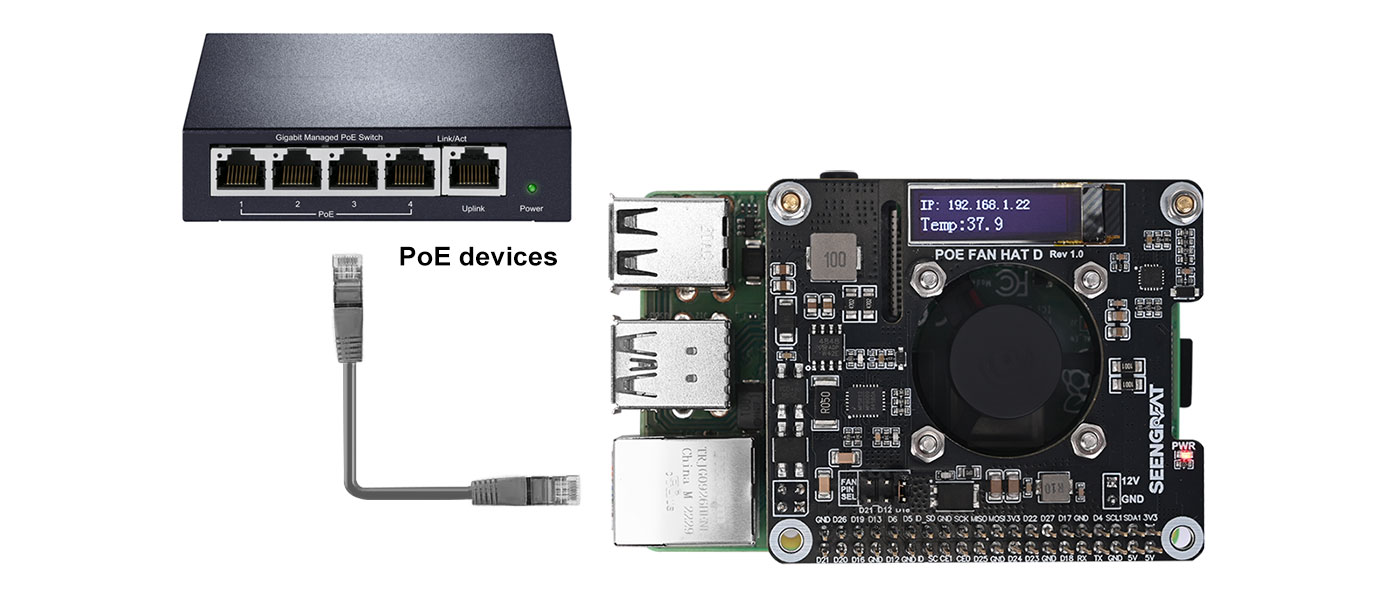
The product installation wiring diagram is shown in Figure 2-2. The PoE switch/router needs to support the IEEE 802.3af/at network standard. Then, correctly insert the product into the Raspberry Pi 3B+/4B and connect it with an 8-pin Ethernet cable.
Python Libraries Installation
The example program uses the Python 3 environment. To run the Python example program, you need to install smbus:
sudo apt-get install -y python-smbusWiringPi Library Installation
sudo apt-get install wiringpi
wget https://project-downloads.drogon.net/wiringpi-latest.deb #
Download the WiringPi package:
sudo dpkg -i wiringpi-latest.deb
gpio -v #
If version 2.52 appears, it indicates that the installation was successful.
#For the Bullseye branch system, use the following commands:
git clone https://github.com/WiringPi/WiringPi
cd WiringPi
. /build
gpio -v #
# Running gpio -v will display version 2.70. If not, it means the installation failed.
If the error "ImportError: No module named 'wiringpi'" appears when running the Python version of the sample program, execute the following command:
# For Python2.x
pip install wiringpi# For Python3.x
pip3 install wiringpiNote: If the installation fails, you can try the following compilation installation:
git clone --recursive https://github.com/WiringPi/WiringPi-Python.gitNote: The `--recursive` option can automatically fetch submodules; otherwise, you will need to download them manually.
Enter the newly downloaded WiringPi-Python folder and input the following commands to compile and install:
# For Python2.x
sudo python setup.py install# For Python3.x
sudo python3 setup.py installIf the following error occurs:

At this point, enter the command `sudo apt install swig` to install SWIG. After completion, then execute `sudo python3 setup.py install` to compile and install. If similar information appears as shown below, it indicates a successful installation.

lgpio library installation
The C language version of the example program uses the lgpio library.
Raspberry Pi lgpio library installation:
wget https://github.com/joan2937/lg/archive/master.zip
unzip master.zip
cd lg-master
make
sudo make install
Configure the I2C interface
sudo raspi-configEnable the I2C interface:
Interfacing Options -> I2C -> Yes
Install the i2c-tools to confirm.
sudo apt-get install i2c-toolsCheck the connected I2C devices:
i2cdetect -y 1If you see the address, it indicates that the board's OLED screen is successfully connected to the Raspberry Pi, with the default address being 0x3c.
Run the example
1)Properly install the POE FAN HAT D onto the Raspberry Pi 3B+/4B and power on the Raspberry Pi.
2)Download the example program from the Resources section at the bottom of the product's WIKI page to the Raspberry Pi.
3)Run the Python program:
Navigate to the poe-fan-hat-d/wiringpi/python/ or poe-fan-hat-d/lgpio/python/ folder and run the program:
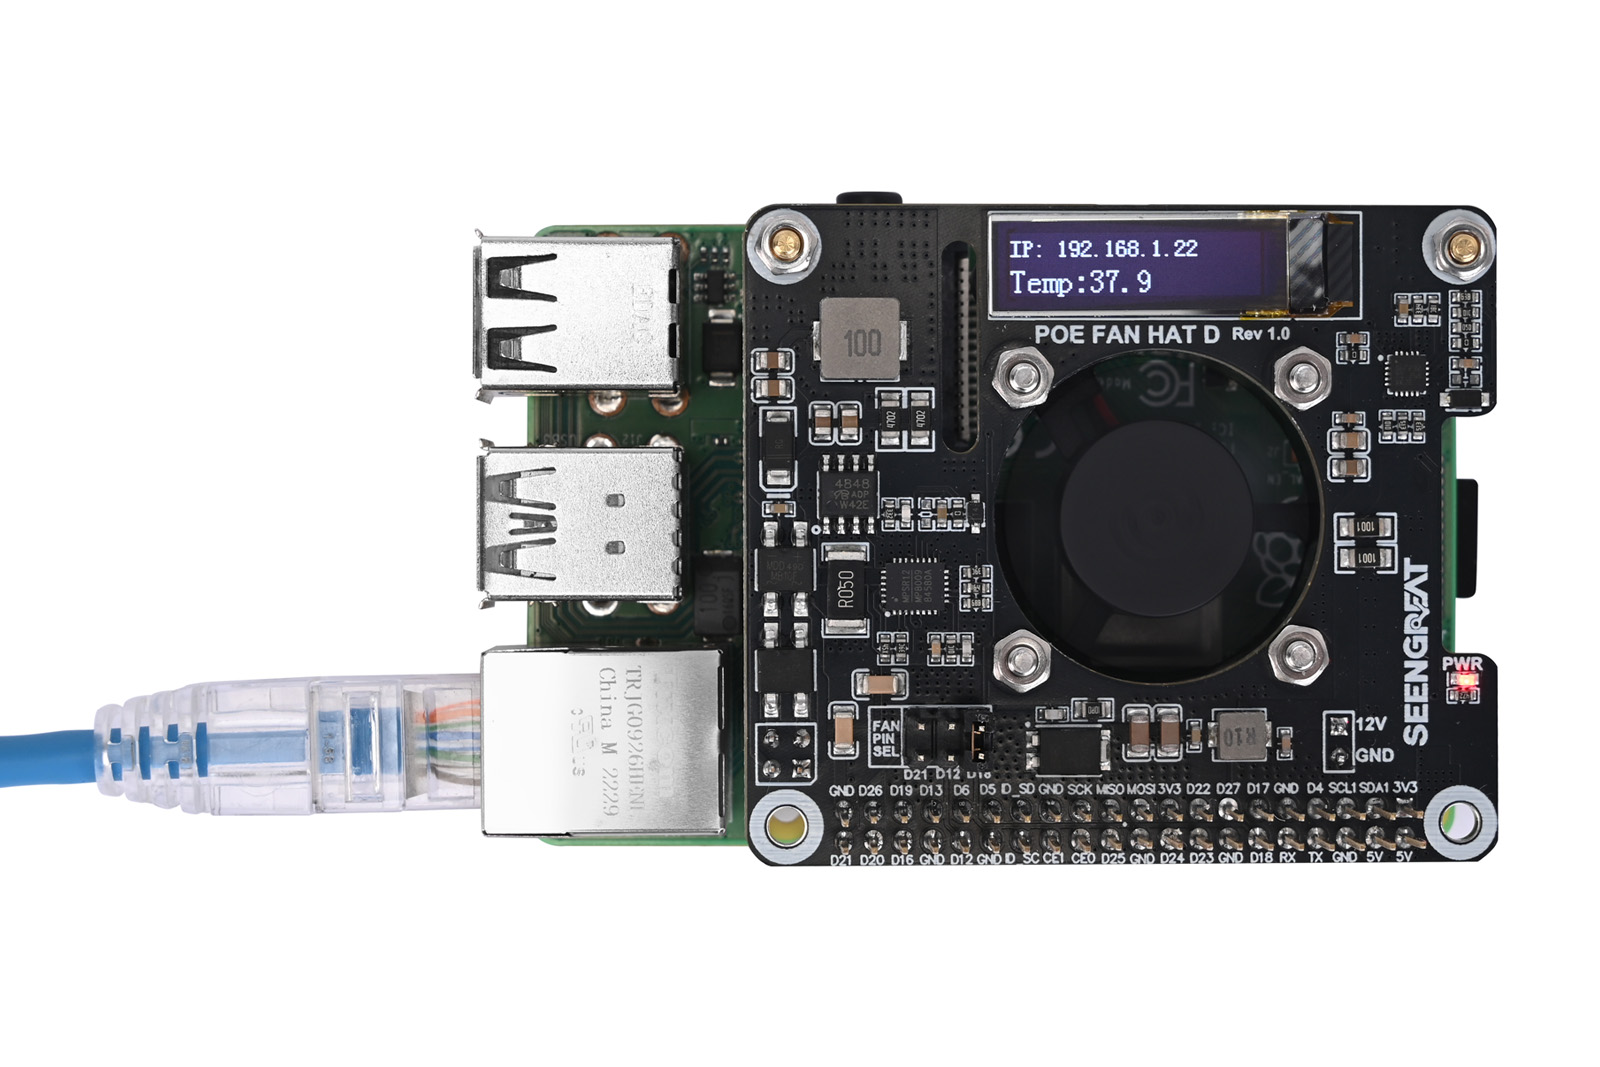
sudo python3 main.pyAfter running the program, the OLED screen on the board will display the Raspberry Pi's IP address (for example, 192.168.1.22 as shown in the image) and the real-time CPU temperature (for example, 37.9℃ as shown in the image), as shown in Figure 2-3:
Navigate to the poe-fan-hat-d/wiringpi/c/ or poe-fan-hat-d/lgpio/c/ folder and execute the following command:
sudo make clean
sudo make
sudo ./main
5)Temperature Control Test
Open a new terminal window and then install stress using the following command:
sudo apt install stressRun the test command:
stress -c 4At this point, the CPU temperature will gradually rise; the higher the CPU temperature, the faster the onboard fan will spin.
Auto-Startup Test
Using systemd (taking the lgpio library as an example):
Create a .service file on the Raspberry Pi, such as poe-fan-hat-d.service, with the following content (the path for the main.py file is /home/pi/poe-fan-hat-d):
[Unit]
Description=poe-fan-hat-d service
After=network.target
[Service]
Restart=always
RestartSec=5
Type=simple
ExecStart=/usr/bin/python3 -u /home/pi/poe-fan-hat-d/lgpio/python/main.py
User=pi
[Install]
WantedBy=multi-user.target
Save and exit, then copy the file to the /etc/systemd/system directory:
sudo cp poe-fan-hat-d.service /etc/systemd/system/Reload all services:
sudo systemctl daemon-reloadEnable the task to run automatically on startup:
sudo systemctl enable poe-fan-hat-d.serviceStart the task immediately:
sudo systemctl start poe-fan-hat-d.serviceCheck the task's running status; under normal circumstances, the OLED display will show the IP address and CPU temperature in real time.
Restart the Raspberry Pi and observe whether the OLED screen displays the IP address and CPU temperature correctly.
If you are using the C language example program, change the line:
"ExecStart=/usr/bin/python3 -u /home/pi/poe-fan-hat-d/lgpio/python/main.py"
to
"ExecStart=/home/pi/poe-fan-hat-d/lgpio/c/main"