
Overview
This 2 inch LCD display offers a SPI interface and resolution of 320 x 240, based on a built-in ST7789V controller, providing Raspberry Pi(C and Python),Arduino,Raspberry Pi Pico and ESP32 demo codes. It can draw points, lines, rectangles, circles and display pictures and characters in Chinese and English.
Specifications
| RESOLUTION | 320 x 240 RGB |
| DRIVING | ST7789V |
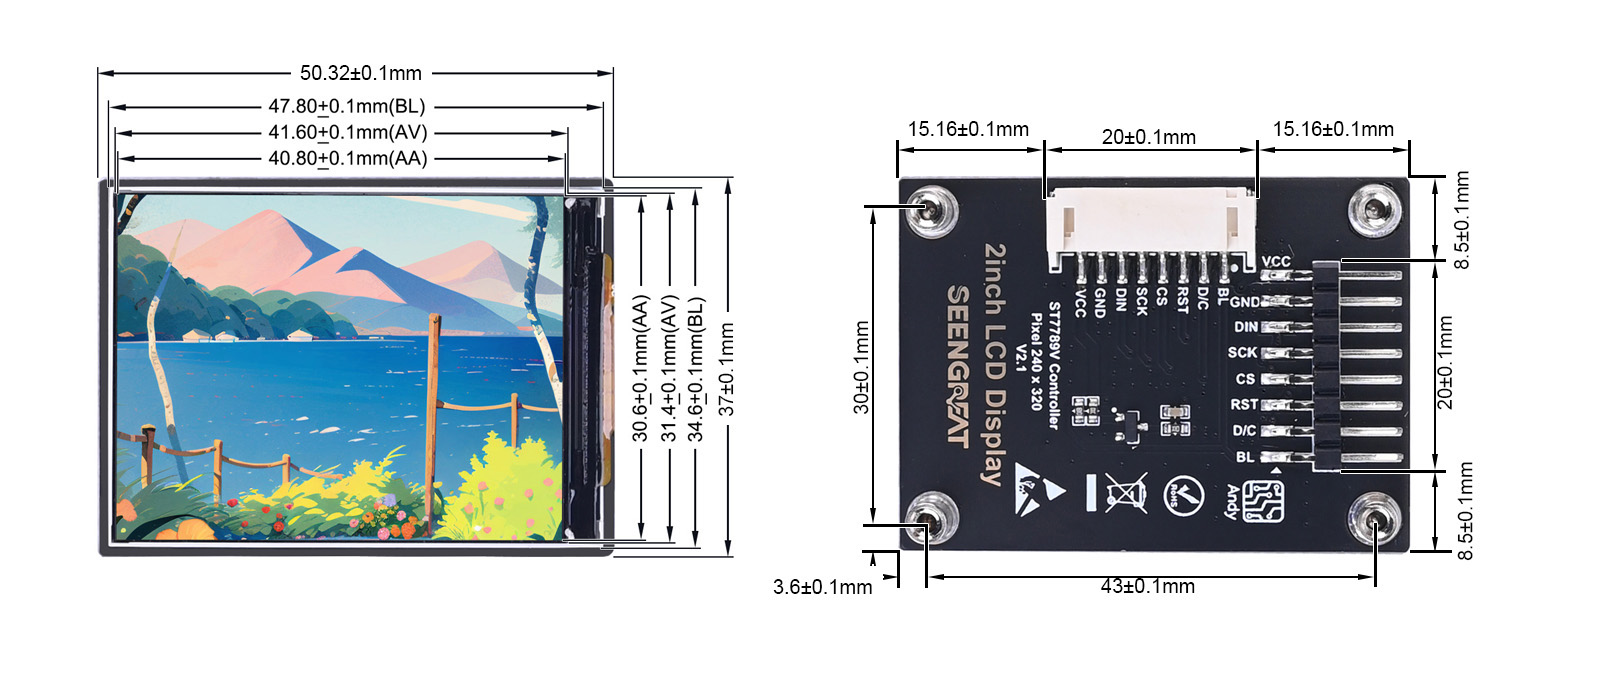
| DISPLAY SIZE | 43mm x 30mm |
| LCD TYPE | IPS |
| OPERATING TEMPERATURE | -20℃ - 70℃ |
| OPERATING VOLTAGE | 3.3V/5V |
| INTERFACE | 4-wire SPI |
| Dimensions | 50.32mm(Length) x 37mm(Width) |
Usage
Since the bookworm system no longer supports the wiringpi library, the example program for this system uses the lgpio library, and for the bullseye system, the wiringpi library version of the example program can be used.
Instructions of Hard Interface Configuration
Raspberry Pi Hardware Connection
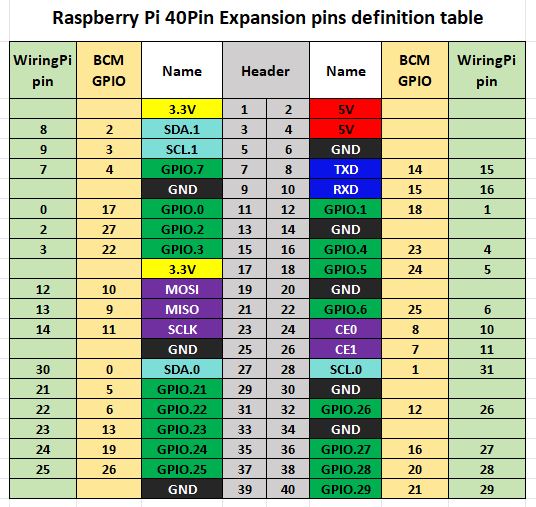
The demo codes of Raspberry Pi motherboard use the pin definition of wiringPi number, and the bookworm system uses the pin definition of the BCM number. The definition of connecting to the Raspberry Pi motherboard is according to the following table:
| LCD Interface | BCM | wiringPi | BOARD |
|---|---|---|---|
| VCC | 3.3V | 3.3V | 3.3V |
| GND | GND | GND | GND |
| DIN | MOSI | 12 | 19 |
| SCK | SCLK | 14 | 23 |
| CS | CE0 | 10 | 24 |
| RST | 22 | 3 | 15 |
| D/C | 25 | 6 | 22 |
| BL | 24 | 5 | 18 |
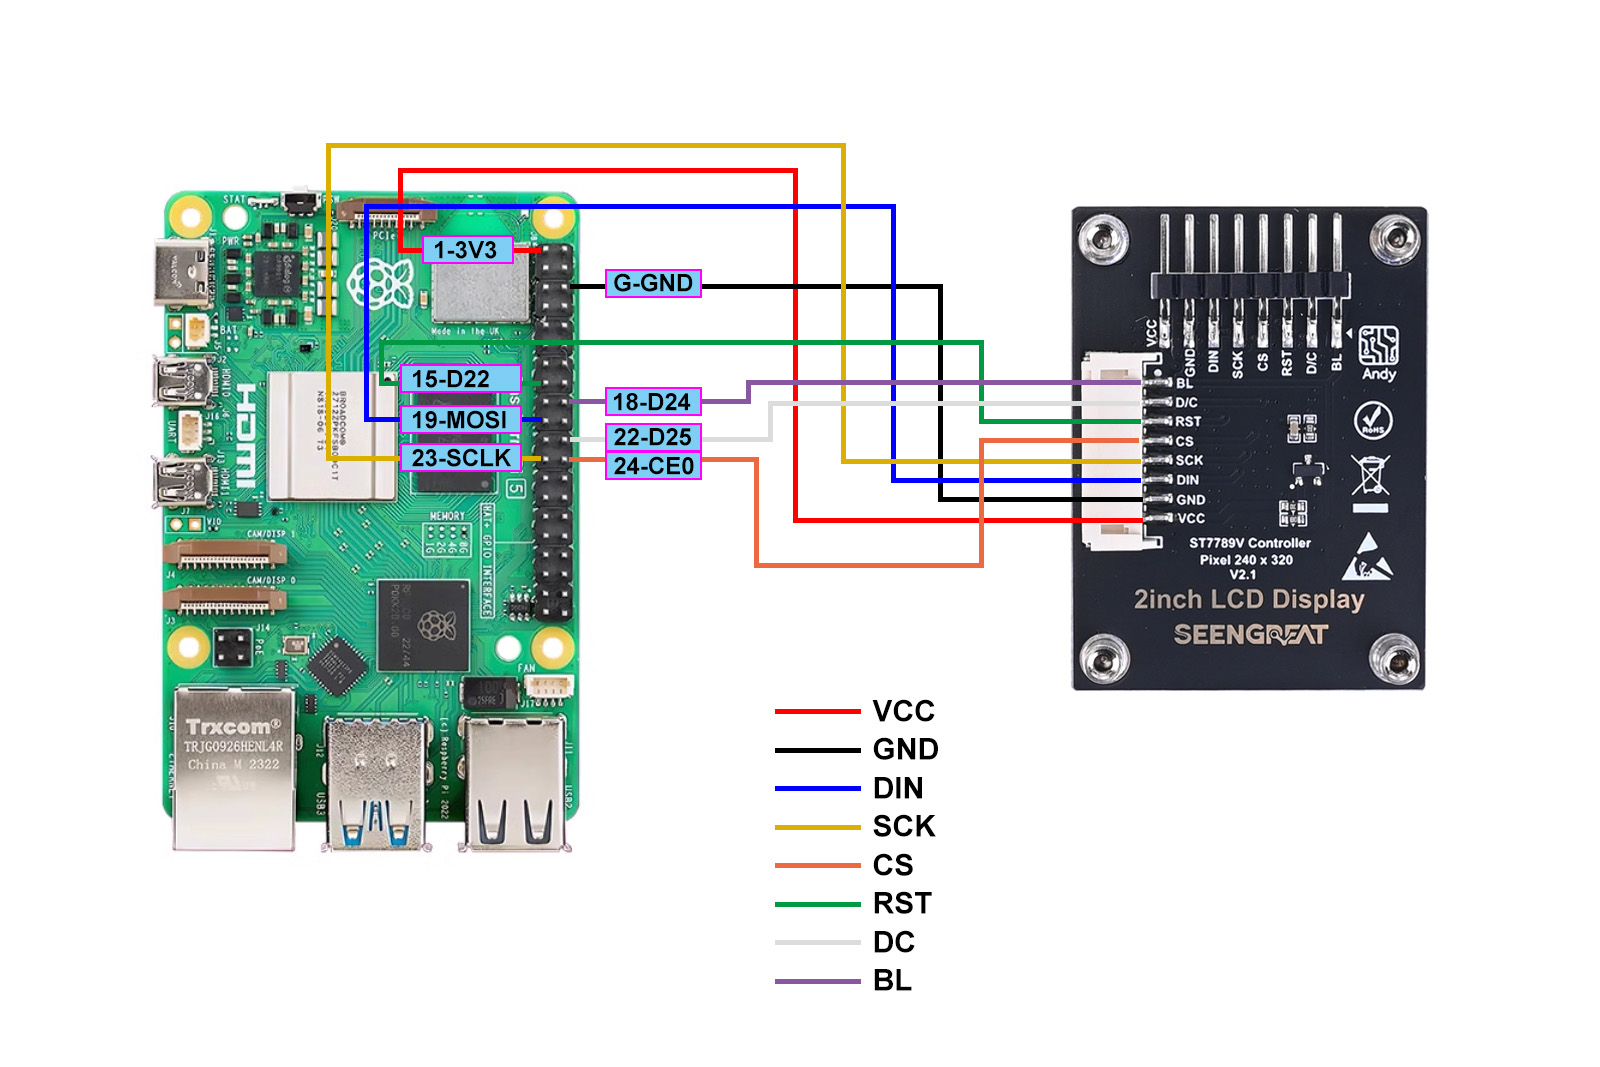
The wiring diagram of connections between the Raspberry Pi and LCD display is shown below.
Usage of Demo Codes
Wiring pi Libraries Installation
sudo apt-get install wiringpi
wget https://project-downloads.drogon.net/wiringpi-latest.deb # Version 4B upgrade of Raspberry Pi
sudo dpkg -i wiringpi-latest.deb
gpio -v # If version 2.52 appears, the installation is successful
#For the Bullseye branch system, use the following command:
git clone https://github.com/WiringPi/WiringPi
cd WiringPi
./build
gpio -v
#Running gpio - v will result in version 2.70. If it does not appear, it indicates an installation error
If the error prompt "ImportError: No module named 'wiringpi'" appears when running the python version of the sample program, run the following command
#For Python 2. x version
pip install wiringpi#For Python version 3. X
pip3 install wiringpiNote: If the installation fails, you can try the following compilation and installation:
git clone --recursive http://github.com/WitingPi/WiringPi-Python.gitNote: The -- recursive option can automatically pull the submodule, otherwise you need to download it manually.
Enter the WiringPi Python folder you just downloaded, enter the following command, compile and install:
#For Python 2. x version
sudo python setup.py install#For Python version 3. X
sudo python3 setup.py installIf the following error occurs:

At this time, enter the command "sudo apt install swig" to install swig. After that, compile and install sudo python3 setup.py install. If a message similar to the following appears, the installation is successful.

lgpio library installation
For the bookworm system, the sample program uses the lgpio library. The following is the installation command for the library:
wget https://github.com/joan2937/lg/archive/master.zip
unzip master.zip
cd lg-master
make
sudo make install
Enable SPI Interface
sudo raspi-configEnable the SPI Interface:
Interfacing Options -> SPI -> YesCheck the enabled SPI devices:
ls /dev/spi*# at this time it will print:"/dev/spidev0.0"and"/dev/spidev0.1"
Python Libraries Installation
The demo codes are working under the python3 environment, and running the demo codes of python requires the installation of the pil, numpy, and spidev libraries. Please run the following commands to install:
sudo apt-get install python3-pil
sudo apt-get install python3-numpy
sudo apt-get install python3-pip
sudo pip3 install spidev
C Demo Codes
Access 2inch_lcd/c directory
sudo make clean
sudo make
sudo ./main
Python Demo Codes
Access 2inch_lcd/python directory
python3 2inch_lcd.pyInstructions of Demo Codes
C
The structure of demo codes is divided into the underlying layer and the application layer. The underlying file is lcd_2inch.c and lcd_2inch.h, the underlying code implements the initialization of the Raspberry Pi motherboard control pin and the LCD screen. The application layer file is lcd_gui.c and lcd_gui.h, which mainly makes the painting of points, lines, rectangles, circles and the display functions of pictures and characters in Chinese and English come true.
Python
The Python demo codes are only provided for the Raspberry Pi platform. Because the Python platform can reference the PIL image processing library, many application-layer API functions can be provided directly by the library, greatly reducing the amount of codes in the demo codes.
Arduino Hardware Connection
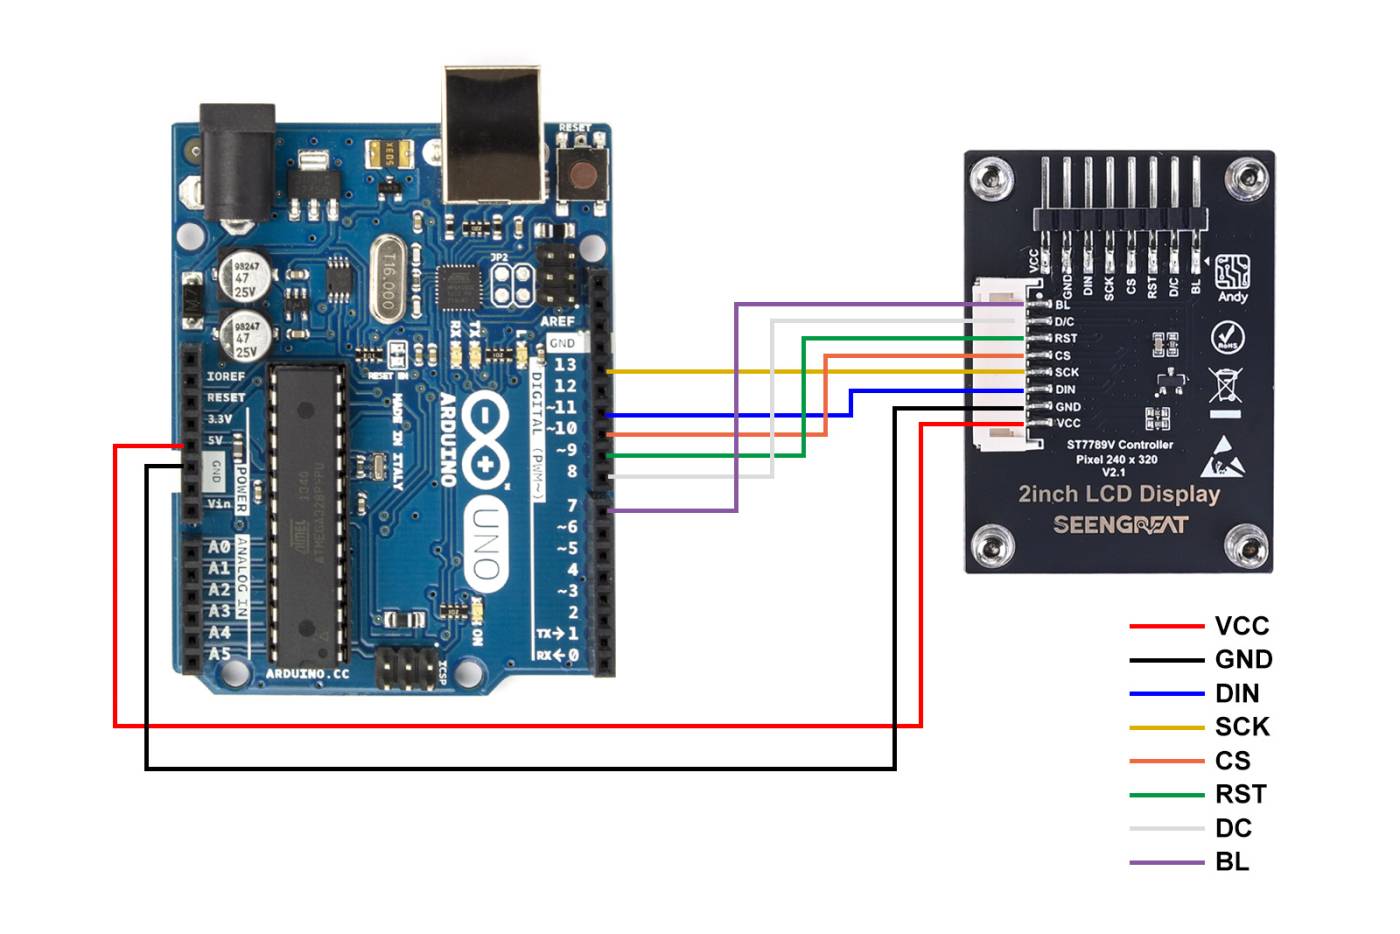
LCD and Arduino Connection Pin Correspondences are shown in the following table:
| LCD Display | Arduino UNO |
|---|---|
| VCC | 5V |
| GND | GND |
| DIN | D11 |
| SCK | D13 |
| CS | D10 |
| RST | D9 |
| DC | D8 |
| BL | D7 |
Example Program Usage
Open the project example program file with the Arduino IDE software, click on verify, and after successful verification, upload it to the module. Observe the display situation of theLCD.
ESP32 Hardware Connection
LCD and ESP32 Connection Pin Correspondences are shown in the following table:
| LCD Display | ESP32 |
|---|---|
| VCC | 3.3V |
| GND | GND |
| DIN | IO23 |
| SCK | IO18 |
| CS | IO27 |
| RST | IO33 |
| DC | IO14 |
| BL | IO13 |
Example Program Usage:
Open the example program project file with the Arduino IDE software. After compiling without errors, download it to the module, and observe the display situation of the LCD.
Raspberry Pi Pico Hardware Connection
LCD and Raspberry Pi Pico Connection Pin Correspondences are shown in the following table:
| LCD Display | Raspberry Pi Pico |
|---|---|
| VCC | 3.3V |
| GND | GND |
| DIN | GP19 |
| SCK | GP18 |
| CS | GP17 |
| RST | GP21 |
| DC | GP16 |
| BL | GP20 |
Example Program Usage:
1.Press and hold the BOOTSEL button on the Raspberry Pi Pico, then connect it to the computer using a USB cable. Release the button after the RPI-RP2 drive appears.
2.Copy the corresponding MicroPython UF2 firmware file to the RPI-RP2 drive. For Raspberry Pi Pico 2, copy the Pico 2 firmware file to the RP2350 drive.
3.Open the demo project in Thonny. Upload the required library files and the main program to the Pico.
4.Click Run in Thonny and observe the display result on the LCD module.
Resources
Data Sheet
Related Links
Image Libraries of Python
If users need to get other more functions, they can learn on the official website as shown:
https://pillow.readthedocs.io/en/latest/handbook/index.html