Rev2.2
We have released an updated version (Rev2.2) on January 15, 2025, which incorporates several enhancements and adjustments based on user feedback. The following changes have been implemented:
- Added Type-C Connector: A Type-C connector has been integrated for improved connectivity.
- Implemented Spring-Loaded Pogo Pins for Raspberry Pi Pico Debugging: Spring-loaded pogo pins have been added to facilitate easier debugging of the Raspberry Pi Pico.
- Introduced Audio Left/Right Channel Selection Jumpers: Jumpers have been added to allow users to select the audio left and right channels.
- Integrated AT24C32 EEPROM Chip with I2C Pin Selection Jumpers: An AT24C32 EEPROM chip has been added, along with I2C pin selection jumpers for configuration flexibility.
- Replaced 4HY-2.0-4P Connector Voltage Selection Slide Switch with Jumpers: The voltage selection for the 4HY-2.0-4P connector has been changed from a surface-mount slide switch to jumpers.
- Removed Pico GPIO Status Indicator Surface-Mount Slide Switch: The surface-mount slide switch for the Pico GPIO status indicator has been removed.
- Removed DHT11/DS18B20 Female Header: The female header for DHT11/DS18B20 sensors has been removed
Overview
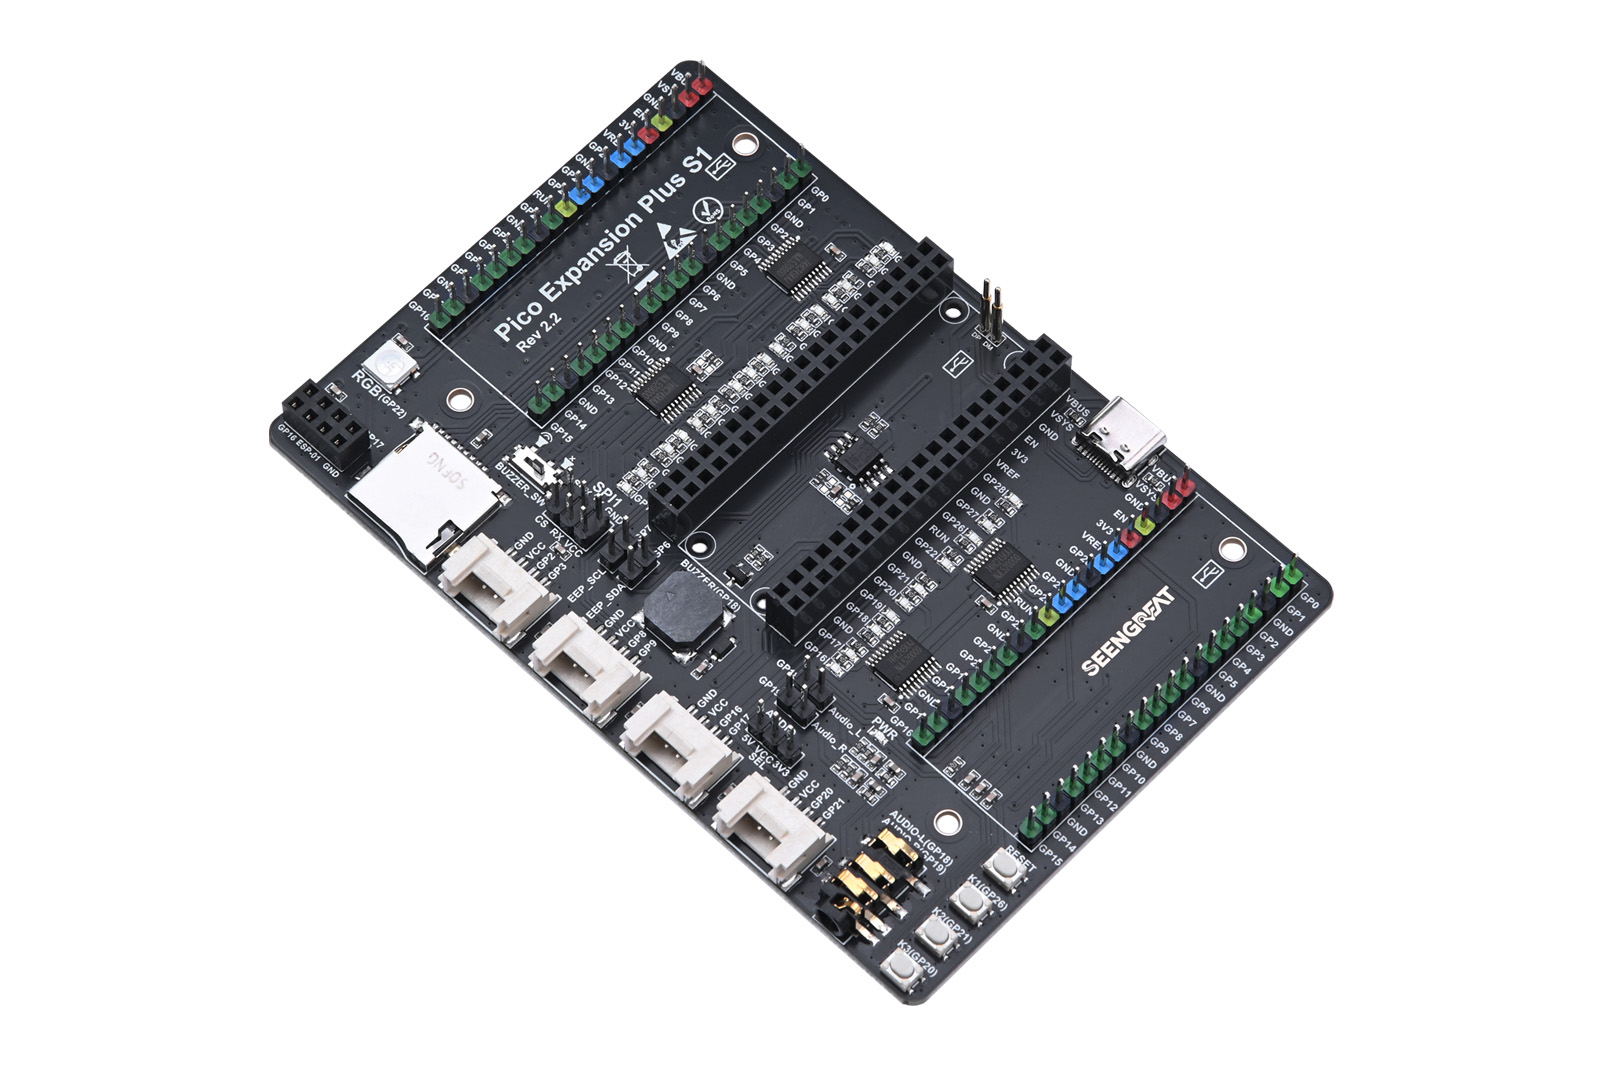
Pico Expansion Plus S1 is an upgraded expansion board specially designed for the Raspberry Pi Pico. It not only has the status indicator LEDs of all GPIOs in Pico of Pico Expansion Plus version, two sets of 2 * 20PIN pin header, four HY-2.0-4P connectors, one set of SPI1 header and one reset button, but also adds one Full-color RGBLED, onboard Micro SD card slot, buzzer with switch, and one 2.54mm4PIN female header for DHT11/DS18B20 sensors(only for V1.3 version), AT24C32 EEPROM(only for V2.2 version),Type C connector(only for V2.2 version),There is also a standard 3.5mm audio jack.
Raspberry Pi Pico does not have a reset button, but this product increases the reset button, so it is convenient for users to debug or write programs without frequent plugging USB line of Pico.
Product parameters
| Supply voltage | 5V(procided by PICO) |
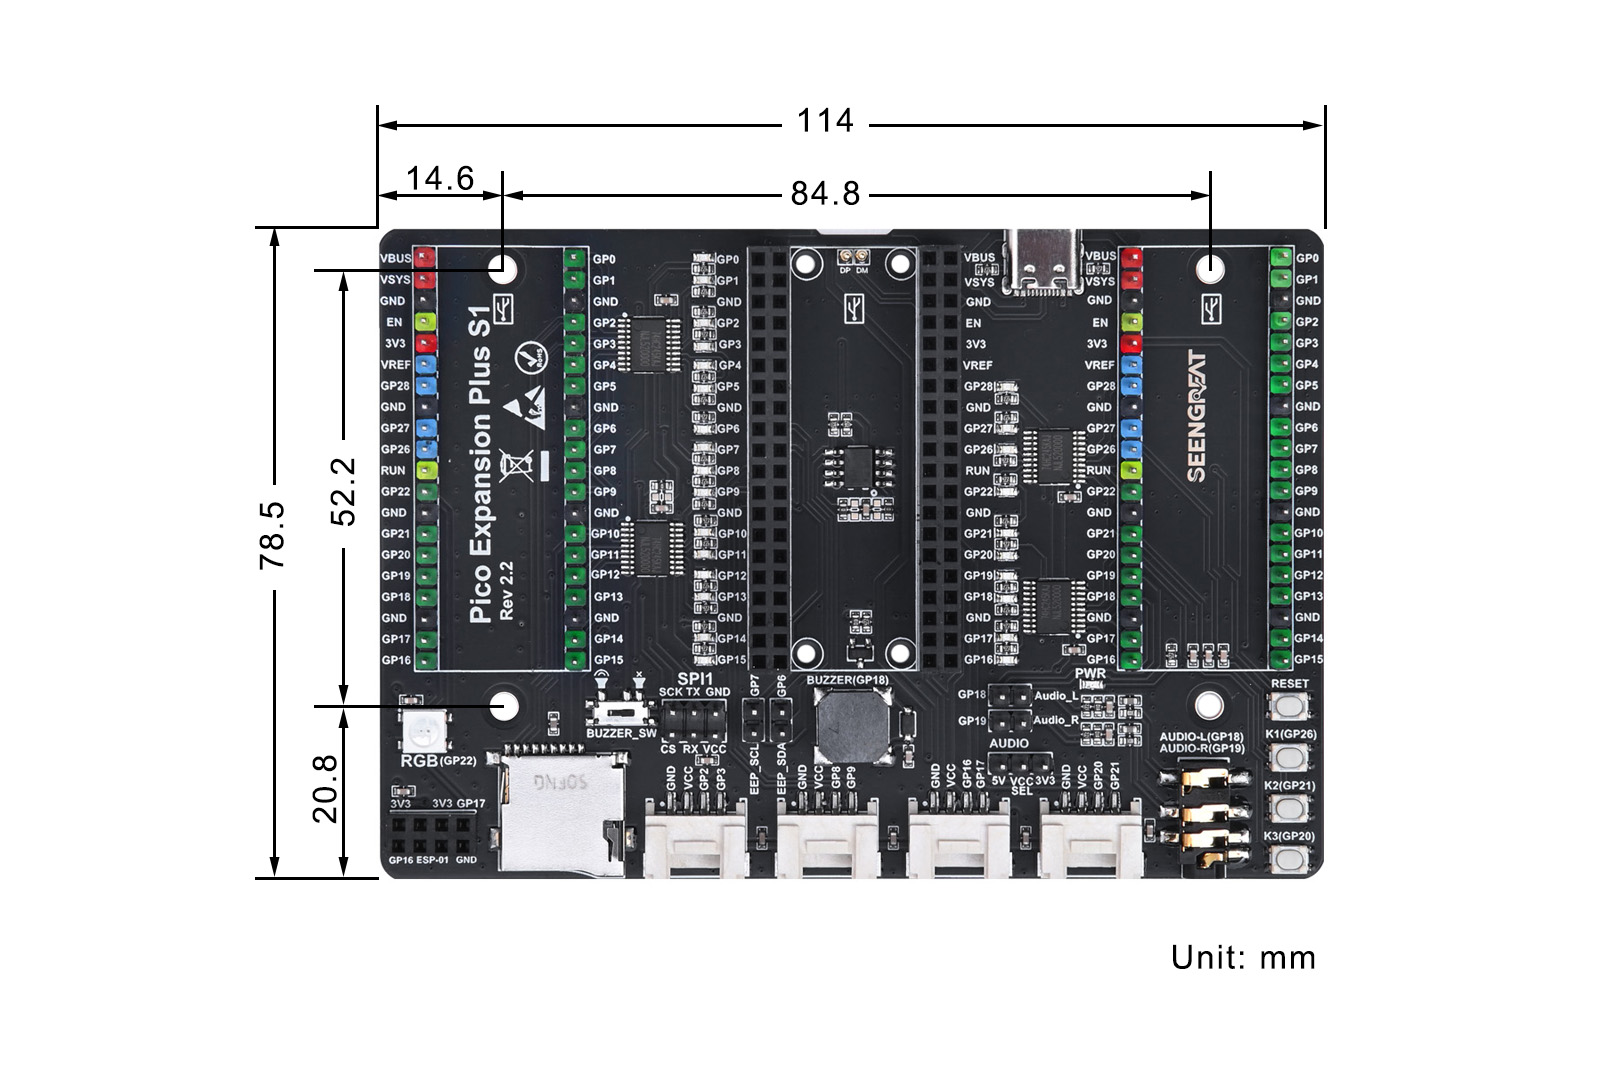
| Size | 114mm(L) x 78.5mm(W) x 11mm(H) |
| Weight | 50g |
Usage
Resource Profile
Rev1.3
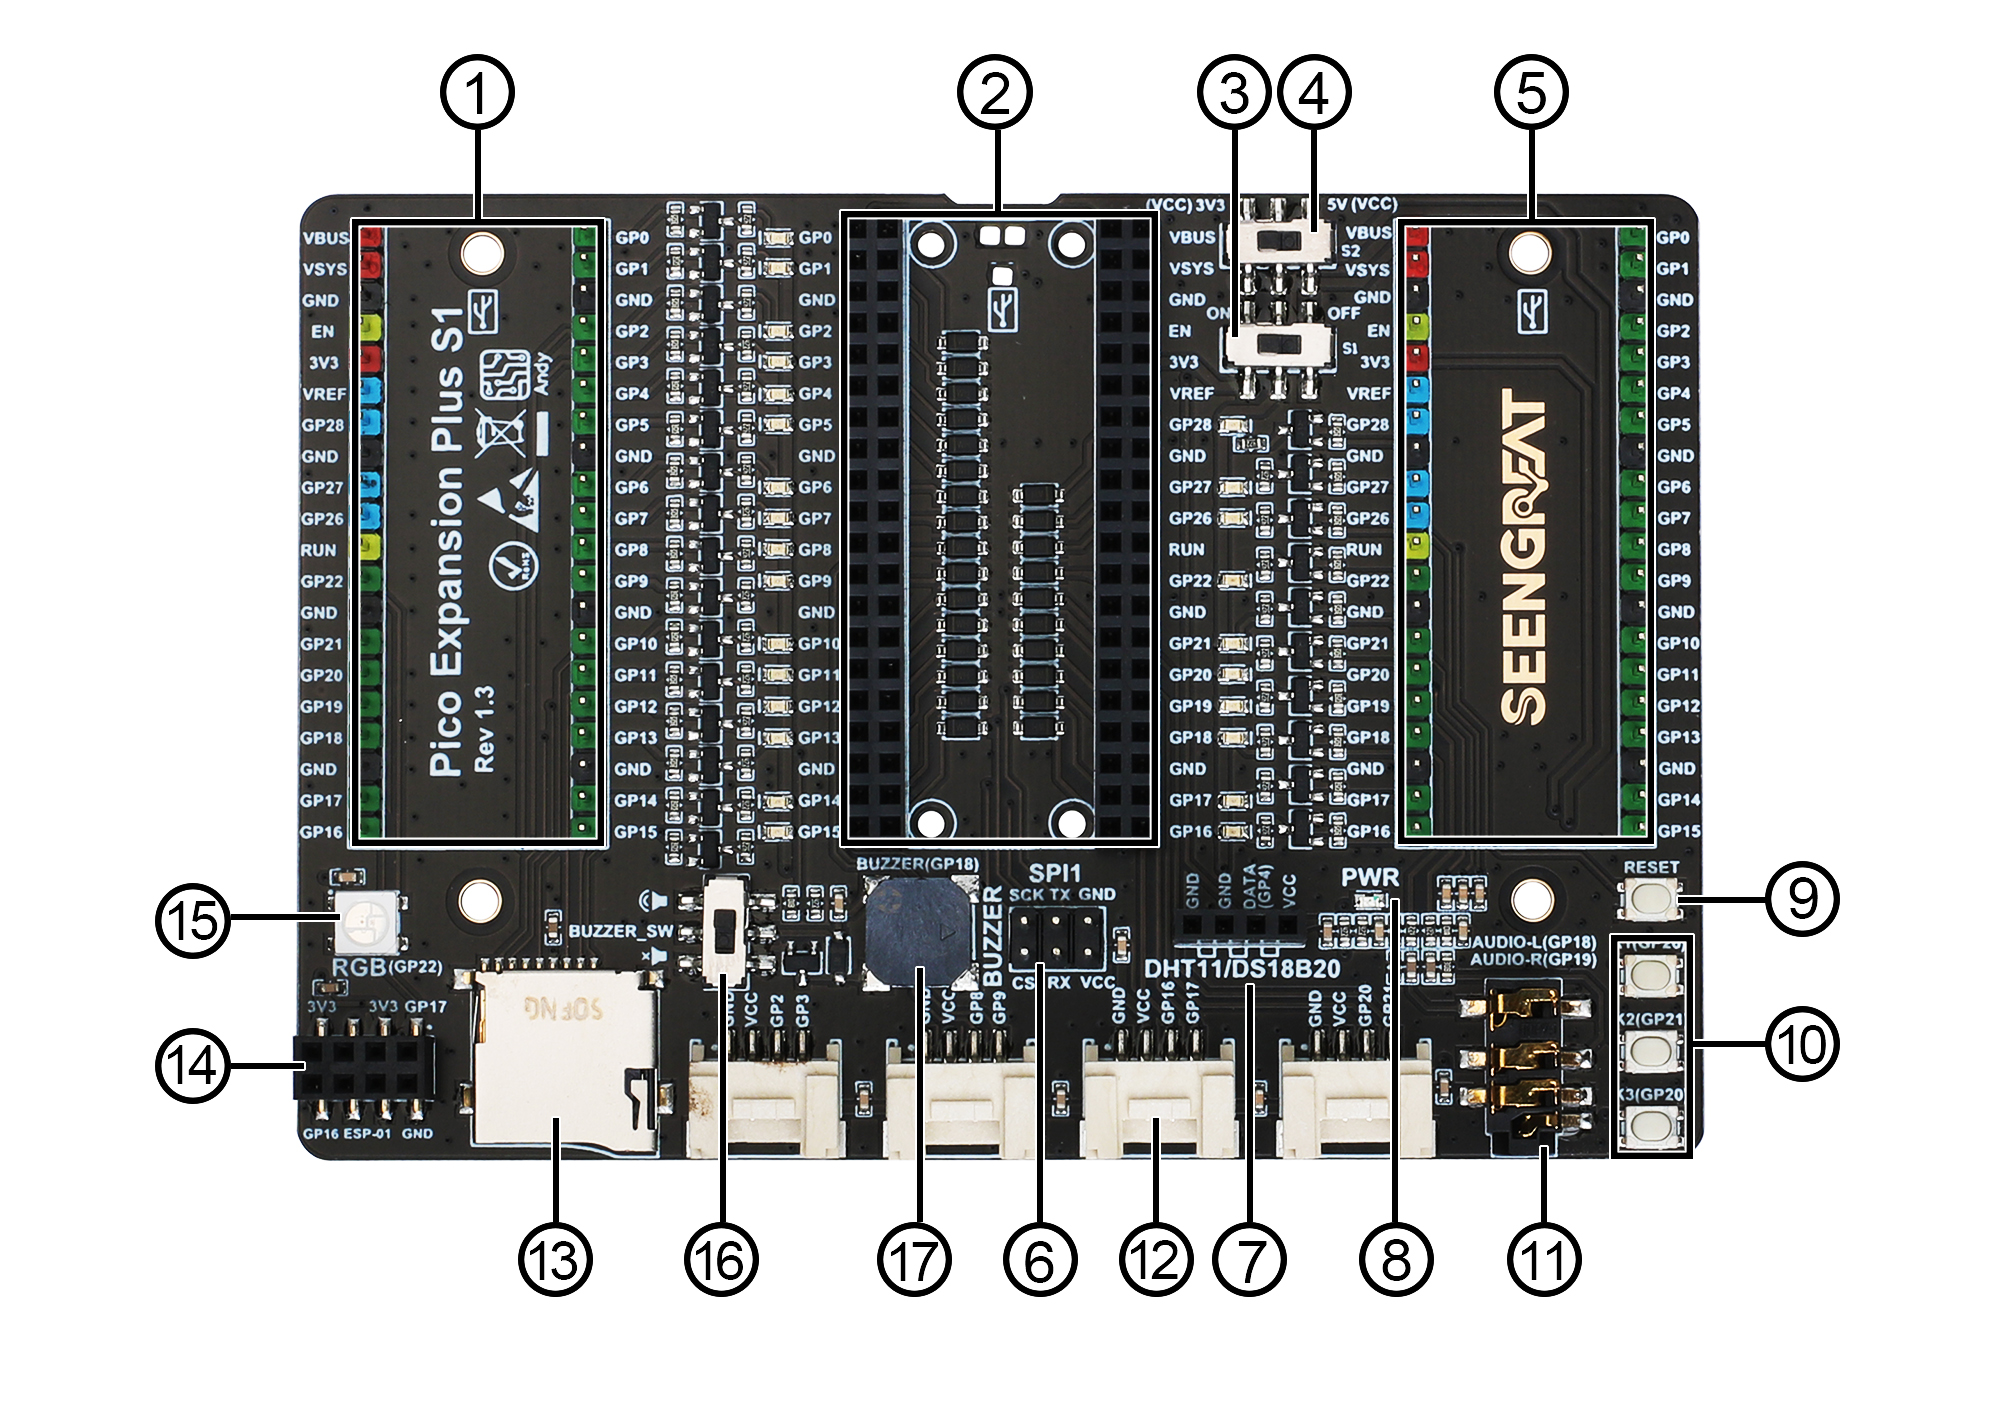
① & ⑤. PICO external expansion pins ② Raspberry Pi Pico socket. ③ The selective switch of GPIO LED indicators to display the GPIO status. ④ The selective switch of voltage for 4 HY-2.0-4P connectors. ⑥ SPI interface header size. ⑦ DHT11/DS18B20 female header. ⑧ Expansion board power indicator. ⑨ PICO reset button. ⑩ User buttons. ⑪3.5mm audio jack. ⑫4 HY-2.0-4P connectors. ⑬ Micro SD card slot. ⑭ ESP-01 solder joint. ⑮ Full-color RGB LED (WS2812). ⑯ Buzzer switch. ⑰ Passive buzzer.
Rev2.2
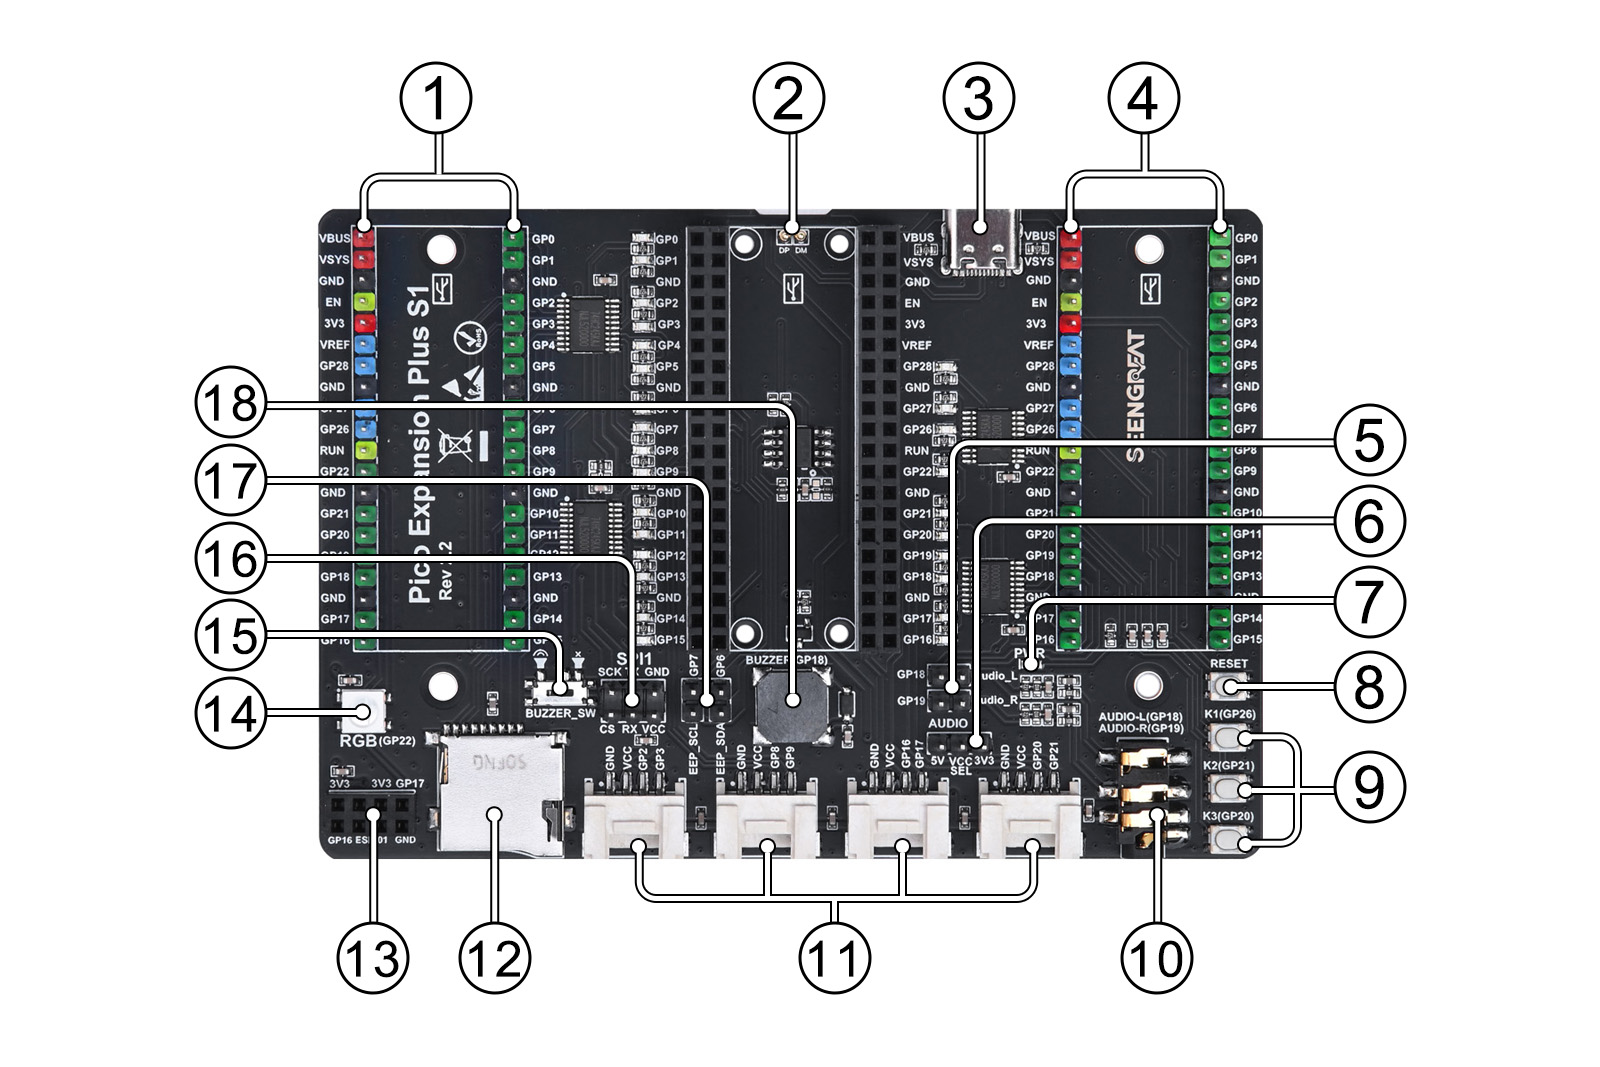
① & ④ PICO expansion port pin header ② Ejector pins for USB port ③ Type C Port(Can power the board and upload programs). ④ 4 HY-2.0-4P connector power supply voltage selection switch. ⑤ Audio interface pin selection jumper ⑥ VCC Voltage selection jumper for HY-2.0-4P connector ⑦ Expansion board power indicator LED ⑧ PICO reset button ⑨ User buttons(K1:GP26 K2:GP21 K3:GP20). ⑩ 3.5mm audio jack (L:GP18 R:GP19). ⑪4 HY-2.0-4P connectors. ⑫ Micro SD card slot ⑬ ESP-01 solder pads. ⑭Full-color RGB LED (WS2812:GP22) . ⑮Buzzer switch . ⑯SPI interface header . ⑰ EEPROM pins selection jumper ⑱ Passive buzzer.
Two sets of 2x20PIN headers allow easy connection to Raspberry Pi Pico expansion boards or external devices using DuPont wires. The pin functions are clearly marked on both sides of the board for easy use and measurement.
There are 4 HY-2.0-4P connector for connecting 2.0mm pitch ribbon cables, providing a convenient way to connect other functional modules. Sliding switch S2 allows you to select the power supply voltage for these connectors. When S2 is switched to 5V, the connected modules are powered with 5V; when switched to 3.3V, they are powered with 3.3V. Note: All VCC pins of the external HY-2.0-4P connectors are connected together, so the voltage will be the same for all connected modules once a voltage is selected.
One set of headers is used to expose the SPI1 interface, allowing you to connect SPI peripherals using ribbon cables or DuPont wires. This SPI1 interface shares the same VCC voltage as the 4 HY-2.0-4P connectors.
There is one full-color RGB LED that produces cool lighting effects when running example programs. A Micro SD card slot is available for storage. The board also features a buzzer with a switch for on-demand use.
expanding the usage range. An ESP-01 adapter module solder point is reserved, supporting the I2C bus and UART. Additionally, there is a standard 3.5mm audio jack that supports stereo and left-channel switching.
only for V1.3 version:
A 2.54mm 4PIN female header is reserved, providing access to power supply pins, data pins, and two ground pins, making it compatible with various expansion modules such as DS18B20 temperature sensors, DHT11 temperature and humidity sensors, etc.
GPIO Status Indicator LEDs: You can turn on the GPIO status display function by toggling switch S1 to the ON state. When a GPIO is high, the corresponding LED indicators up; otherwise, it goes off. If you don't need to display the GPIO status with LEDs, you can toggle switch S1 to the OFF state.
Switch S2:When the S2 is switched to 5V, the 4 HY-2.0-4P connectors for connecting 2.0mm pitch ribbon cables modules are powered with 5V; when switched to 3.3V, they are powered with 3.3V. Note: All VCC pins of the external HY-2.0-4P connectors are connected together, so the voltage will be the same for all connected modules once a voltage is selected.
only for V2.2 version:
The board has an EEPROM chip AT24C32, and brings out the corresponding I2C pin selection pin jumper cap. Users can choose the pin to use according to actual conditions.
One Type C Connector add and it can power the board and upload programs.
VCC SEL:When shorted to 5V, the 4 HY-2.0-4P connectors for connecting 2.0mm pitch ribbon cables modules are powered by 5V; when shorted to 3.3V, they are powered by 3.3V.
Python Demo Codes Usage
1. Installation Thonny
Thonny download:https://thonny.org
2. After installing Thonny, hold down the BOOTSEL button on Pico when the power is off, connect the computer with a USB cable and release the button, at this time pop up an RPI-RP2 disk directory, drag adafruit-circuitpython raspberry_pi_pico-en_US-7.3.3.uf2 in the demo codes\python directory into the RPI-RP2 disk.If you are using the Pico 2, drag the adafruit-circuitpython-solderparty_rp2350_stamp-en_US-9.2.0-beta.0.uf2 file into the popped-up RP2350 disk.
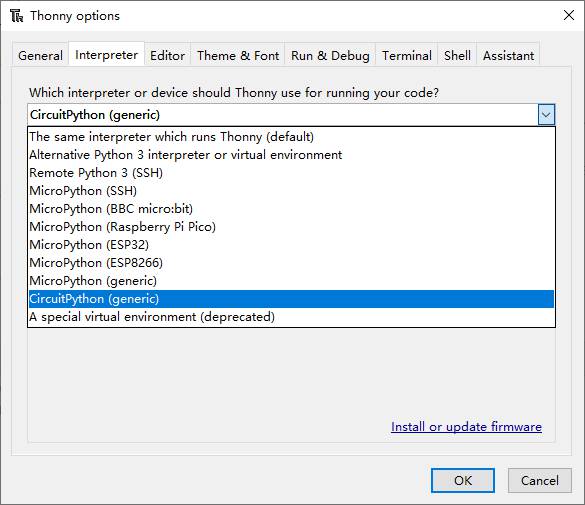
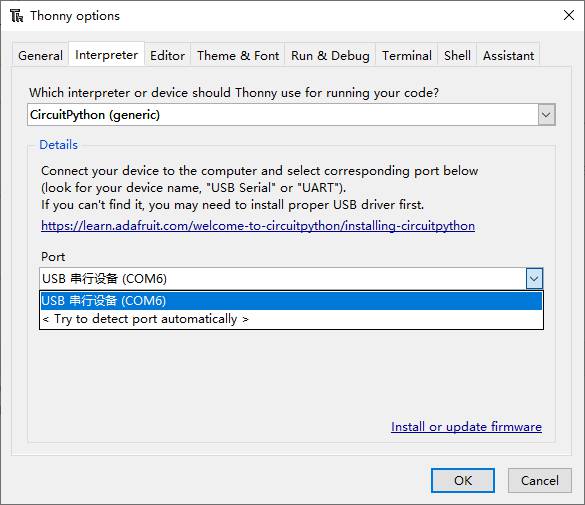
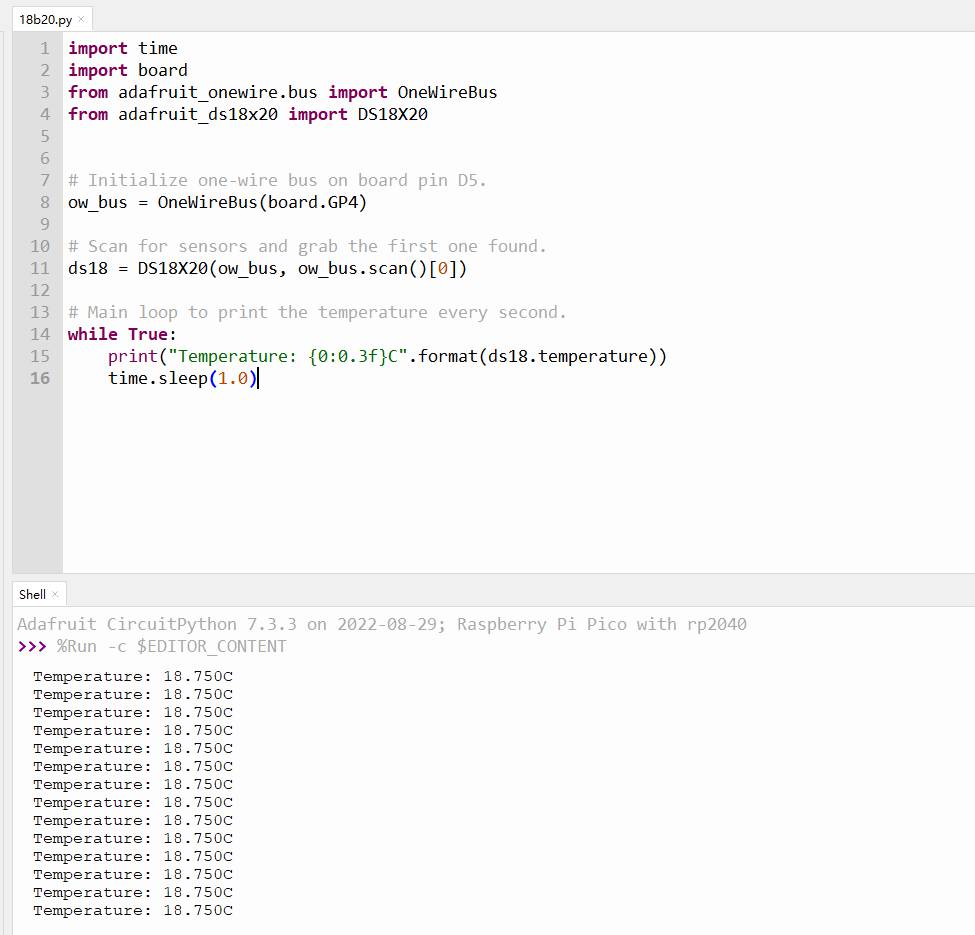
3. (Only for V1.3 version)Right click the 18b20.py in the demo codes demo codes\python directory, open with Thonny, click Tools - Settings, in the interpreter bar, select CiruitPython (general), and set the Raspberry Pi Pico port (COMx: the port number x of the computer may be different), and then click OK.
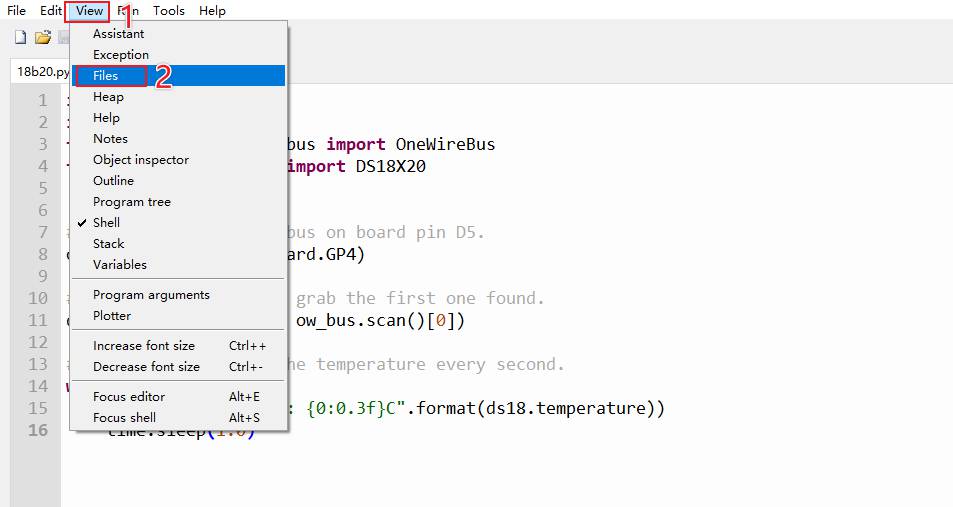
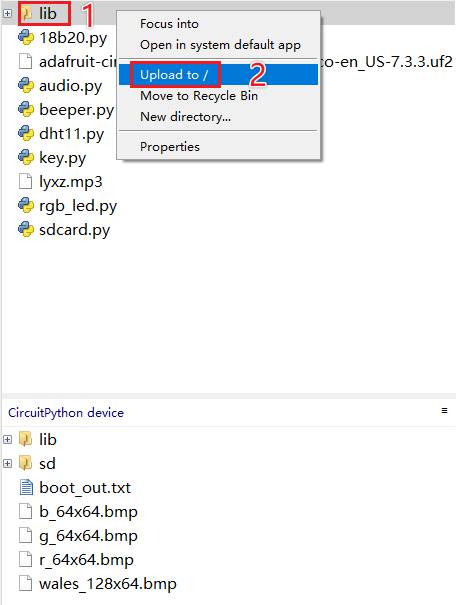
4. Files window and upload the Lib library file to Raspberry Pi Pico.
5. (Only for V1.3 version) Connect the 18B20 temperature sensor to the DHT11/DS18B20 header of the expansion board (see Figure 2-1 pin definition diagram), then click the "Run current script" button or press the F5 key to run the current script and observe the data output in the shell window of the Thonny application.
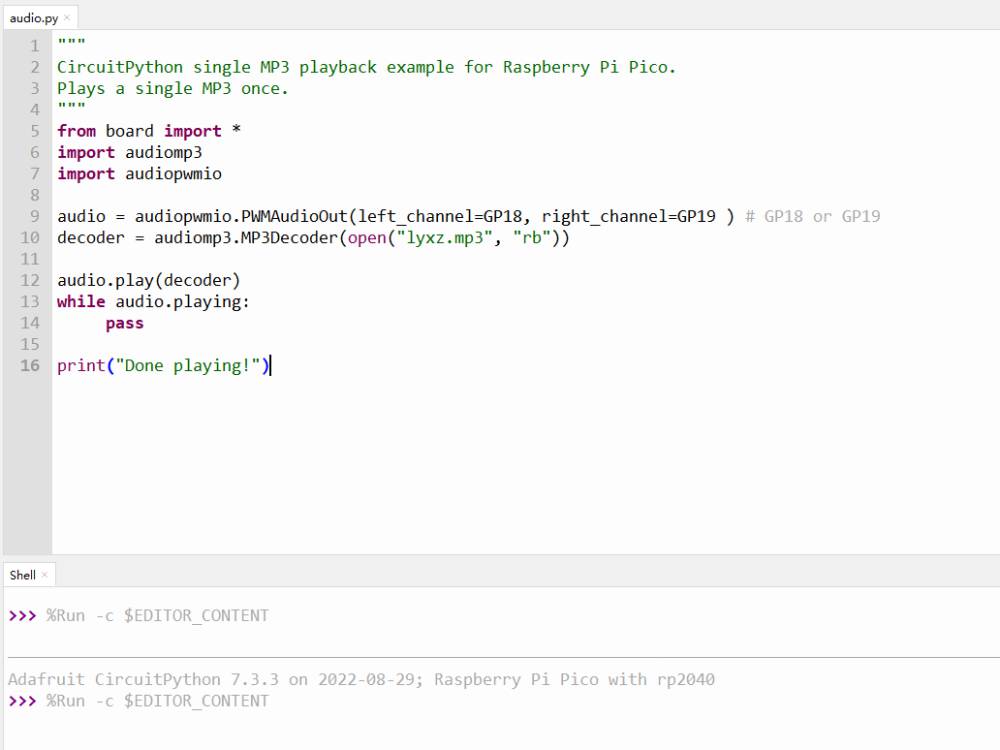
6. Connect the headset to the 3.5mm audio jack of the expansion board (see Figure 2-1 Pin Definition Diagram) and open the audio.py demo code, upload the prepared MP3 file to Raspberry Pi Pico, and then click the "Run current script" button or press the F5 key to check the headset playback.
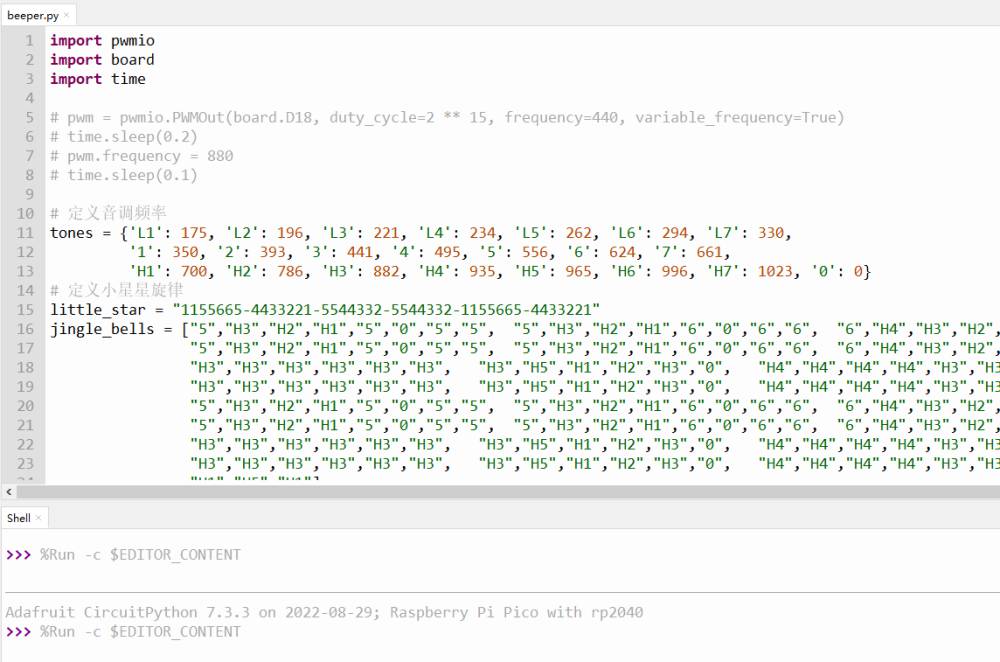
7. Turn the slide switch of the buzzer on the expansion board to the  position ( means the buzzer is turned on,
  means the buzzer is mute), open the beeper.py demo code, and then click the "Run current script" button or press F5 to run the current script and check the playback of the expansion board buzzer.
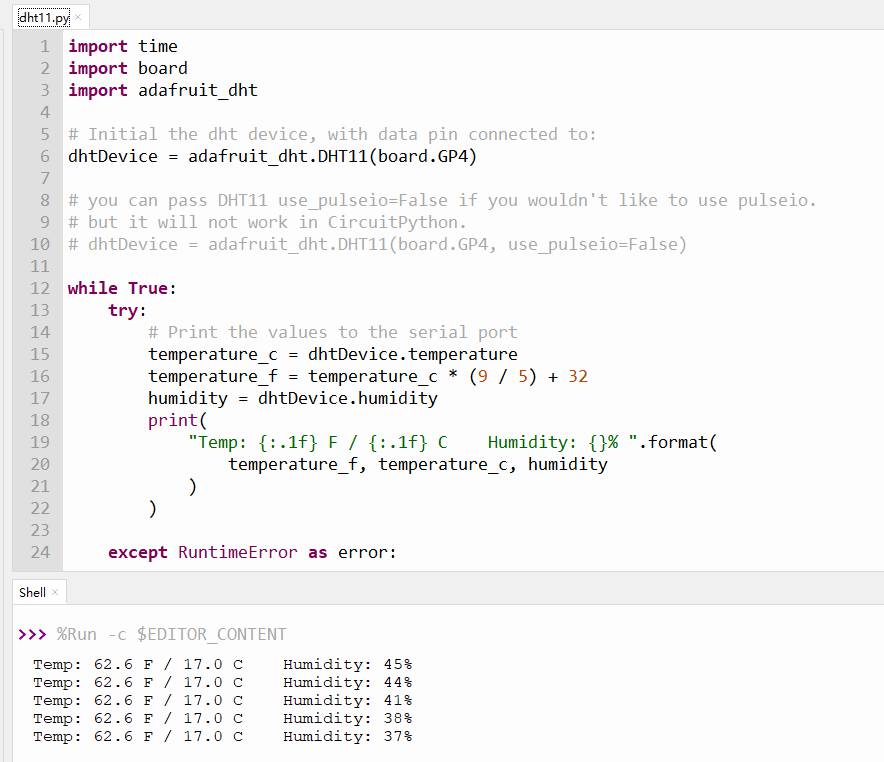
8. (Only for V1.3 version) Connect the DHT11 temperature and humidity sensor module to the DHT11/DS18B20 female header of the expansion board (see Figure 2-1 pin definition diagram), open the dht11.py demo code, click the "Run current script" button or press the F5 key to run the current script, and observe the data output in the shell window of the Thonny application.
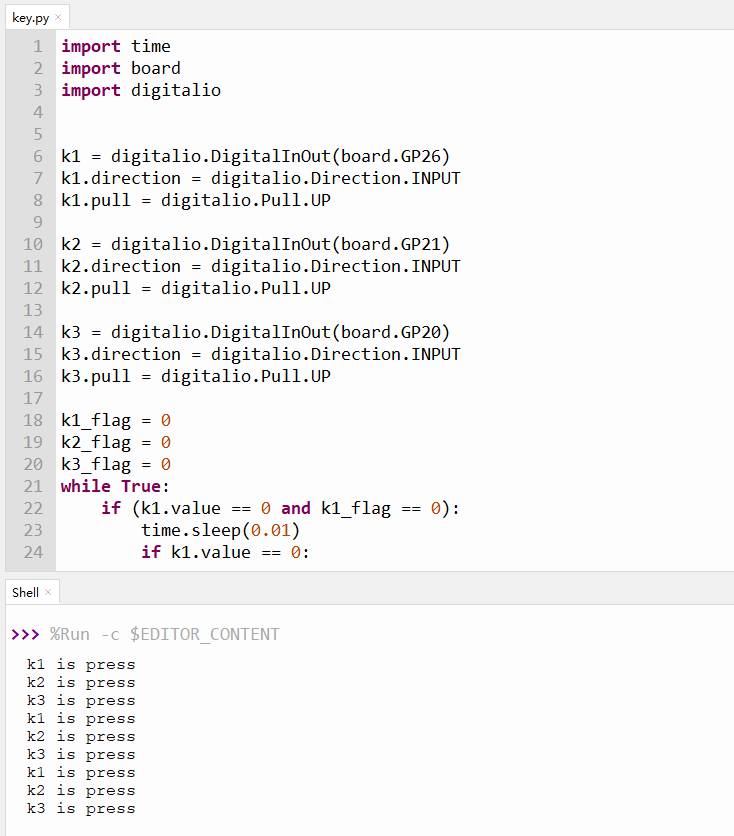
9. Open the key.py demo code, click the "Run current script" button or press the F5 key to run the current script, press the user button K1/K2/K3, and observe the data output in the shell window of the Thonny application.
10. Open the rgb_led.py demo code, click the "Run current script" button or press F5 to run the current script and observe the RGB changes on the expansion board.

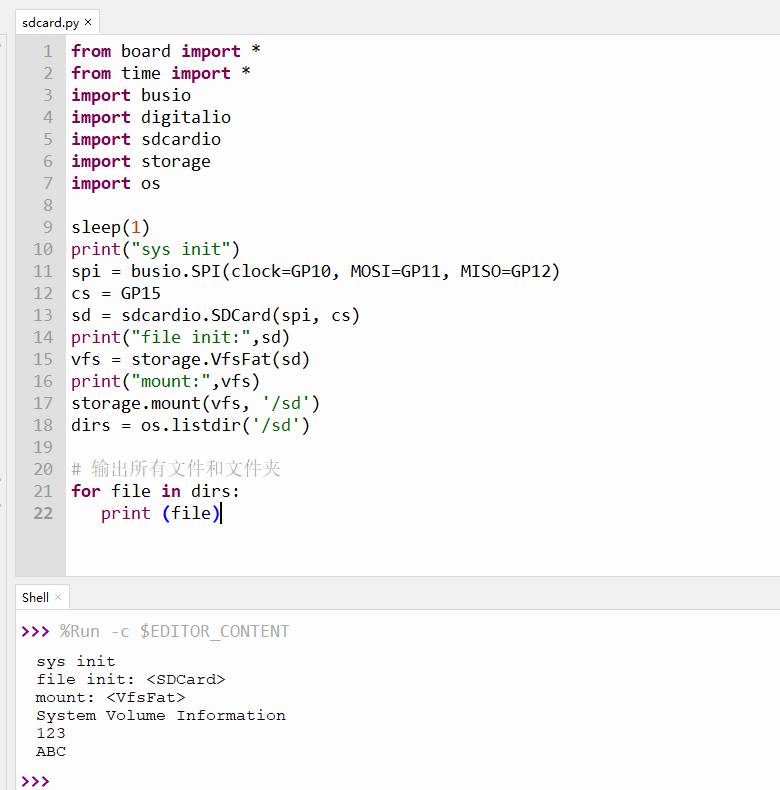
11. Open the sdcard.py demo code to detect Micro SD card slot function, the file system of SD card is FAT32 or FAT, and then click the "Run current script" button or press F5 to run the current script and observe the data output in the shell window of the Thonny application.
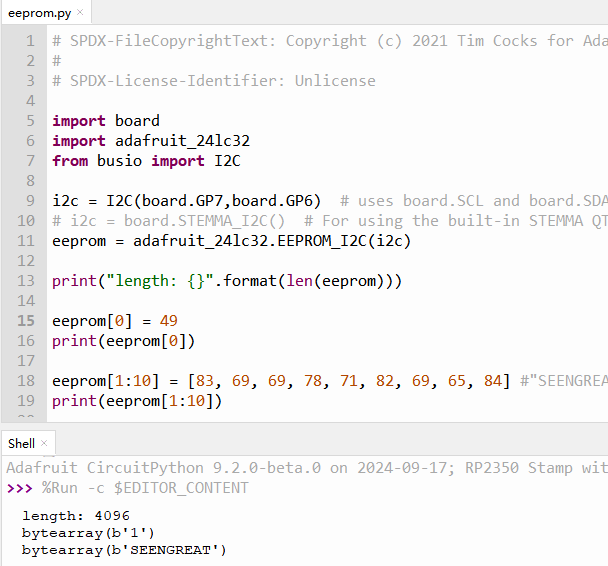
12. (Only for V2.2 version)Open the eeprom.py demo code, and then click the "Run current script" button or press F5 to run the current script and observe the data output in the shell window of the Thonny application.

Resources
Schematic
Data Sheet