Product Overview
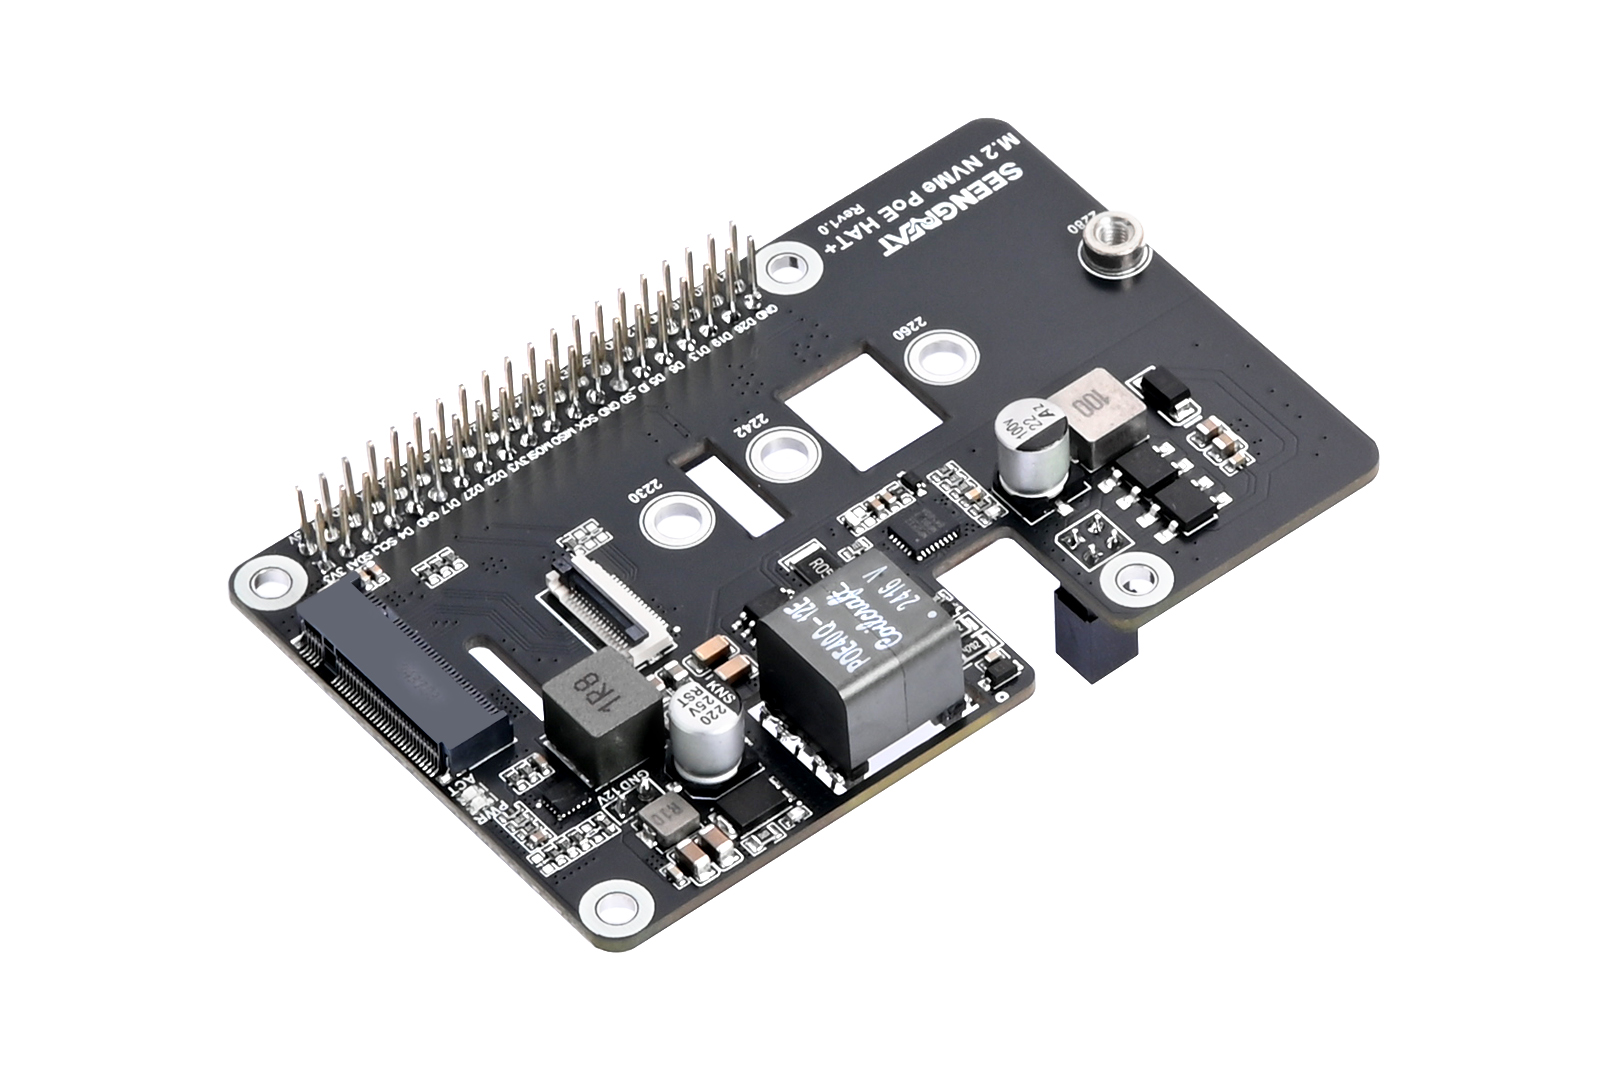
The M.2 NVMe PoE HAT+ is a PCIe-to-M.2 and PoE power supply solution designed specifically for the Raspberry Pi 5. This board is compatible with 2230/2242/2260/2280 M.2 SSD sizes and supports both Gen2 and Gen3 modes, enabling booting the Raspberry Pi 5 directly from the SSD.The product works seamlessly with PoE routers or switches that comply with the IEEE 802.3af/at network standard, allowing both power supply and network connectivity through a single Ethernet cable.Designed based on the HAT+ standard, the board is simple to use and can be directly connected to the Raspberry Pi's 40-pin expansion interface.
Usage
Resource Profile
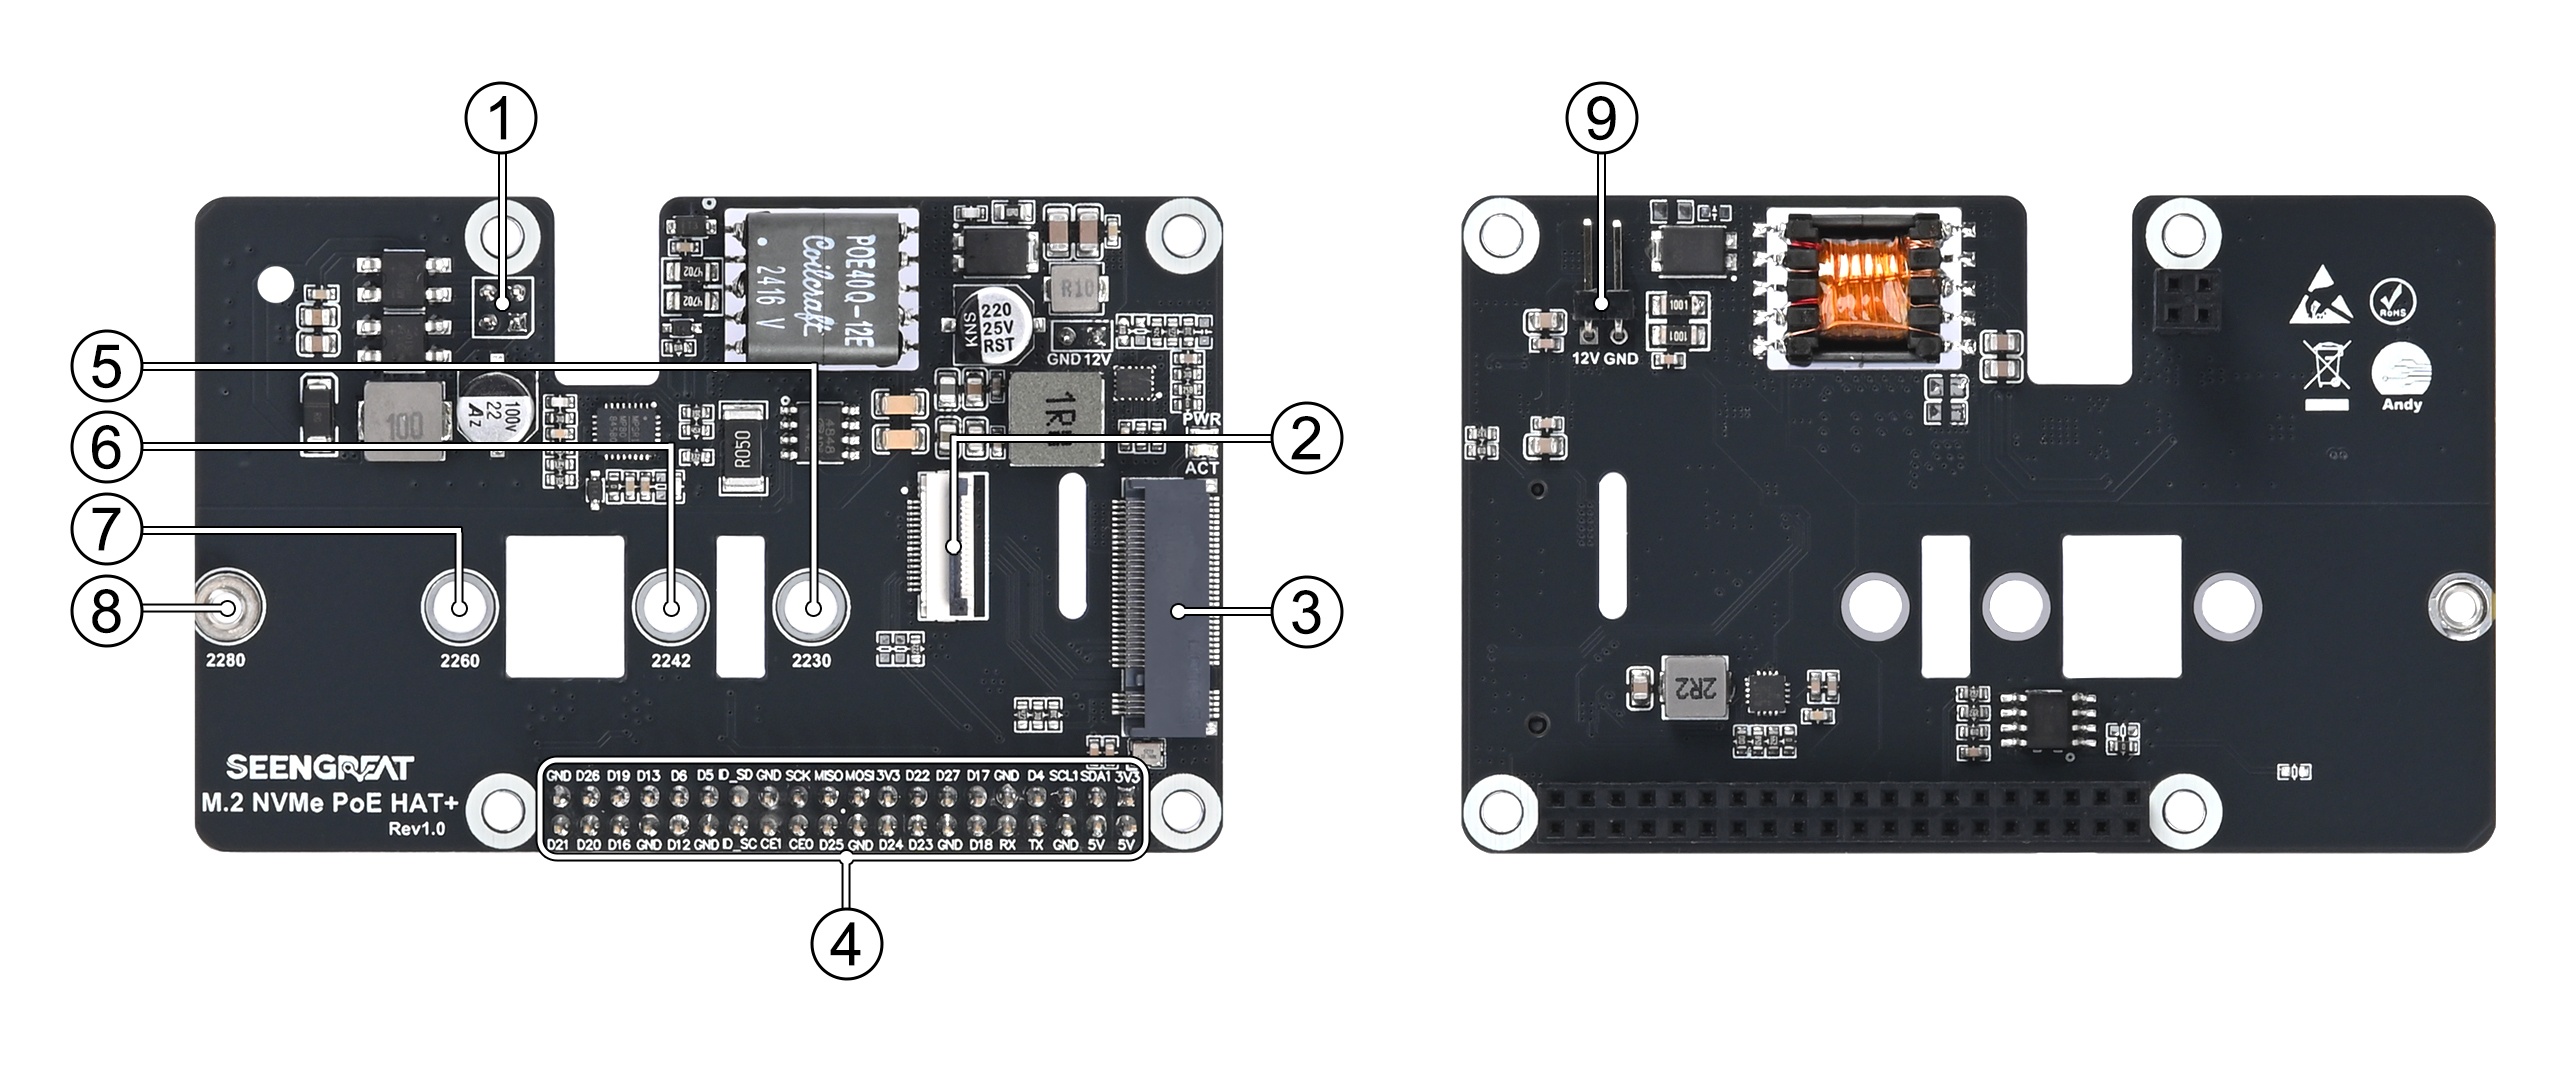
① Raspberry Pi 5 PoE Power Input Header: Provides power input via PoE for the Raspberry Pi 5② PCIe 16P FPC Connector: Used to connect the PCIe interface via a flexible printed cable. ③ M-Key Slot: Slot for M.2 SSDs supporting NVMe protocol. ④ Raspberry Pi 40-Pin Expansion Header: Standard GPIO header for Raspberry Pi compatibility. ⑤ 2230 SSD Mounting Hole: Secures SSDs of 2230 size. ⑥ 2242 SSD Mounting Hole: Secures SSDs of 2242 size. ⑦ 2260 SSD Mounting Hole: Secures SSDs of 2260 size. ⑧ 2280 SSD Mounting Hole: Secures SSDs of 2280 size. ⑨ 12V Output Pin: Provides 12V power output for external devices.
Test
Update the Raspberry Pi
1. Update the Raspberry Pi to ensure it can run the latest software by entering the following command:
sudo apt update && sudo apt upgrade2. Check the firmware to ensure it is up to date by entering the following command:
sudo rpi-eeprom-update3. Install rpi-update to get the latest firmware:
sudo apt install rpi-update4. Update the firmware by running rpi-update:
sudo rpi-update5. After updating, restart the Raspberry Pi:
sudo rebootIdentify the SSD
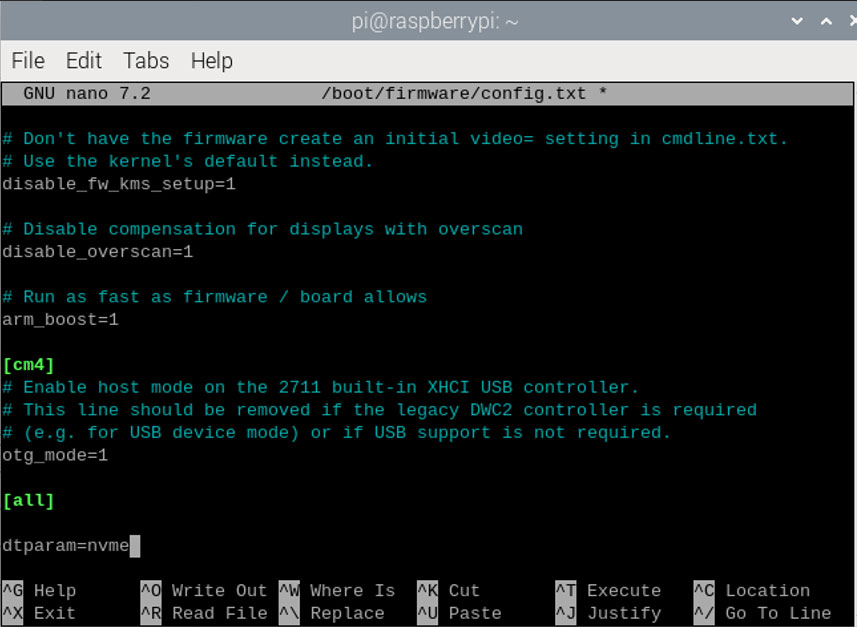
1. Edit the /boot/firmware/config.txt file and add dtparam=nvme to enable the PCIe interface:
sudo nano /boot/firmware/config.txtAdd dtparam=nvme at the end of the file, as shown:
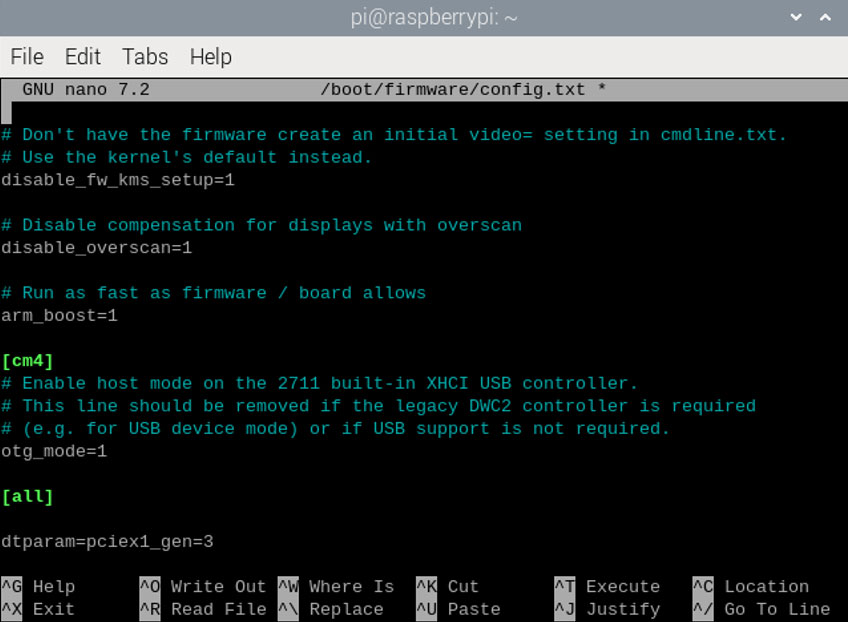
2. If PCIe Gen3 needs to be enabled:
Method 1: Continue by adding dtparam=pciex1_gen=3 to the same file.
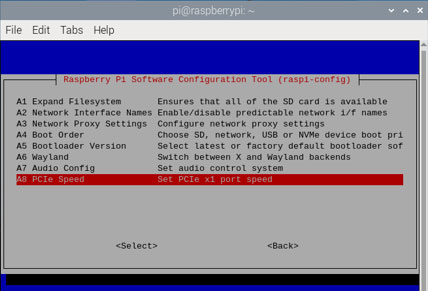
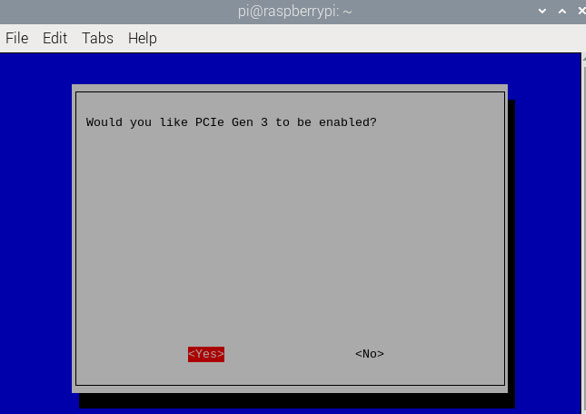
Method 2: Use the raspi-config command to open Raspberry Pi configuration:
raspi-configSelect Advanced Options
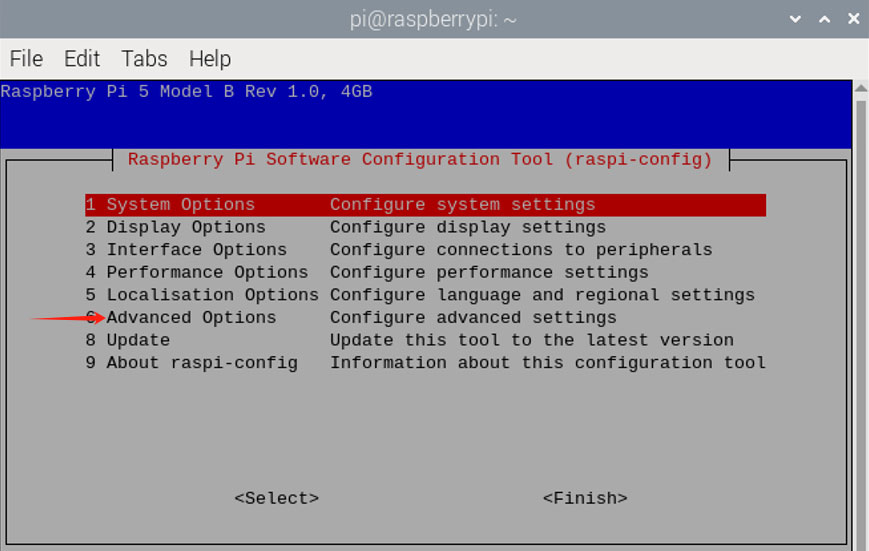
Select PCIe Speed — Yes to enable PCIe Gen 3 mode.
3. Then restart the Raspberry Pi to apply the changes:
sudo reboot4. After restarting, open the Raspberry Pi terminal and enter the command lspci to identify your SSD. For example, if you are using a Sandisk SSD, it will be shown within the red box in the figure, with the other being the PI5's RPI chip.

Partitioning
1. Ensure that the Raspberry Pi is correctly connected to and recognizes the SSD.
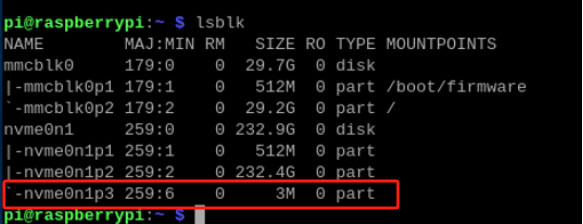
2. Identify the device number by running the lsblk command, which will display the device number and the directories where the device is mounted.
lsblk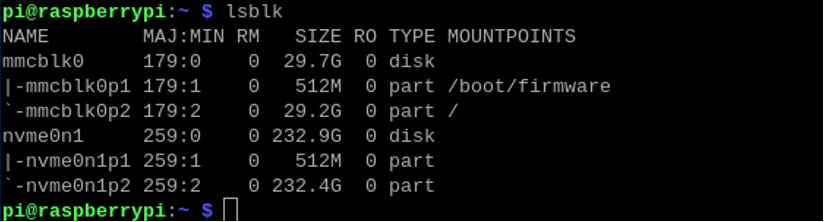
NAME —— Displays the name of the device.
MAJ:MIN —— Displays the major and minor device numbers. RM —— Indicates whether the device is removable (0 for non-removable, 1 for removable).
SIZE —— Displays the size of the device.
RO —— Indicates whether the device is read-only (0 for read-write, 1 for read-only).
TYPE —— Displays the type of the device (disk for disk, part for partition).
MOUNTPOINT —— Displays the mount point of the device.
3. Open the disk partitioning tool.
Here, taking creating a new partition as an example: For the device to be partitioned (such as nvme0n1), open the disk partitioning tool.
sudo fdisk /dev/nvme0n1Type the letter 'n' and follow the operation prompts to partition.
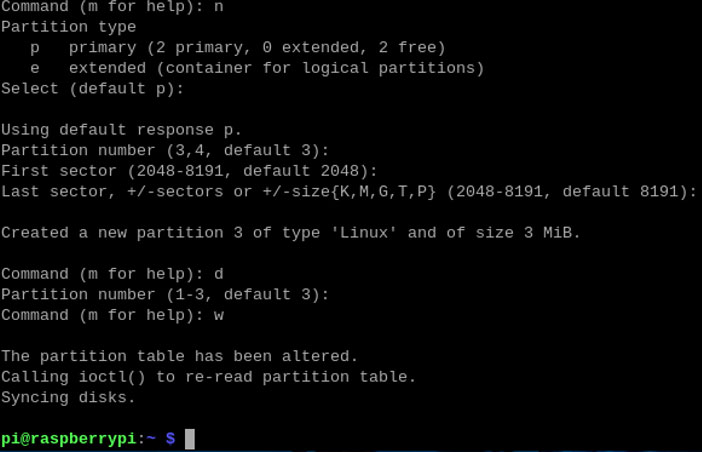
Enter the command 'lsblk' again to check whether the partitioning is successful.
As shown in the figure, there is an additional device named nvme0n1p3. This is the newly created partition.
Formatting
1.File system type
sudo mkfsThen press the tab key. You can see multiple different file system type options as shown in the figure.

2. Format the partition. If you want to format a certain partition, enter "sudo mkfs.file format type /dev/device name". For example, I want to format partition nvme0n1p3 into ext4 file format.
sudo mkfs.ext4 /dev/nvme0n1p3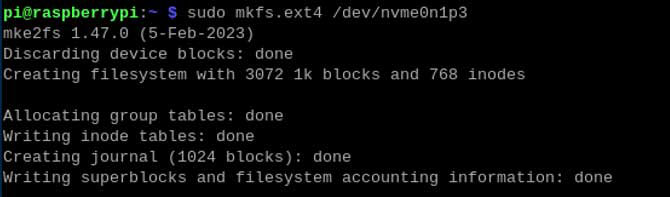
As shown in the figure above, if "done" appears at the end, it proves that the formatting is successful.
Mount the device
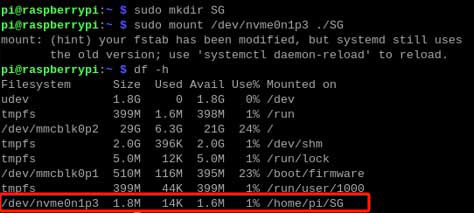
1. Create a mount directory
The format of the command is "sudo mkdir name of the created mount directory". For example, "sudo mkdir SG".
sudo mkdir SG2. Mount the device
Mount partition nvme0n1p3 to directory SG.
sudo mount /dev/nvme0n1p3 ./SG3. Enter the command "df -h" to check the disk status.
df -hAs shown in the figure, it can be seen that partition nvme0n1p3 has been mounted to directory SG.
Partition read-write test
1.Enter the directory where the partition is mounted.
cd SG2.Release memory cache
To ensure the accuracy of the read-write test, we need to release the cache. Use the following command to release the memory cache:
sudo sh -c "sync && echo 3 > /proc/sys/vm/drop_caches"3.Write test (copy the Raspberry Pi memory content to the hard disk)
Use the dd command to generate data from /dev/zero and write it to the mounted hard disk to perform a write performance test.
sudo dd if=/dev/zero of=./test_write count=2000 bs=1024k
4.Read test (copy the hard disk content to the Raspberry Pi memory)
Use the dd command to read data from the test_write file generated just now to /dev/null to perform a read performance test.
sudo dd if=./test_write of=/dev/null count=2000 bs=1024k
5. Clear the cache
sudo sh -c "sync && echo 1 > /proc/sys/vm/drop_caches"This will synchronize the data in the cache to the disk and release the cache of the file system.
6. Delete the test file
After performing the read-write test, it is recommended to delete the created test file.
sudo rm ./test_write
Notes:
Different cards and environments: Test results may vary depending on the memory card used and the environment. The Raspberry Pi is limited by its hardware performance, and the test results may not be as accurate as tests on a PC.
Automatic mounting at startup
1. Set up mounting
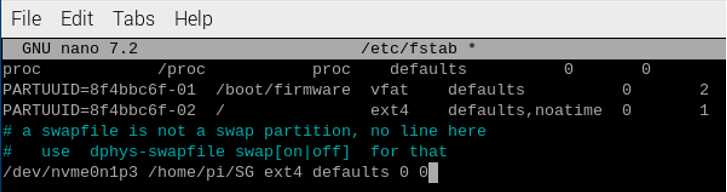
If there are no problems with the test and you do not need the M.2 SSD as the system disk but only use it as an extended disk, you can set up automatic mounting by editing the file "/etc/fstab" with the command "sudo nano /etc/fstab".
sudo nano /etc/fstabAdd at the end of the file:
/dev/nvme0n1p3 /home/pi/SG ext4 defaults 0 0The format is:
/dev/nvme0n1p3 (device name)
/home/pi/SG (mounted directory)
ext4 (file system type)
defaults (default mounting options)
The 0 and 0 respectively indicate whether to perform backup and the order of file system checks.
After editing, save and exit (press Ctrl + X, then press Y and Enter).
2. Make the changes take effect
To ensure that the configuration is correct, you can use the command sudo mount -a to make the mounting configuration take effect immediately:
sudo mount -a3. Restart the system and check the mounting status.
sudo reboot
lsblk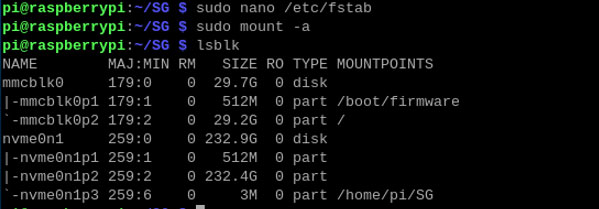
Notes:
When editing the /etc/fstab file, ensure that you enter the correct device name and mount point to avoid system boot failure; use the command 'sudo mount -a' to apply the changes and confirm there are no errors.
Cancel Automatic Mounting and Delete Mount Directory
1. To unmount the device and delete the mount directory:
Navigate back to the parent directory of the mount directory
cd ..Unmount the directory
sudo umount ./SGDelete the mount directory
sudo rmdir ./SG
2. Cancel Automatic Mounting
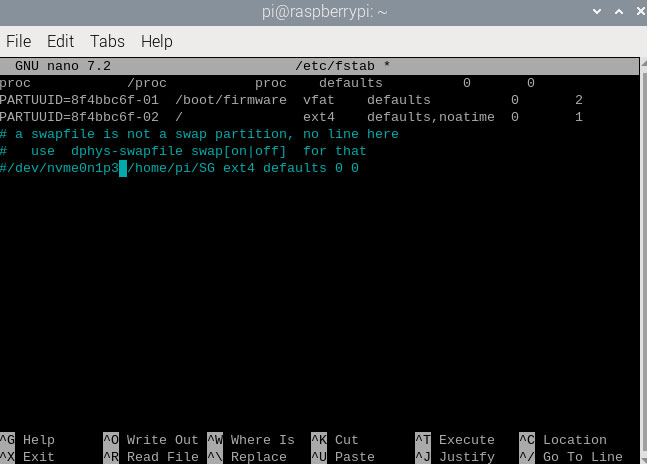
Edit the file to comment out or delete the added automatic mounting command.
sudo nano /etc/fstabComment out the line '/dev/nvme0n1p3 /home/pi/SG ext4 defaults 0 0' by adding a "#" symbol at the beginning of the line.
Booting from NVME SSD
1. Ensure that the rpi-eeprom tool is installed and updated:
sudo apt update
sudo apt full-upgrade
sudo apt install rpi-eeprom
2. Edit the bootloader configuration:
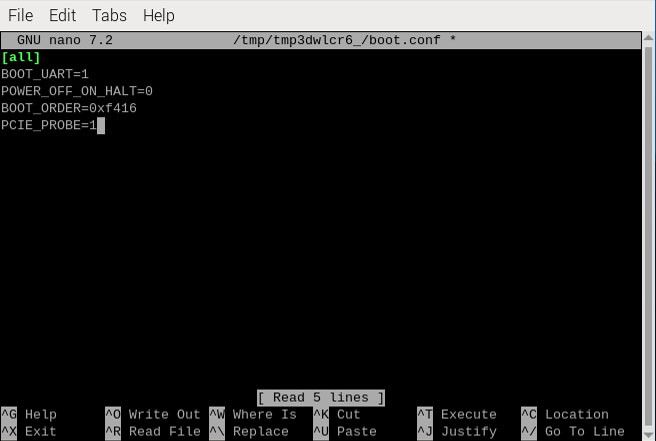
sudo rpi-eeprom-config --editIn the editor, find the line for BOOT_ORDER and modify it to the following content:
BOOT_ORDER=0xf416
Add the line:PCIE_PROBE=1
Save and exit the editor (press Ctrl + X, then press Y and Enter).
If you want to prioritize booting from the SD card, change it to BOOT_ORDER=0xf461.
If you want to configure other content, refer to the following table:
| Value | Mode | Description |
|---|---|---|
| 0x0 | SD CARD DETECT | Try SD then wait for card-detect to indicate that the card has changed - deprecated now that 0xf (RESTART) is available. |
| 0x1 | SD CARD | SD card (or eMMC on Compute Module 4). |
| 0x2 | NETWORK | Network boot - See Network boot server tutorial |
| 0x3 | RPIBOOT | RPIBOOT - See usbboot |
| 0x4 | USB-MSD | USB mass storage boot - See USB mass storage boot |
| 0x5 | BCM-USB-MSD | USB 2.0 boot from USB Type C socket (CM4: USB type A socket on CM4IO board). Not available on Raspberry Pi 5. |
| 0x6 | NVME | CM4 and Pi 5 only: boot from an NVMe SSD connected to the PCIe interface. See NVMe boot for more details. |
| 0x7 | HTTP | HTTP boot over ethernet. See HTTP boot for more details. |
| 0xe | STOP | Stop and display error pattern. A power cycle is required to exit this state. |
| 0xf | RESTART | Restart from the first boot-mode in the BOOT_ORDER field i.e. loop |
3. Make the configuration take effect
After editing is completed, update the bootloader.
sudo rpi-eeprom-update -d -f
4.Download the system to the solid-state drive
There are many ways to download the system. This article takes downloading in the Raspberry Pi as an example.
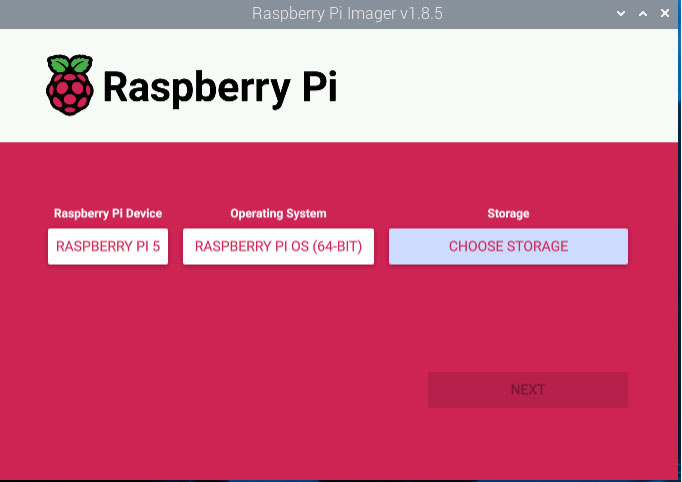
Click on the menu bar in the upper left corner of the Raspberry Pi desktop - select Accessories - select Imager.

In the official Raspberry Pi Imager tool in the Raspberry Pi, customize the desired system and initial settings, and then download the system to the solid-state drive.
After the download and installation are completed, restart the Raspberry Pi.
sudo rebootAfter the Raspberry Pi boots up, the mount of the SD card appears on the desktop, indicating that the system is applicable and the configuration of booting from the SSD is successful.

Notes:
If your solid-state drive has already mounted a directory to the Raspberry Pi system and you did not unmount it before using the Raspberry Pi Imager tool to download the system, the official Raspberry Pi Imager tool will not be able to find the hard drive, which will result in the inability to download the system. You need to unmount the hard drive. For specific operations, please refer to section Cancel Automatic Mounting and Delete Mount Directory.
If you encounter a situation where the hard drive cannot be recognized during use and the statement added in the config.txt file is dtparam=nvme, you can try adding the statement dtparam=pciex1_gen=3 to enable PCIe Gen3. For specific operations, please refer to section Identify the SSD.
At present, we have tested many hard drives. Some hard drives have poor compatibility with our products. You can refer to the Raspberry Pi official test description of the compatibility of some hard drive models at the following link:
NVMe compatibility list - Pineberry Pi Documentaton