Product Overview
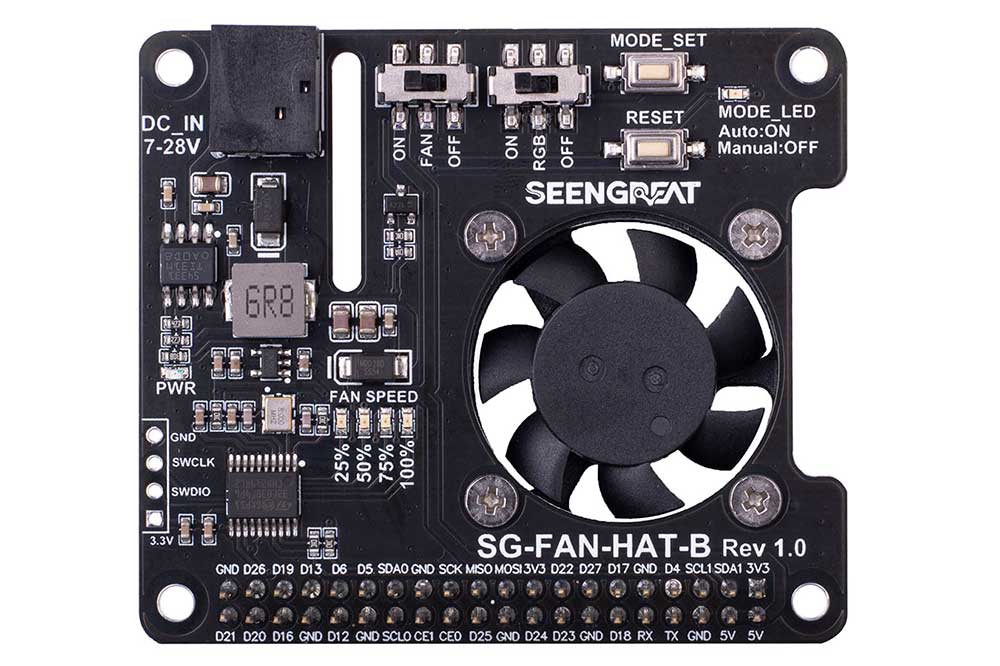
The Raspberry Pi cooling fan is a dedicated cooling solution designed for the Raspberry Pi. The Raspberry Pi is a powerful small computer, but it may generate a certain amount of heat when running under high loads. The cooling fan is designed to provide effective cooling performance and maintain the Raspberry Pi's operating temperature within a reasonable range. It consists of a control chip STM32F030F4P6, 6 full-color RGB LEDs WS2812, a DC power conversion circuit TPS54331, fan speed indicator LEDs, fan mode switch, and button speed adjustment circuits, and it can seamlessly connect to the Raspberry Pi's 40-pin expansion connector.
Product Specifications
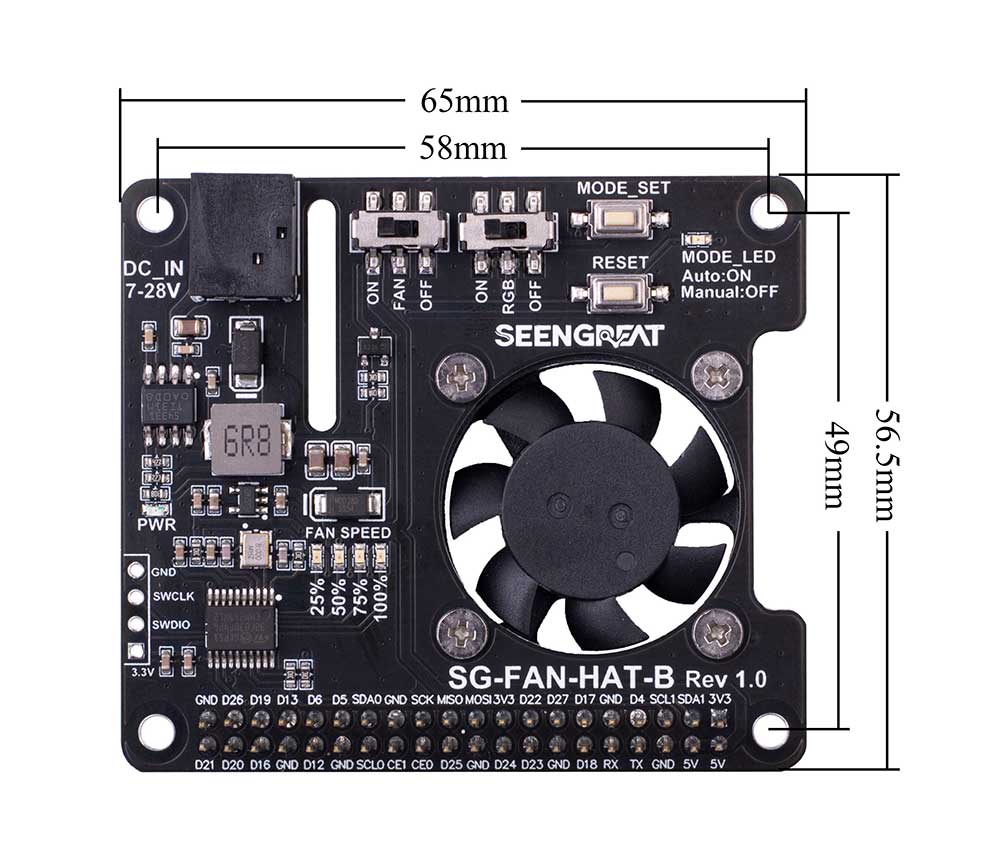
| Dimensions | 65mm (length) x 56.5mm (width) |
| Weight | 28g |
| Input Voltage | 5V |
| Logic Voltage | 3.3V |
| Driver Chip | STM32F030F4P6 |
| Fan PWM Duty Cycle | ≥40% |
| Fan Speed (Max) | 8500 RPM (Revolutions Per Minute) |

Raspberry Pi Example Usage
Since the bookworm system no longer supports the wiringpi library, the example program for this system uses the lgpio library, and for the bullseye system, the wiringpi library version of the example program can be used.
Resource Overview Diagram


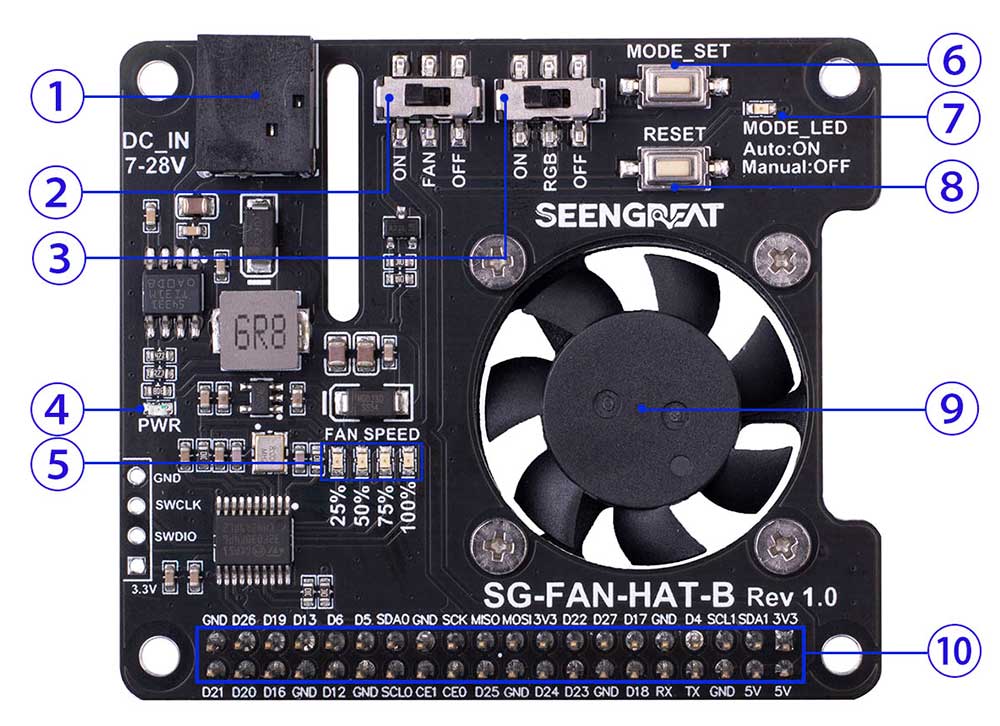
- ① DC-044 power inputJack, input voltage can be DC 7-28V
- ② Fan switch
- ③ RGB LED WS2812 switch
- ④ 5V power indicator
- ⑤ Fan speed indicators
- ⑥ Mode or fan speed switch button
- ⑦ Mode indicator
- ⑧ Microcontroller reset button
- ⑨ Fan
- ⑩ 40-pin Raspberry Pi expansion connector
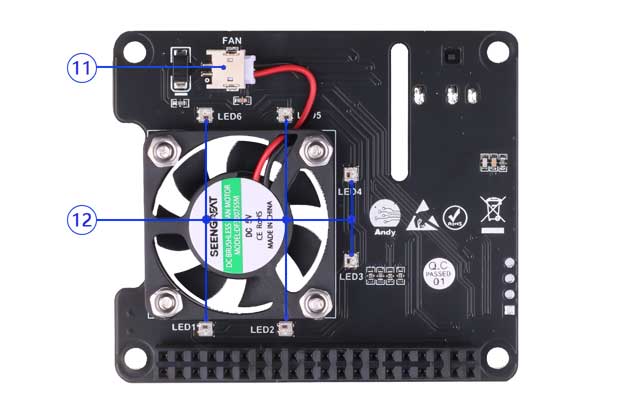
- ⑪ Fan connector
- ⑫ 6 RGB LEDs

Function Description
This module automatically enters manual mode when no example program is running on the Raspberry Pi mainboard. The MODE_LED will be off, and you can adjust the fan speed by pressing the MODE_SET button. When the Raspberry Pi runs a example program, the module enters automatic mode. In this case, the MODE_LED will light up, and the fan speed will be automatically adjusted based on the Raspberry Pi's CPU temperature. The MODE_SET button cannot be used to adjust the speed in automatic mode. If you need to manually adjust the fan speed while in automatic mode, you can press and hold the MODE_SET button for more than 2 seconds. After releasing the button, the module will enter manual mode, and the MODE_LED will turn off.
Note: Automatic mode and manual mode (switched by the button) are only available when a example program is running on the Raspberry Pi. Otherwise, the board will always remain in manual mode.
Install the WiringPi Library
sudo apt-get install wiringpi
wget https://project-downloads.drogon.net/wiringpi-latest.deb  # Raspberry Pi 4B Version Upgrade
sudo dpkg -i wiringpi-latest.deb
gpio -vFor the Bullseye branch system, use the following command:
git clone https://github.com/WiringPi/WiringPi
cd WiringPi
./build
gpio -vIf you got the error message "ImportError: No module named 'wiringpi'" when running a Python version of the example program, run the following commands:
#For Python 2.x version
pip install wiringpi#For Python 3.x version:
pip3 install wiringpiNote: If the installation fails, you can try the following compilation and installation steps:
git clone --recursive https://github.com/WiringPi/WiringPi-Python.gitThe --recursive option will automatically fetch submodules; otherwise, you would need to manually download them.
Navigate to the downloaded WiringPi-Python folder and run the following commands for compilation and installation:
#For Python 2.x version:sudo python setup.py install#For Python 3.x version
sudo python3 setup.py installIf you encounter an error like the following:

Run the command sudo apt install swig to install SWIG. Afterward, rerun sudo python3 setup.py install for compilation and installation. If you receive a message similar to the one below, it indicates a successful installation.

Installing the lgpio Library
For the bookworm system, the sample program uses the lgpio library. The following is the installation command for the library:
wget https://github.com/joan2937/lg/archive/master.zip
unzip master.zip
cd lg-master
make
sudo make install
Install Python Libraries
#python3
sudo apt-get update
sudo apt-get install python3-pip
sudo pip3 install rpi-ws281x
The example program uses a Python 3 environment. To run the Python example program, you need to install "smbus" with the following command:
sudo apt-get install -y python-smbusConfiguring the I2C Interface:
sudo raspi-configEnable the I2C interface:
Interfacing Options -> I2C -> Yes
Install the "i2c-tools" tool for confirmation:
sudo apt-get install i2c-toolsTo check connected I2C devices:
i2cdetect -y 1If you see an address representing successful connection between the fan board and Raspberry Pi, the default address is 0x0b.
Run the Program
1)Install the SG-FAN-HAT-B correctly onto the Raspberry Pi and power up the Raspberry Pi. Make sure the fan switch and RGB LED switch are set to "ON."
2)Download the example codes of the board at the bottom of this webpage and unzip it into the Raspberry Pi mainboard.
3)run python program:
Enter the path "\SG-FAN-B_bookworm\raspberry_pi\python\" and then run the following command:
sudo python3 fan-hat-b.pyOr run the C program:
Enter the path "\SG-FAN-B_bookworm\raspberry_pi\c\" and then run the following command:
sudo make clean
sudo make
sudo ./main
After the program is run, SG-FAN-HAT-B will enter the automatic mode, and the MODE_LED on the board will light up. The program will print the current CPU temperature every 0.5 seconds. The fan speed will be automatically adjusted based on the CPU temperature. There are four onboard LEDs and six RGB LEDs at the bottom, which will display different statuses based on the CPU temperature. The temperature values and their corresponding statuses are shown in Table 1 below:
| CPU Temperature:T | Fan Speed (Percentage) | Fan Speed LED Indicator | RGB LED Effect (RGB Encoding) |
|---|---|---|---|
| T<40℃ | 40% | The first 2 LEDs on the left are on | Random color encoding |
| 40℃ =< T < 50℃ | 50% | The first 2 LEDs on the left are on | (127,255,255) |
| 50℃ =< T < 55℃ | 75% | The first 3 LEDs on the left are on | (255,255,0) |
| 55℃ =< T < 60℃ | 90% | All 4 LEDs are on | (255,127,0) |
| 60℃ =< T | 100% | All 4 LEDs are on | (255,0,0) |
4) Switch Functionality
Move the fan and RGB LED switches from "ON" to "OFF" position. Check if the fan and RGB LEDs have turned off. If they haven't turned off, it indicates an issue.
5)Temperature Control Test
Install sysbench:
sudo apt install sysbenchPerform a thread scheduling test:
sysbench --test=threads --num-threads=4 --thread-yields=10000 runMove the fan switch to "OFF" and the RGB LED switch to "ON" position. The CPU temperature will slowly rise. Observe if the 4 green LEDs and RGB LEDs display according to the states in Table 1.
Next, move the fan switch to "ON," and the fan will start spinning. The CPU temperature will slowly decrease. Observe if the 4 green LEDs and RGB LEDs display according to the states in Table 1.
6)Startup Auto-Run TestUsing the /etc/rc.local method:
Open /etc/rc.local:
sudo nano /etc/rc.localAdd the following content before "exit 0" line(Users need to fill in according to their own code storage path):
sudo /home/pi/fan-hat-b/c/main &
Save and then reboot the Raspberry Pi. After rebooting, observe if the example code is running correctly.
Python code:
Open /etc/rc.local:
sudo nano /etc/rc.localAdd the following content before "exit 0" line(Users need to fill in according to their own code storage path):
sudo python3 /home/pi/fan-hat-b/python/fan-hat-b.py &
Save and then reboot the Raspberry Pi. After rebooting, observe if the example code is running correctly.
Note: You cannot run both C and Python code simultaneously. If you want to run the C code on startup, comment out "sudo python3 /home/pi/fan-hat-b/python/fan-hat-b.py &," and if you want to run the Python code on startup, comment out "sudo /home/pi/fan-hat-b/c/main &."
Resources
Datasheets
Example code for bullseye system
Example code for bookworm system
