
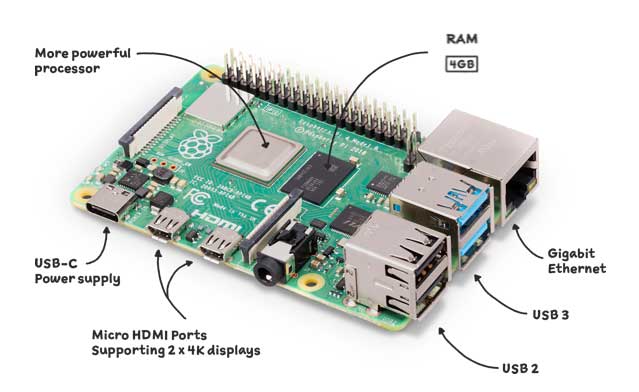
Product Overview
The Raspberry Pi 4B is a single-board computer based on the ARM architecture, developed by the Raspberry Pi Foundation in the United Kingdom. It is equipped with the Broadcom BCM2711 quad-core processor, running at a speed of up to 1.5GHz, and comes with 2GB/4GB/8GB of LPDDR4 memory, with support for Micro SD card expansion.
The Raspberry Pi 4B features dual-band Wi-Fi and Bluetooth 5.0 technology, as well as a variety of interfaces such as Ethernet, Micro HDMI, and USB, facilitating the connection of various peripherals and expansion devices. It is also equipped with an 802.11n wireless card and a Bluetooth 5.0 module, enabling connectivity to the internet and other devices.
Product Specifications
| SOC | BCM2711B0 (ARM Cortex-A72) |
| CPU | Quad-core ARM Cortex-A72 running at 1.5GHz |
| GPU | Broadcom VideoCore IV@500MHz |
| Memory | 4GB |
| USB | USB2.0 x 2, USB3.0 x 2 |
| HDMI | Micro HDMI x 2 |
| Bluetooth | Bluetooth 5.0 |
| WIFI | 802.11 b/g/n/ac, Dual-band 2.4GHz/5GHz |
| Ethernet Port | 1000Mbps |
| Ethernet PoE | Supported |
| Power Interface | USB Type-C(5V 3A) |
| Dimensions | 85 x 56 x 17 mm |
| Weight | 45g |
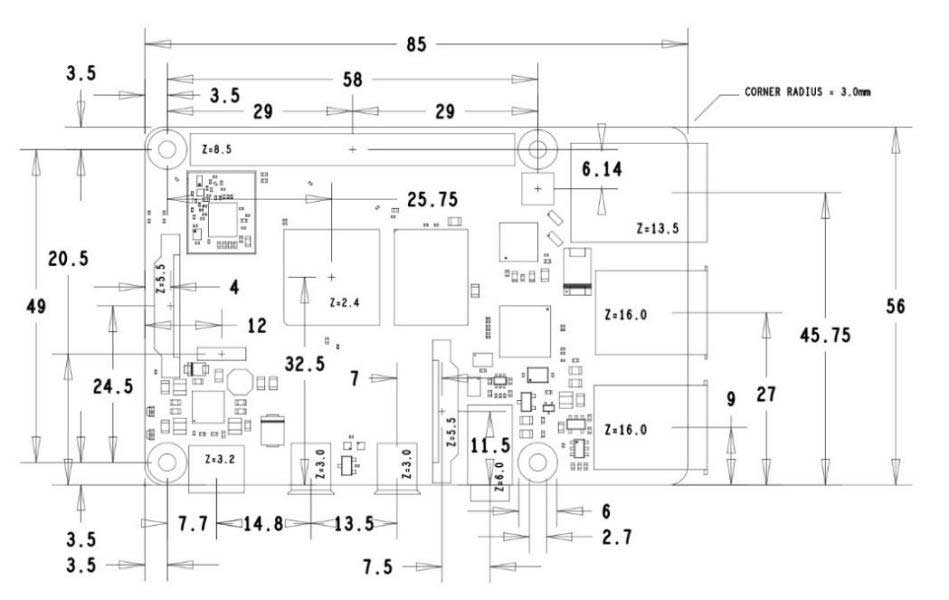
Product Dimensions
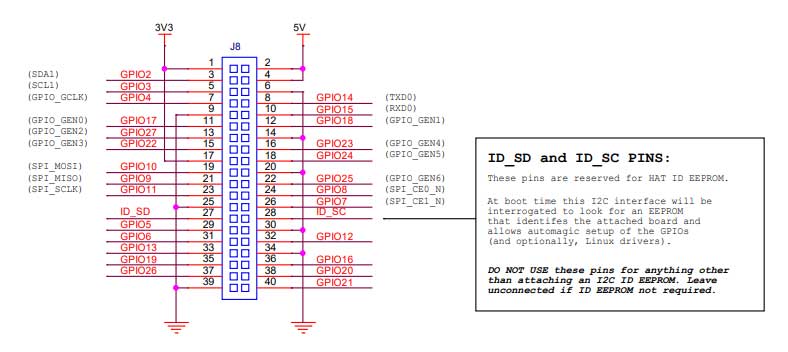
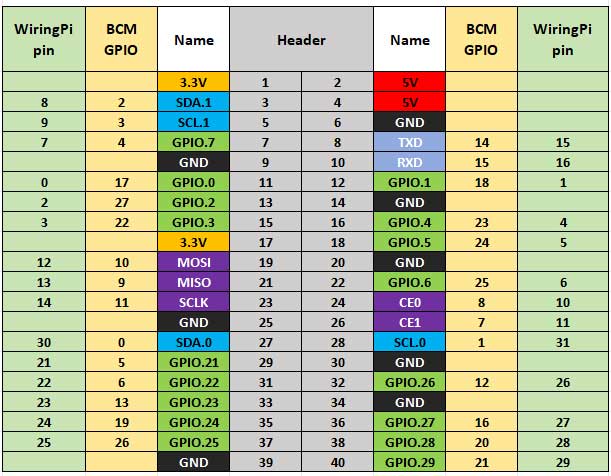
Interface Definitions
The definitions of the expansion interfaces are as shown in the following diagram
Usage Instructions
Getting Ready:Prepare a 16GB microSD card, a card reader, and your peripherals.
Installing the Operating System for Your Raspberry Pi:
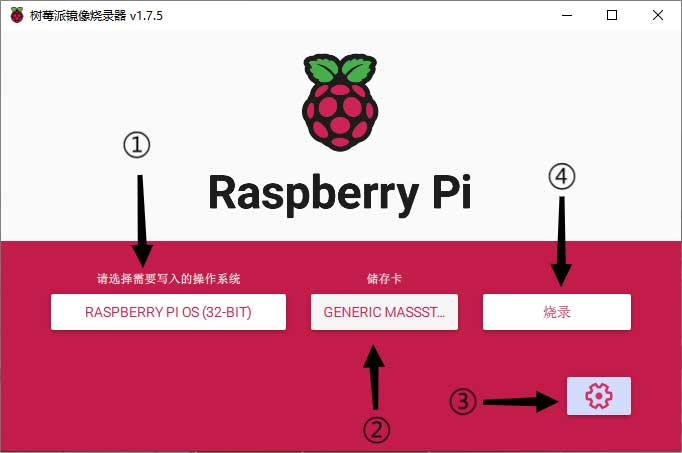
Method One (Recommended): Installing Raspberry Pi OS on the microSD (TF) card using the official image writer.
1.Download from: https://www.raspberrypi.org/software/
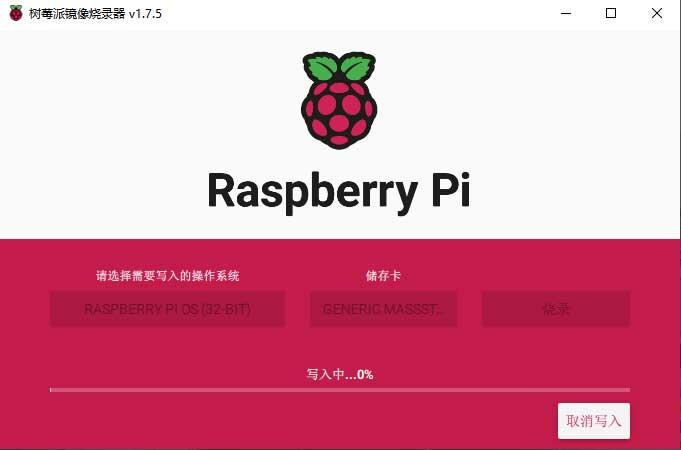
2.Run the image writer: Double-click on the downloaded imager.exe file. Follow the prompts to select the desired system, choose the microSD card (TF card), configure options such as hostname, enable SSH service and set the password for the "pi" user, configure Wi-Fi, set language and timezone, and finally, click "Write" to flash the system onto the microSD card.
Wait for the installation to complete before proceeding to the next step.
https://www.raspberrypi.com/software/operating-systems/
Method Two: You can download the required system for Raspberry Pi 4 from the official website. If you are a beginner, it's recommended to download the "Raspbian Buster with desktop and recommended software" version of the system. Here is the link: https://www.raspberrypi.com/software/operating-systems/

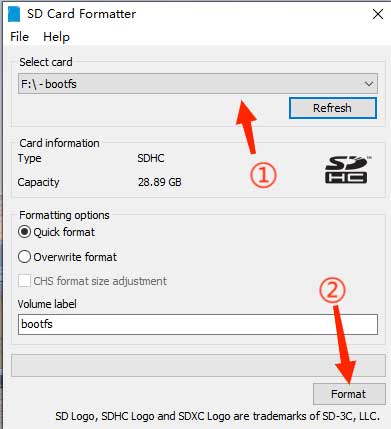
1.Format the microSD Card
Insert the microSD card with the card reader into your computer. Use SDFormatter (or any other software of your choice) to format your microSD card. Open the software, select your microSD card, and click the "Format" option in the bottom-right corner to complete the formatting of the microSD card.
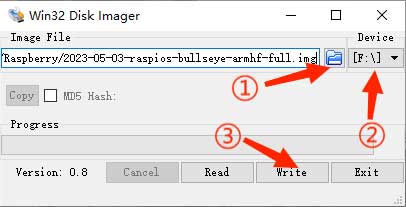
2.Write the Downloaded Image to the microSD Card
After downloading the image file, extract it. Here, we will use Win32 Disk Imager to write the image file to the microSD card (you can choose other software for this purpose if you prefer). Select the extracted image file and your microSD card in the software, then click "Write" to complete the image writing process.
3.Add the ssh and wpa_supplicant.conf Files
After the system has been burned onto the microSD card, do not remove the card right away. Instead, go to the root directory of the microSD card and create two files: one named "ssh" (without an extension). This file enables the Raspberry Pi system to automatically start the SSH service for remote access. In the "wpa_supplicant.conf" file, add the following text to configure the Raspberry Pi to automatically connect to a specified Wi-Fi network:
country=Your_Country_Code
ctrl_interface=DIR=/var/run/wpa_supplicant GROUP=netdev
update_config=1
network={
   ssid="Your_WiFi_SSID"
   psk="Your_WiFi_Password"
   key_mgmt=WPA-PSK
   priority=1
}
Insert the microSD Card and Connect the Power
Insert the microSD card into the Raspberry Pi, and then connect a 5V 3A power supply using the Type-C connector to power up the Raspberry Pi. You will see the power indicator light on the Raspberry Pi stay lit in red, and the ACT indicator light will blink.
Connect Peripheral Devices
Use the Raspberry Pi's interfaces, such as the Micro HDMI and USB ports, to connect your mouse, keyboard, display, and other peripheral devices to operate your Raspberry Pi.
Resources
Related Links
Documents including hardware and configuration:https://www.raspberrypi.com/documentation/
Getting Started Tutorials:https://www.raspberrypi.com/documentation/computers/getting-started.html