

Overview
This product adopts BI CMOS image sensor produced by SONY, HD camera has 8 Megapixel, excellent anti blurring characteristics, adopts 15P-1.0 MIPI interface, weight and light only 10g, adopts fixed focus mode , and supports Jetson Nano operating system.
Features
- HD camera,8 Megapixel;
- On-board CMOS image sensor IMX219 supports, ISP (image signal processing), high-speed video shooting, lens shading compensation function;
- Meet the basic functional requirements of high sensitivity, high frame rate shooting for high-performance photography applications;
- Support Jetson Nano operating system.
Specifications
| Model | IMX219 C8M 200 |
| Dimensions | 25mm(Length) x 24mm(Width) x 14mm(Hight)±0.5mm |
| Temperature (Operation) | -20℃~70℃ |
| Temperature (Stable Image) | 0℃~50℃ |
| Assembly Technique | SMT(ROSH) |
| Focus | Fixed |
| Object Distance | 30cm~∞ |
| Resolution | 800LW/PH(Center) |
| Interface | 15P-1.0MIPI |
| Supply Voltage | 3.3V(pin15) |
| Operating System | Jetson Nano |
| Sensor Type | IMX219(1/4" ) |
| Sensor Package | PLCC,Bare Die |
| Maximum resolution | 3296*2512 |
| Sensitivity | 600mv /(lux-sec) |
| Pixel Size | 1.12µm * 1.12µm |
| Maximum Image Transfer Rate | 30 fps for QSXGA |
| S/N Ratio | 39db |
| Dynamic Range | 69db |
| Output Formats | 8/10bit RGB RAM output |
| Lens Construction | 1G4P+IR |
| F/No | 2.0 |
| EFL | 0.9mm |
| FBL(Optical) | 1.41mm |
| FOV | 200° |
| TV Distortion | <18.6% |
Relative Illumination (Sensor) | 70% |
| IR Filter | 650±10nm |
| Package | Anti-electrostatic tray |
Dimensions

(The picture is for reference only, please subject to the real product.)
Usage
Use the product in connection with the Jetson Nano
After the Camera module is connected to the MIPI CSI connector of Jetson Nano with the 15p-1.0 MIPI connection cable (for night vision, infrared fill light is required), start Jetson Nano (the input voltage of Jetson Nano is 5V).
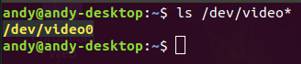
Open the terminal (Ctrl+Alt+T) and enter the following command
ls /dev/video*video0 indicates successful mount recognition
After successfully mounting, enter the command
nvgstcapture-1.0(see nvgstcapture-1.0 --help for details) to preview the camera, or use
nvgstcapture-1.0 --sensor-id=xto select a camera (x=0 or 1).