
1. Description
1.1 Product Overview
This PCIe-to-Dual-M.2 Adapter Board is specially designed for the Raspberry Pi 5. It is based on the Pi 5's onboard 16‑pin PCIe interface and provides two M.2 NVMe SSD slots, supporting simultaneous installation of two NVMe‑protocol SSDs. It is compatible with M.2 drives of size 2230/2242/2260/2280. The board operates with PCIe x1 Gen2 specification, delivering transfer speeds far exceeding the Raspberry Pi's native Micro SD interface. This greatly improves system and file read/write efficiency and enhances workflow. It also supports booting the Raspberry Pi 5 directly from an NVMe SSD. The onboard EEPROM stores the HAT ID and product information. When used with the Raspberry Pi mainboard and SSDs, it can fully unlock the hardware performance.
1.2 Product Features
- Supports NVMe‑protocol dual‑channel M.2 SSDs with high‑speed read/write performance
- Designed for the Raspberry Pi 5 16‑pin PCIe interface; supports PCIe x1 Gen2 only
- Supports Raspberry Pi 5 NVMe SSD boot
- Supports M.2 SSD size formats: 2230 / 2242 / 2260 / 2280
- Complies with HAT+ standard; supports Raspberry Pi firmware/software auto‑detection
- Onboard LED status indicators
1.3 Product Parameters
PCIe Speed | PCIe Gen 2.0 |
PCIe Switch Chip | ASM1182e |
Supported SSD Sizes | 2230 / 2242 / 2260 / 2280 |
Operating Voltage | 5V |
PCB Dimensions | 88 mm × 56.1 mm |
Weight | 20.5 g |
2. Usage
2.1 Resource Overview
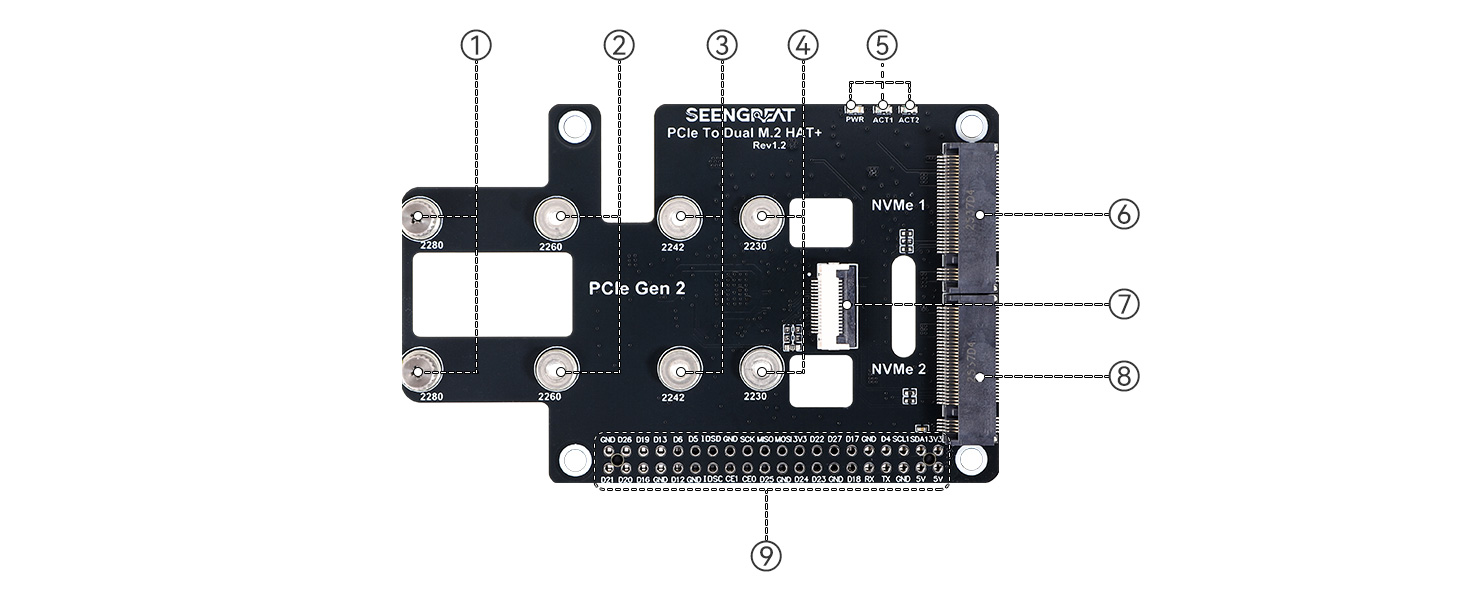
①2280 SSD mounting hole
② 2260 SSD mounting hole
③ 2242 SSD mounting hole
④2230 SSD mounting hole
⑤ Indicators: PWR (power), ACT1 (NVMe1 activity), ACT2 (NVMe2 activity)
⑥ NVMe 1 M‑Key Slot
⑦ PCIe 16‑pin FPC Connector
⑧NVMe 2 M‑Key Slot
⑨ Raspberry Pi 40‑pin expansion header pass‑through
2.2 Installation Instructions
Refer to Figure 2‑2 for the installation wiring diagram. First connect the 16‑pin FPC cable to the onboard FPC connector (Figure 2‑2 position ⑦). Ensure correct orientation of the cable (refer to Figure 2‑2). Then connect the other end of the ribbon cable to the Raspberry Pi 5 PCIe FPC connector. After that, install the SSD(s) and mount the board onto the Raspberry Pi 5 using screws (Figure 2‑3).

Figure 2‑2

Figure 2‑3
2.3 Usage Instructions
2.3.1 Mounting
1. Enable PCIe
Raspberry Pi 5 enables PCIe by default. If PCIe fails to initialize, add the following line to /boot/firmware/config.txt:
dtparam=pciex1
Then save and reboot.
Note: This module supports PCIe Gen2.0 x1 only.
2.Device Detection
Run command:lspci

As shown in the figure, "ASM1182e" is the detected PCIe switch chip, and "Sandisk Corp WD Green SN350 240GB (DRAM-less) SN560E NVMe SSD" along with "SK hynix BC501 NVMe Solid State Drive" are the two NVMe SSDs recognized by the system.
3.Partitioning
Use lsblk to view disk information.

Use fdisk for partitioning. Example:
sudo fdisk /dev/nvme0n1Key commands:
p – print partition table
d – delete partition
n – create partition
q – quit without saving
m – menu
w – save and exit
4.Formatting
Enter the command
sudo mkfsand then press the Tab key.
You will see a variety of different suffixes, which represent the filesystem formats you can use for formatting.
The following command formats the partition nvme0n1p1 as ext4:sudo mkfs.ext4 /dev/nvme0n1p1Once "done" appears, the formatting process is complete.

5. MountingCreate a mount directory in the current path:sudo mkdir sg2
Mount the nvme0n1p1 device to the sg2 directory:sudo mount /dev/nvme0n1p1 ./sg2
Check the disk status:df -h
2.3.2 Read/Write Test
Enter the mounted directory:
cd sg2Clear cache:
sudo sh -c "sync && echo 3 > /proc/sys/vm/drop_caches"Write test:
sudo dd if=/dev/zero of=./testfile count=2000 bs=1MRead test:
sudo dd if=./testfile of=/dev/zero count=2000 bs=1M
Note: Speed varies with SSD and test environment.
2.3.3 System Boot
Method 1:
Ensure your Pi OS is updated (Bookworm or newer):
sudo apt update && sudo apt upgrade -y

sudo rpi-eeprom-update -a

sudo raspi-config
Advanced Options->press Enter:

Bootloader Version->press Enter:

Latest->press Enter:

Select No here - you want the latest bootloader.

And exit from the tool by selecting Finish:

If asked to reboot, select Yes.

Step 2:Cick Applications =>Accessories =>SD Card Copier on the main screen, run the SD Card Copier program, and copy the OS to the NVME SSD as shown in the figure below.
Copy From Device: source
Copy To Device: NVMe SSD
If you need to copy the system from the SD card to the NVMe SSD, generally select the SD card under "Copy From Device" and select the NVMe SSD under "Copy To Device," as shown in the figure below.

If the SD card slot on your Raspberry Pi is easy to access, you can power off the Pi and remove the SD card. If everything is configured correctly, the next boot should automatically start from the NVMe drive. However, if you prefer to keep the SD card inserted while still booting from the NVMe drive, you will need to modify the boot order.Enter the following command:

select Boot Order and press Enter:

Choose NVMe/USB Boot and press Enter:

Configuration will be confirmed. Press Enter:

Return to the first screen by selecting Back or pressing the Esc key. Then navigate to Finish using the right cursor key.

You will be asked whether you want to reboot now. Click Yes:

Method 2:
You may refer to Method 1 and use the SD Card Copier for system cloning, or use Raspberry Pi Imager.After booting the Raspberry Pi from the SD card, modify the boot settings by editing the BOOT_ORDER parameter in the bootloader configuration. Enter the following terminal command:
sudo rpi-eeprom-config --editAdd the following line:
NVME_CONTROLLER=1Then change:
BOOT_ORDER=0xf41to:
BOOT_ORDER=0xf416For more details, refer to BOOT_ORDER documentation.
If you prefer to prioritize SD card boot, you may set:
BOOT_ORDER=0xf4612.4 Additional Notes
1. LED Indicators: ACT1 corresponds to NVMe 1; ACT2 corresponds to NVMe 2.
2. Generally, the NVMe SSD installed in the NVMe 1 slot will be recognized as "/dev/nvme1n1", and the one in the NVMe 2 slot as "/dev/nvme0n1". If two NVMe SSDs are connected to the rboard and one is used for booting, it is recommended to install the boot SSD into the NVMe 2 slot — it has higher priority.
3. Resources
4. Related Links
5. FAQ
6. Appendix
6.1 Product Precautions & Maintenance
6.1.1 Precautions
- Do NOT plug/unplug the module while powered.
- Follow all warning labels and instructions.
- Keep the product dry; if exposed to liquid, disconnect power immediately and dry completely.
- Ensure adequate ventilation; avoid overheating.
- Do not use/store in dusty or dirty environments.
- Avoid rapid temperature changes to prevent condensation.
- Handle with care; shocks may damage components.
- Do not clean with organic solvents or corrosive liquids.
- Do not disassemble or repair the device yourself; contact manufacturer. Unauthorized repair voids warranty.