
I Overview
Compatible with the Raspberry Pi Zero series, this USB expansion board provides three USB 2.0 ports plus USB-to-TTL. It is designed specifically for the Raspberry Pi Zero series and achieves true plug-and-play via pogo-pin contacts—no soldering required. With three standard USB-A ports, it easily connects keyboards, mice, storage devices, and other peripherals, addressing the scarcity of native ports on the Raspberry Pi Zero.
Two independent slide switches let you select operating modes. The on-board USB-to-TTL function can connect directly to the Raspberry Pi for debugging, or output independently to a pin header (5V/3.3V/GND/TXD/RXD) to power external development. Multiple status LEDs are provided: a power LED shows supply status in real time; three dedicated LEDs indicate the mounting status of each USB device; TXD/RXD LEDs reflect serial data activity at a glance.
II Product Features
- Plug-and-play: pogo-pin connection—solder-free power and data links to the Zero.
- Three USB 2.0 ports with individual indicators.
- Dual-mode Type-C port: one Type-C serves as both USB-to-TTL and as a USB HUB upstream.
- USB upstream source selection: choose the Raspberry Pi or the Type-C port as the HUB host.
III Product Parameters
Model | Pi USB HUB |
Supply Voltage | 5V |
Logic Voltage | 3V3 |
Chip | CH334F、CP2102-GMR |
USB Ports | USB 2.0 |
Serial Baud Rate | 12Mb/s(MAX) |
Hole Diameter | 2.5mm |
Dimensions | 65mm(L)×30mm(W) |
Resource module
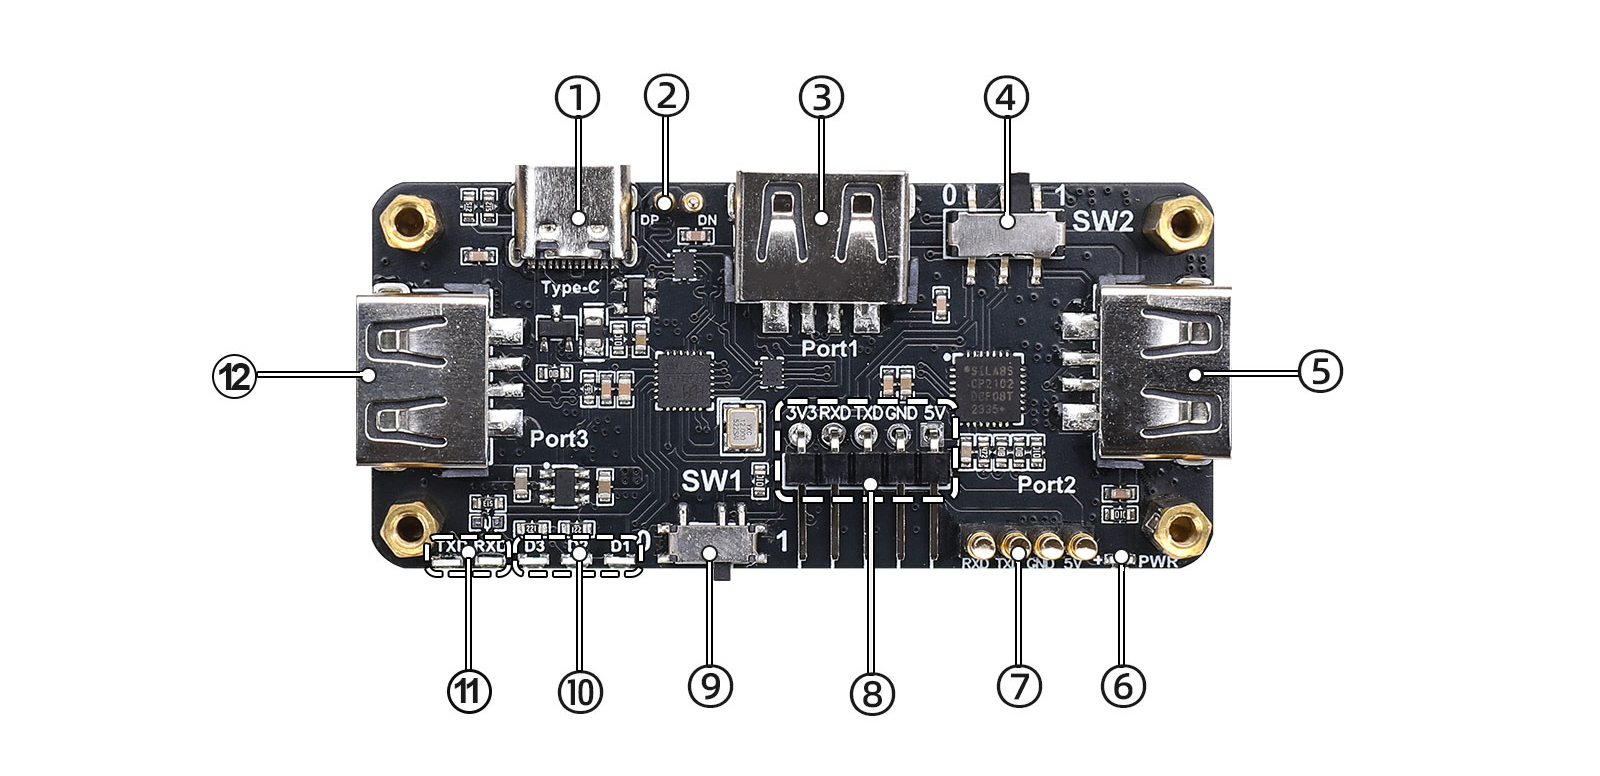
① Type-C connector — for power input, USB-to-serial, and Normal USB HUB usage
② Communication pogo-pins
③ USB 2.0 Type-A connectors
④ SW2 — UART connection-mode slide switch
⑤ Power indicator LED
⑥ Power & communication pins
⑦ UART (TTL) header
⑧ SW1 — USB HUB upstream-source selection
⑨ Three USB 2.0 port status LEDs
⑩ TXD/RXD LEDs
⑪ M2.5 mounting holes
IV Usage
4.1 Instructions
4.1.1 Hardware DescriptionThis Raspberry Pi Zero docking station solves the issues of insufficient interfaces and debugging difficulty. It integrates pogo-pin connection, three USB 2.0 ports, Type-C for both power/debugging, flexible serial channel switching, selectable data source, and status LEDs — all in one compact board.4.1.2 Function Introduction
1.USB HUB upstream source (SW1):
- Position 0 — Pi Zero USB HUB mode: expands USB 2.0 ports for the Raspberry Pi.
- Position 1 — Normal USB HUB mode: connect a single Type-C data cable to a host to expand three USB 2.0 ports.
2.UART connection mode (SW2):
- Position 0 — Pi Zero UART mode: CP2102 TXD/RXD connect to the Raspberry Pi Zero's RXD/TXD for one-cable debugging.
- Position 1 — Normal UART mode: CP2102 TXD/RXD connect to the UART (TTL) header.
3.Three on-board USB 2.0 ports with status LEDs; when a device mounts normally, the corresponding LED turns on.4.On-board TXD/RXD LEDs dynamically indicate serial traffic.5.USB 2.0 port protection: over-current and short-circuit protection; each USB 2.0 port current-limited to 500 mA.
4.1.3 Notes
1.Disconnect power before assembly to prevent short circuits.2.Reference table on the back of the board shows switch settings:Model Setting | 0 | 1 |
SW1(HUB MODE) | Pi Zero USB HUB | Normal USB HUB |
SW2(UART MODE) | Normal UART | Pi Zero UART |
4.2 Raspberry Pi Configuration and Testing
4.2.1 Pi USB HUB Connection
1.Securely assemble the Raspberry Pi Zero onto the Pi USB HUB.2.Set SW1=0 (Pi Zero HUB mode), SW2=1 (Pi Zero UART mode).3.Connect peripherals (mouse, keyboard) to USB ports; indicator LEDs will light.4.2.2 Serial Port Test
Connect the board and PC with USB cable.check recognition.lsusbcheck serial device, e.g., ttyUSB0.
ls -l /dev/tty*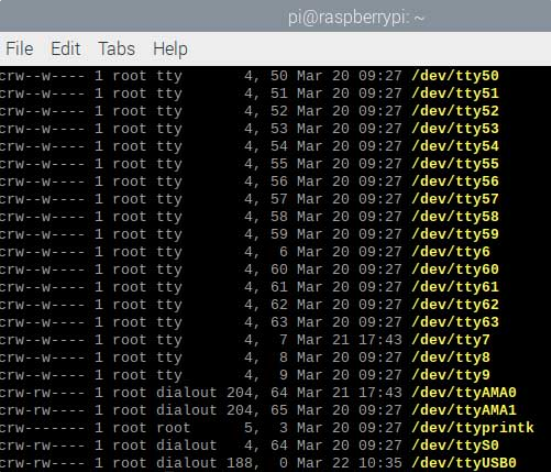 check baud rate.(Note: The USB number here should correspond to the one identified above.)
stty -F /dev/ttyUSB0
4.2.3 Sample Program Demonstration
Enter the directory of the downloaded sample program files.cd My Demo Files Director
Python3 send.py #Send dataPython write.py #Receive dataUSB 2.0 read/write test:
#check mount point.
lsblk
#write test.
sudo dd if=/dev/zero of=/monut point/testfile bs=1M count=1024 oflag=direct status=progress
#read test.
sudo dd if=/mount point/testfile of=/dev/null bs=1M count=1024 iflag=direct status=progress
#clean up.
sudo rm /mount point/testfile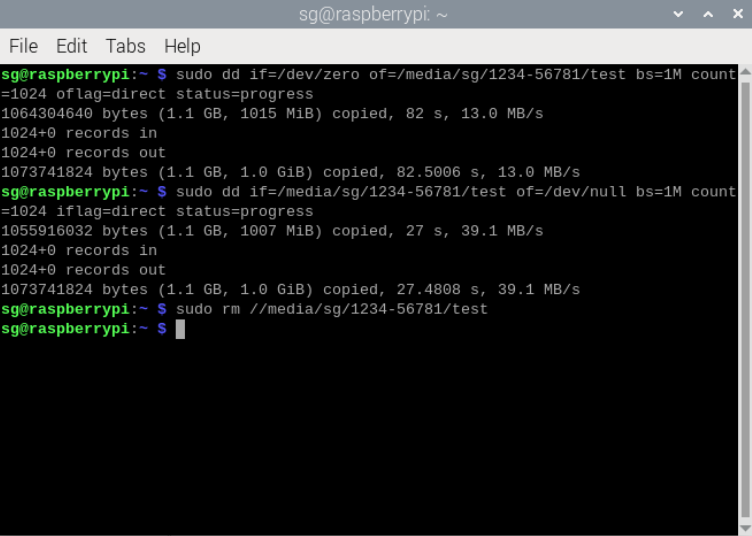
Resources