
Product Overview
This product is a 7inch capacitive touchscreen display with an HDMI interface, offering high performance and ease of use. It combines 5-point touch capacitive technology with a 1024x600 high-resolution color display, providing an intuitive user interface and rich display functionality. The display also features stereo dual speakers and a 3.5mm standard audio jack, delivering an excellent audio experience. Additionally, it supports multi-language OSD (On-Screen Display) menus, and the onboard 5 OSD control buttons make it easy for users to adjust settings such as volume, brightness, and other parameters.
Product Features
- 7inch display with a compact and portable design, featuring a high 1024x600 resolution.
- Capacitive touch technology, plug-and-play design, supporting up to 5-point touch.
- Onboard 3.5mm audio jack and stereo dual speakers, delivering an excellent audio experience.
- Equipped with a standard HDMI interface, compatible with systems such as Raspberry Pi series, Jetson Nano, Windows, and Ubuntu.
- Dual power supply interfaces, suitable for motherboards with insufficient USB power capabilities.
- Supports multi-language OSD menus, with 5 OSD control buttons for easy adjustments of volume, brightness, and other settings.
Interface Definition
Parameter | Specification |
Type | TFT |
Supply Voltage | 5V |
Power Consumption | 3.5W (Max 6.5W) |
Viewing Angle | Full view angle |
Display Colors | RGB |
Resolution | 1024x600 (Pixel) |
Display Area | 153.54mm x 85.63mm |
Product Dimensions | 165mm x 104mm |
Screen Usage
If the screen volume is set too high through the OSD menu (higher volume results in higher speaker power consumption), or if the USB power supply from the motherboard is insufficient, it is recommended to input a slightly higher external power supply via the "Power Only" connector (recommended 5V/2A or higher).Resources Overview
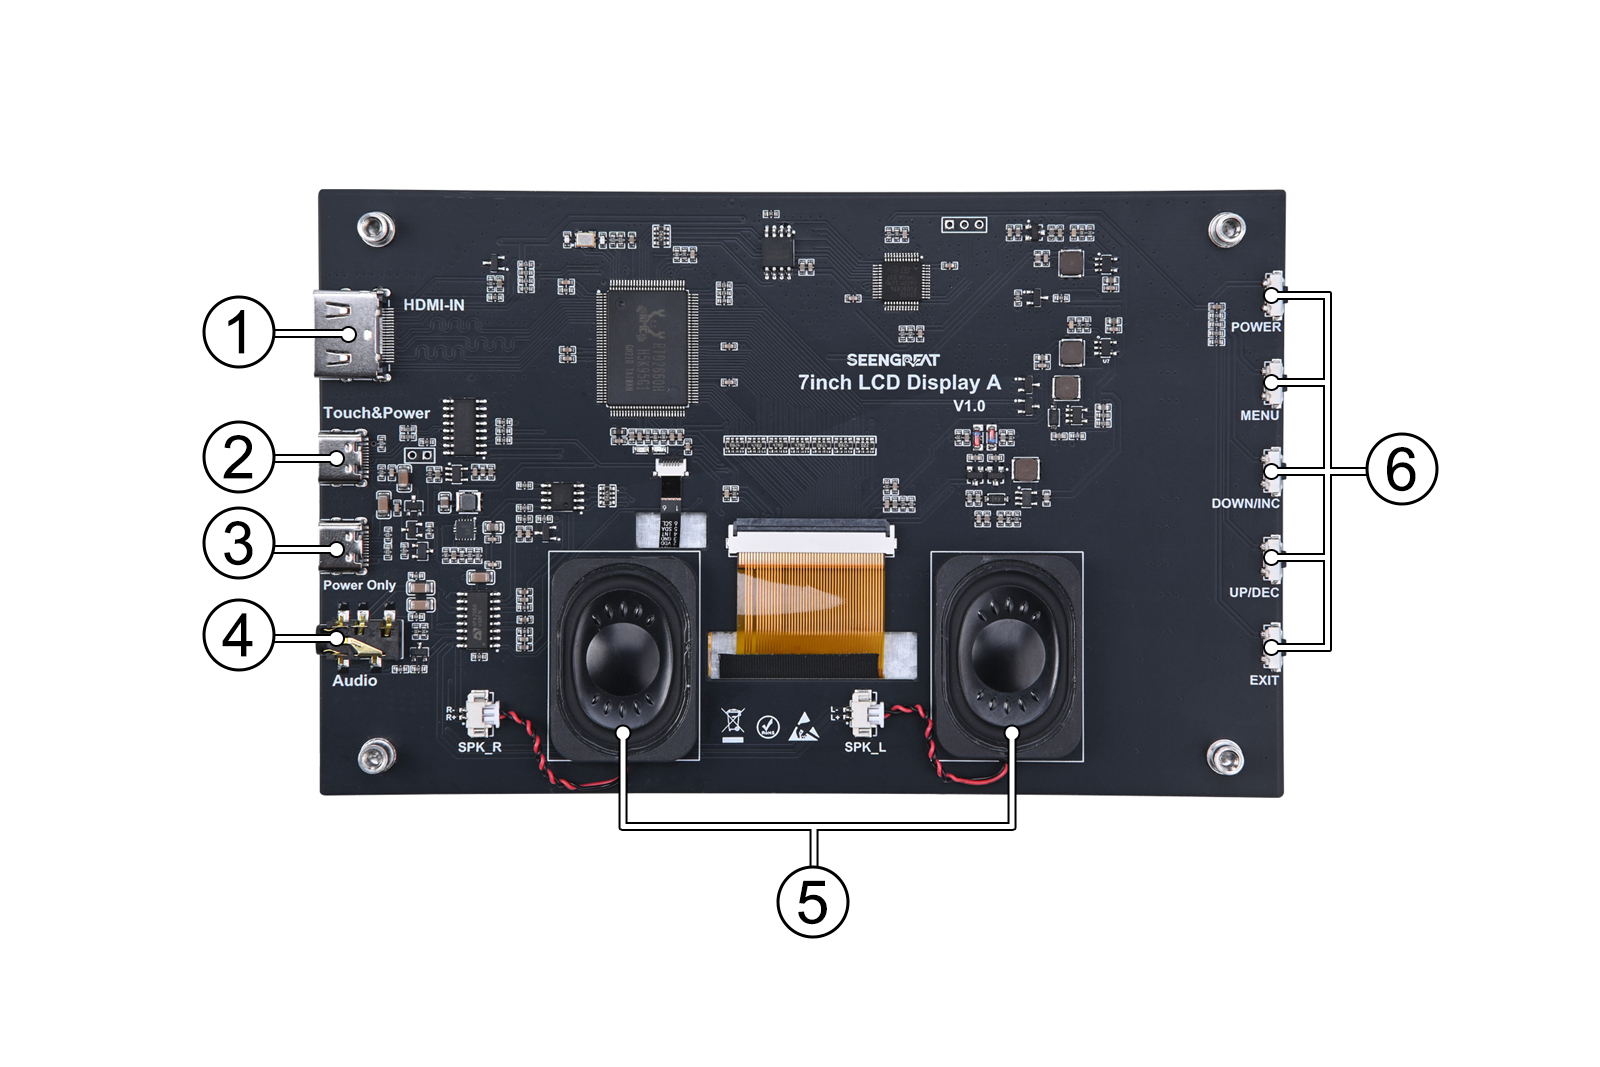
① HDMI Input Connector: Used to connect the display to HDMI-compatible devices.
② Power and Touch Interface Connector (Type C): Provides power and supports touch functionality.
③ Power Only Connector (Type C): If the screen volume is set too high via the OSD menu or if the motherboard USB port power supply is insufficient, it is recommended to use an external power supply via this connector (suggested 5V/2A or higher).
④ 3.5mm Audio Jack: When headphones are plugged in, the speakers will mute, and audio will be routed to the headphones.
⑤ Stereo Dual Speakers: Outputs audio when headphones are not connected.
⑥ OSD Menu Button: Used to navigate and adjust settings through the On-Screen Display (OSD) menu.
2.2 Windows
2.2.1 Instructions
a. For computers that do not support HDMI plug-and-play, simply restart the computer after connecting the screen.
b. If connecting multiple screens to the same host, refer to section 2.2.2 to assign the touch functionality to our screen.
2.2.2 Assigning Touch Screen
If multiple screens are connected to the computer, the touch functionality will, by default, be applied to the primary screen. To change the touch input to our screen, follow these steps:
① After connecting the screen to the computer, go to [Start] → [Control Panel] → [Tablet PC Settings] → [Settings (S)...].
② A prompt will appear on the computer screen:"Tap this screen with one finger to identify it as a touch screen. If this is not a tablet PC screen, press Enter to proceed to the next screen. To close this tool, press Esc."
③ At this point, tap on our screen with your finger, and the computer will recognize it as a touch panel.
2.3 Raspberry Pi
2.3.1 Bullseye System
When using this screen with the Bullseye system on Raspberry Pi, it is necessary to manually set the resolution. Otherwise, incorrect display resolution may occur, which can affect the accuracy of the touch functionality.
Setup Steps:
1. Open the /boot/config.txt file on your Raspberry Pi.
2. Add the following lines to the end of the config.txt file:
hdmi_force_hotplug=1

config_hdmi_boost=10

hdmi_group=2

hdmi_mode=87

hdmi_cvt 1024 600 60 0 0 0
3. Save and exit the file.
4. Restart the Raspberry Pi.
This will configure the correct display settings, and the screen should work properly.
2.3.2 Bookworm System
The Raspberry Pi 5 running the Bookworm system natively supports the screen's resolution and HDMI audio output, so no additional configuration is needed.
For the Raspberry Pi 4B/3B+ running the Bookworm system, by default, it supports audio output through the 3.5mm headphone jack. To change the audio output to HDMI, use the following command:
sudo raspi-configchoose
1 System Options -> S2 Audio -> 1 vc4-hdmi-0This command will switch the audio output to HDMI.
2.3.3 Assign Touch Screen
Some models of the Raspberry Pi feature two HDMI connectors. When two screens are connected via these HDMI ports, it is possible that touch actions may not correspond to the correct screen. To specify our screen as the touch input device, follow these steps:
1. Open the terminal and run the xrandr command to check the HDMI ID of the primary screen.
① In most cases, the HDMI0 connector corresponds to HDMI-1, and HDMI1 corresponds to HDMI-2.
② If our screen is connected to the HDMI0 connector, run the command as shown in Figure 2-2.
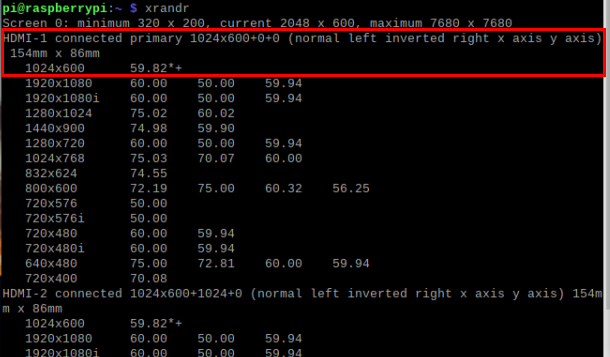
Figure 2-2
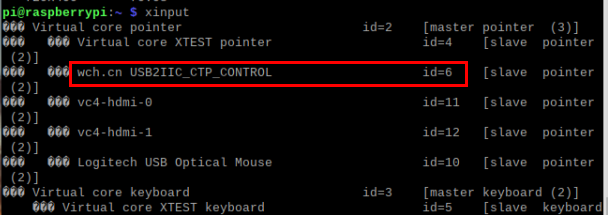
2. In the terminal, run the xinput command to check the touch screen's ID number, as shown in Figure 2-3.
- In this example, the touch ID for our screen is 6, which is associated with the information "wch.cn USB2IIC_CTP_CONTROL".
3. Assign the touch screen effect to the main screen we are connected to, and enter the following command:
xinput map-to-output 6 HDMI-1The command format is:
xinput map-to-output <touch ID> <HDMI-ID>
Where:
· touch ID is the ID number detected by the xinput command.
· HDMI-ID refers to the HDMI ID corresponding to the port our screen is connected to.
For example, if the touch ID is 6 and the HDMI ID is HDMI-1, the command would be:
xinput map-to-output 6 HDMI-1
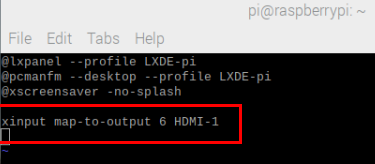
This command, as shown in Figure 2-4, maps the touch input to the correct HDMI output.

Figure 2-4
After running the command, the touch input will be mapped to the screen connected to the HDMI0 connector. This ensures that touch actions are correctly recognized on the intended display.
4. The command in step 3 above needs to be entered once every time the computer is turned on to take effect. For greater convenience, we can first add this command to the startup program. The command is as follows:
sudo nano /etc/xdg/lxsession/LXDE-pi/autostartThen add: xinput map-to-output 6 HDMI-1 content, finally save and restart.
2.4 Jetson Nano Setup
① Connect the Touch & Power interface of the LCD to the USB port on the Jetson Nano using a USB cable.
② Connect the HDMI interface of the LCD to the HDMI port on the Jetson Nano using an HDMI cable.
③ Power on the Jetson Nano.
Note:
① If the Jetson Nano's USB port provides insufficient power, it may cause the LCD to flicker or display a black screen. In this case, connect an external 5V/2A or higher power supply to the "Power Only" connector to ensure proper functionality.
② When using the Audio output, you may need to configure the audio settings in the system to enable sound output.
2.5 OSD Menu Settings
The screen has five buttons located on the left side, listed from top to bottom: POWER, MENU, DOWN/INC, UP/DEC, and EXIT (refer to Figure 2 for button positions, marked as ⑥). The functions of these buttons are as follows:
· POWER: Toggle the screen power on/off. Press once to turn off, and press again to turn it on.
· MENU: Press to open the OSD (On-Screen Display) menu, and it also functions as the OK/Confirm button.
· DOWN/INC: Move down in the main menu or increase values in sub-menu parameters.
· UP/DEC: Move up in the main menu or decrease values in sub-menu parameters.
· EXIT: Exit the OSD menu.
Button Usage Instructions
1、POWER Button:
① Press the POWER button to turn off the screen, which will go black.
② Press it again to power the screen on, and it will light up and display the image.
2、Volume Adjustment:
① Play an audio file on the system first.
② Press the MENU button to open the OSD menu.
③ Press the UP/DEC button to bring up the volume adjustment menu.
④ Press the MENU button twice more to enter the adjustable state (the volume progress bar will turn blue).
⑤ Use the DOWN/INC button to increase the volume, and the UP/DEC button to decrease the volume.
⑥ While adjusting the volume, make sure the screen's audio output changes as expected.
3、Other Menu Adjustments:
① Press the MENU button once to enter the main menu.
② Use the DOWN/INC or UP/DEC buttons to select the first-level sub-menu.
③ After selecting a first-level sub-menu, press MENU again to enter the second-level sub-menu (the second-level menu will turn orange).
④ Use the DOWN/INC or UP/DEC buttons to select the second-level sub-menu.
⑤ After selecting the second-level sub-menu, press MENU again to adjust its parameters (the second-level menu will turn blue).
⑥ Use the DOWN/INC or UP/DEC buttons to adjust the parameters.
⑦ To return, press the EXIT button.